Welcome to Apex Routing. This illustrated guide takes you through each stage of setting up the Windows application, from your first download to linking your device to an account.
BEFORE YOU BEGIN
✓ A computer running 64-bit Windows 10 or Windows 11
✓ A stable internet connection
✓ An email inbox you can access for a one-time verification code
YOUR SETUP JOURNEY
01
DOWNLOAD
Steps 1–4
02
INSTALL
Steps 5–10
03
REGISTER
Steps 11–13
Official website: https://apexrouting.org/
Screenshots appear immediately beneath the step they illustrate. Interface wording and appearance may vary slightly by software version.
PART 01 / DOWNLOAD APEX ROUTING
01Visit the official website
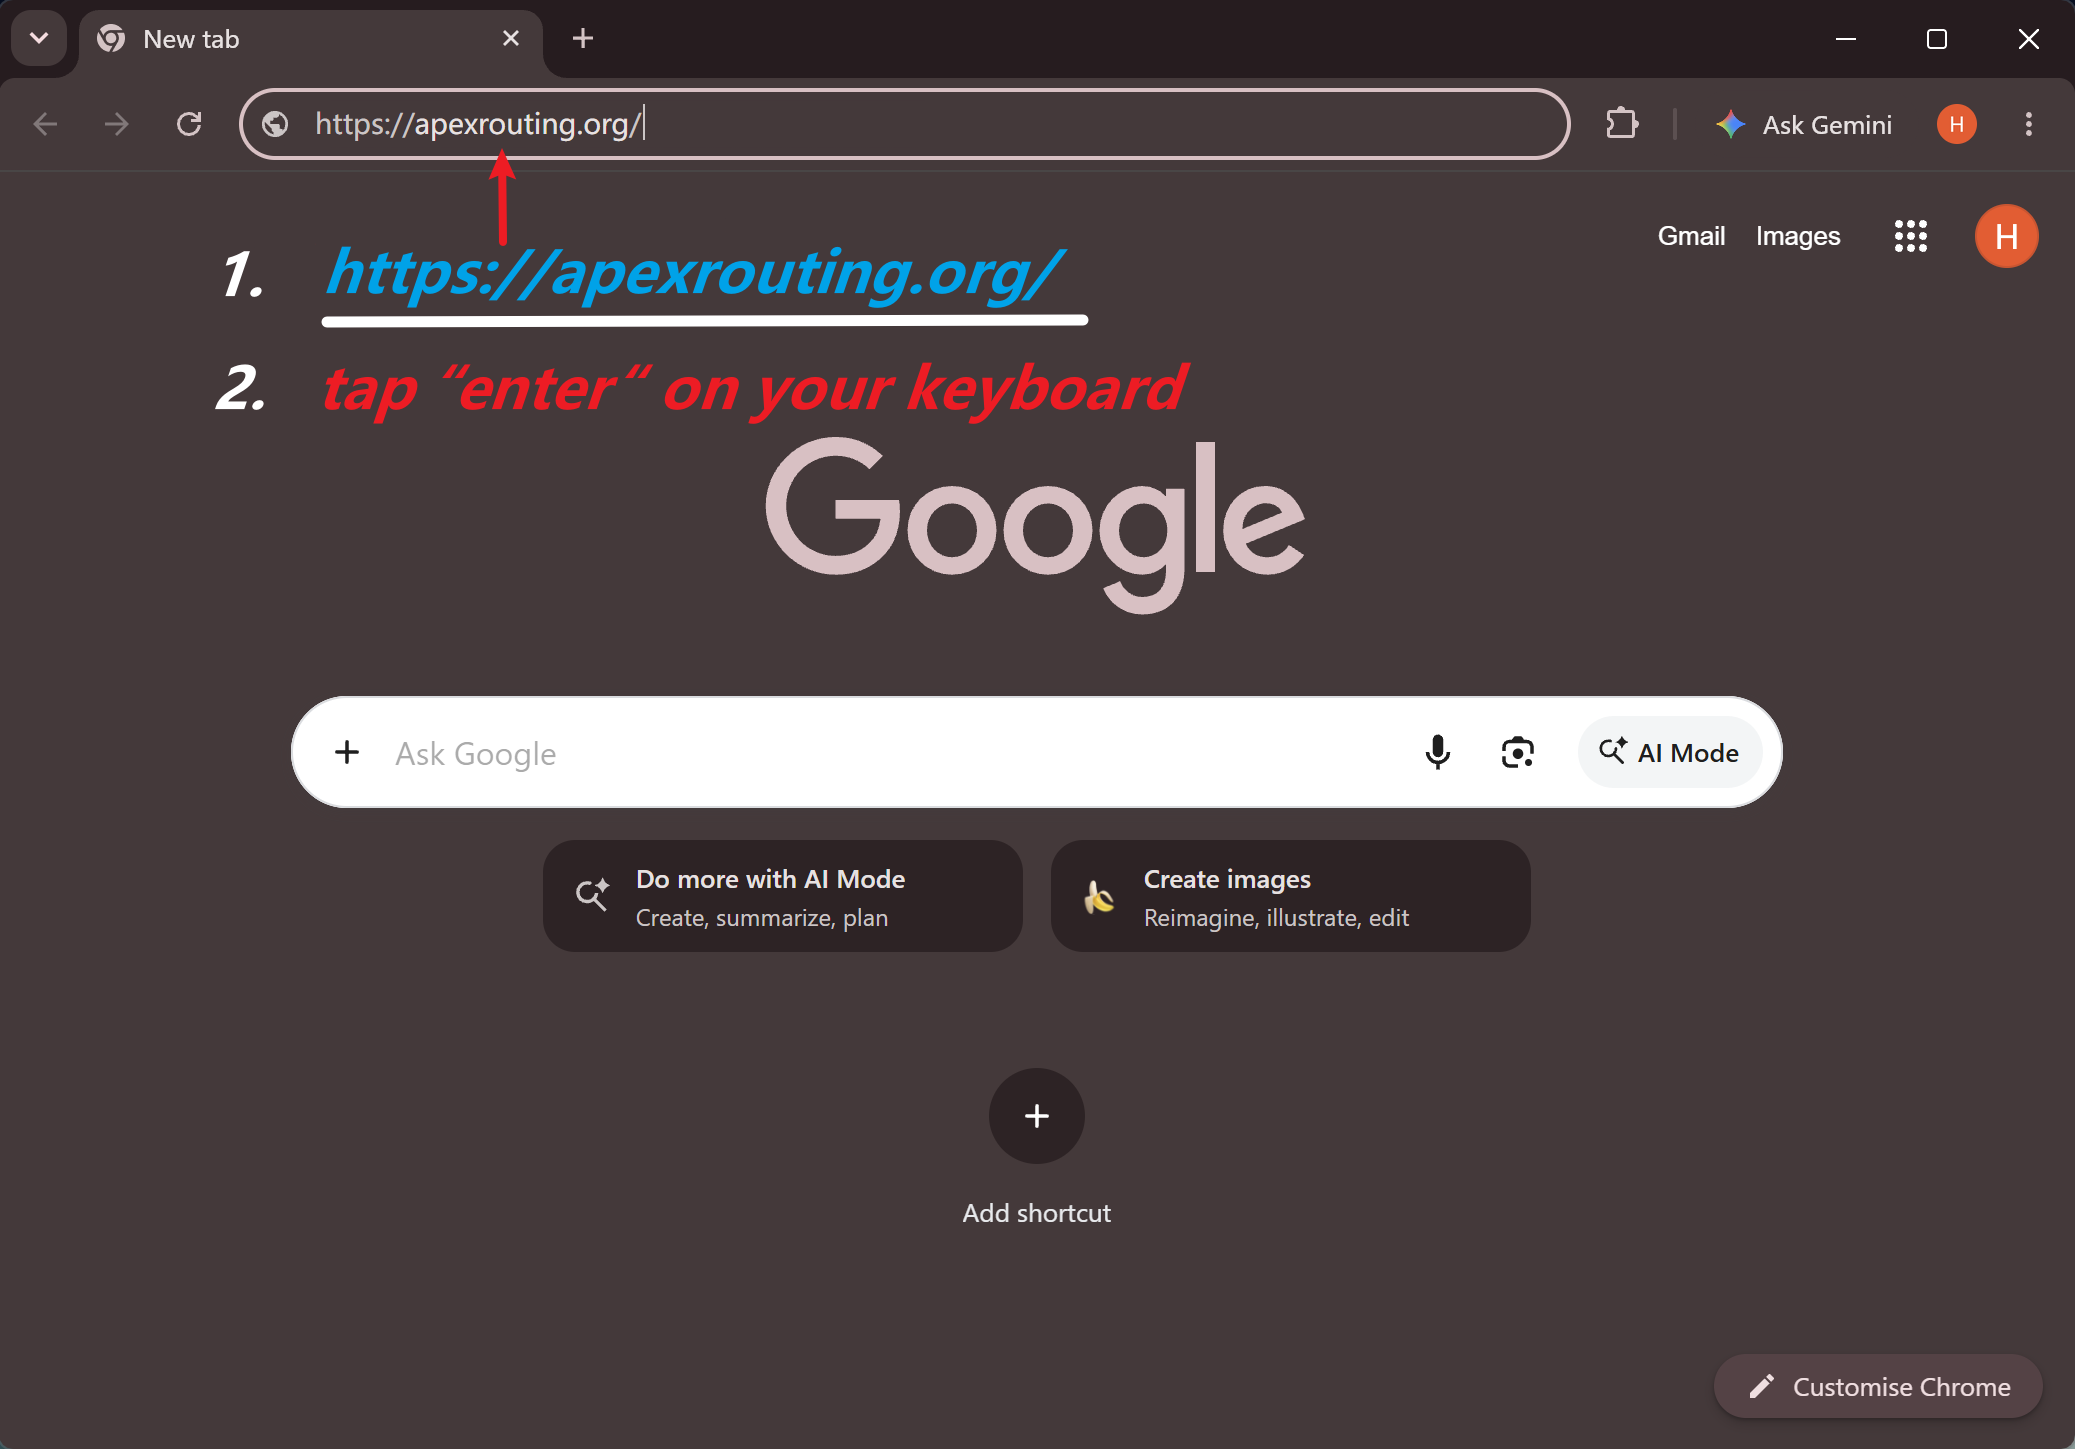
Open your preferred web browser, such as Google Chrome or Microsoft Edge.
Type https://apexrouting.org/ into the address bar and press Enter to open the Apex Routing website.
View larger FIGURE 01 · Open the official Apex Routing website.
PART 01 / DOWNLOAD APEX ROUTING
02Go to the download page
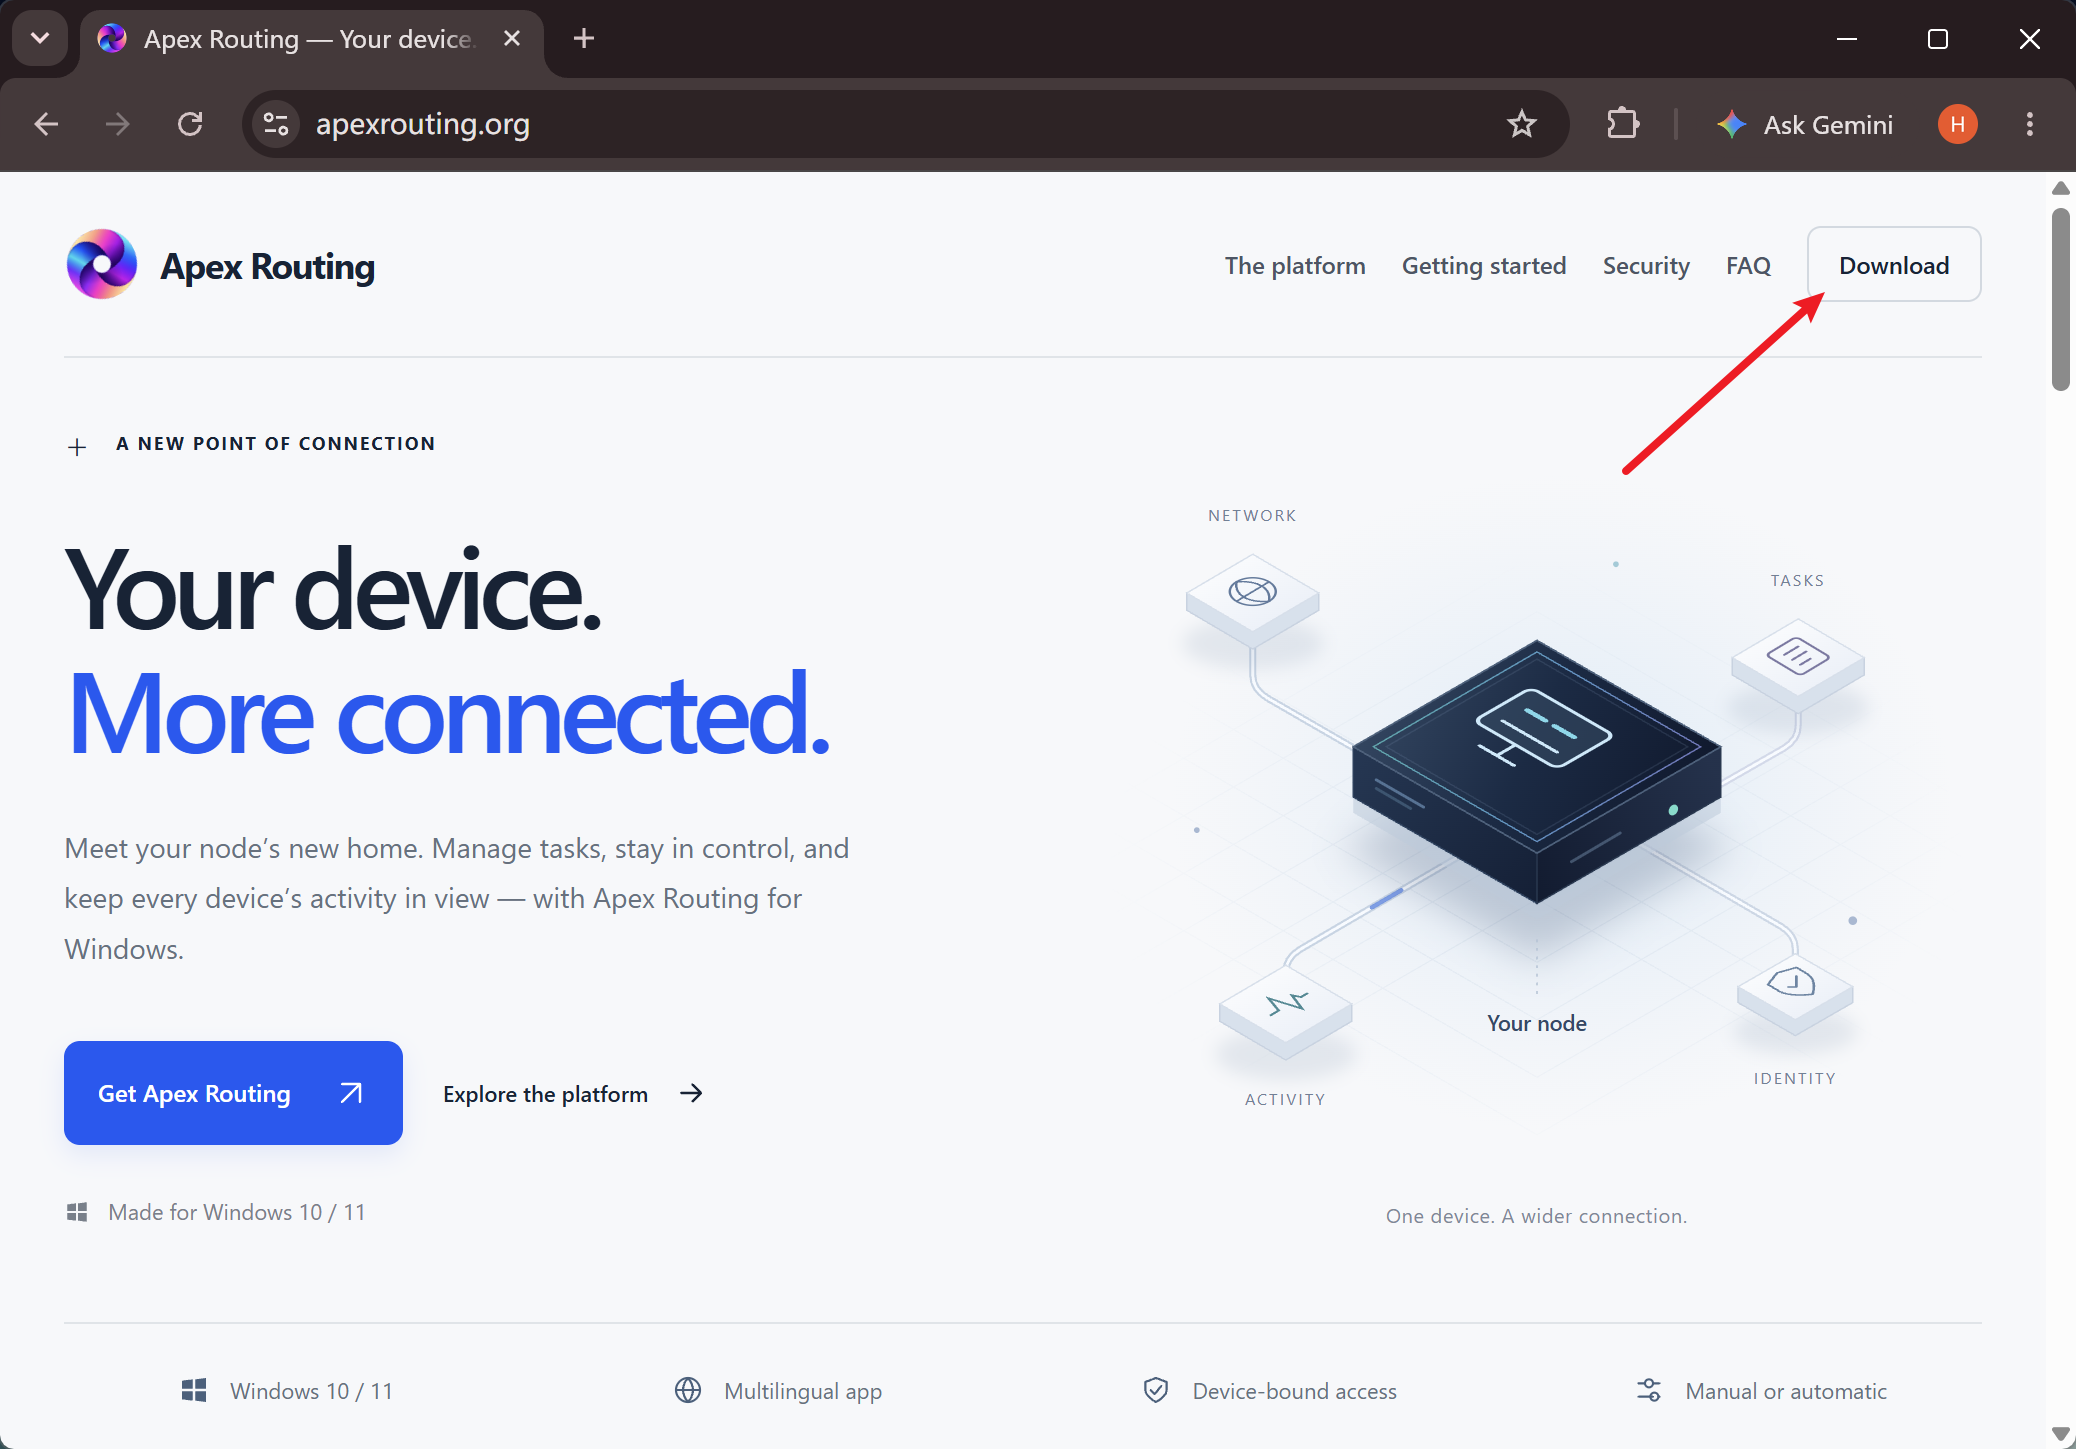
On the Apex Routing homepage, locate Download in the website navigation.
Select Download to open the application download page.
View larger FIGURE 02 · Select Download from the website navigation.
PART 01 / DOWNLOAD APEX ROUTING
03Download the Windows application
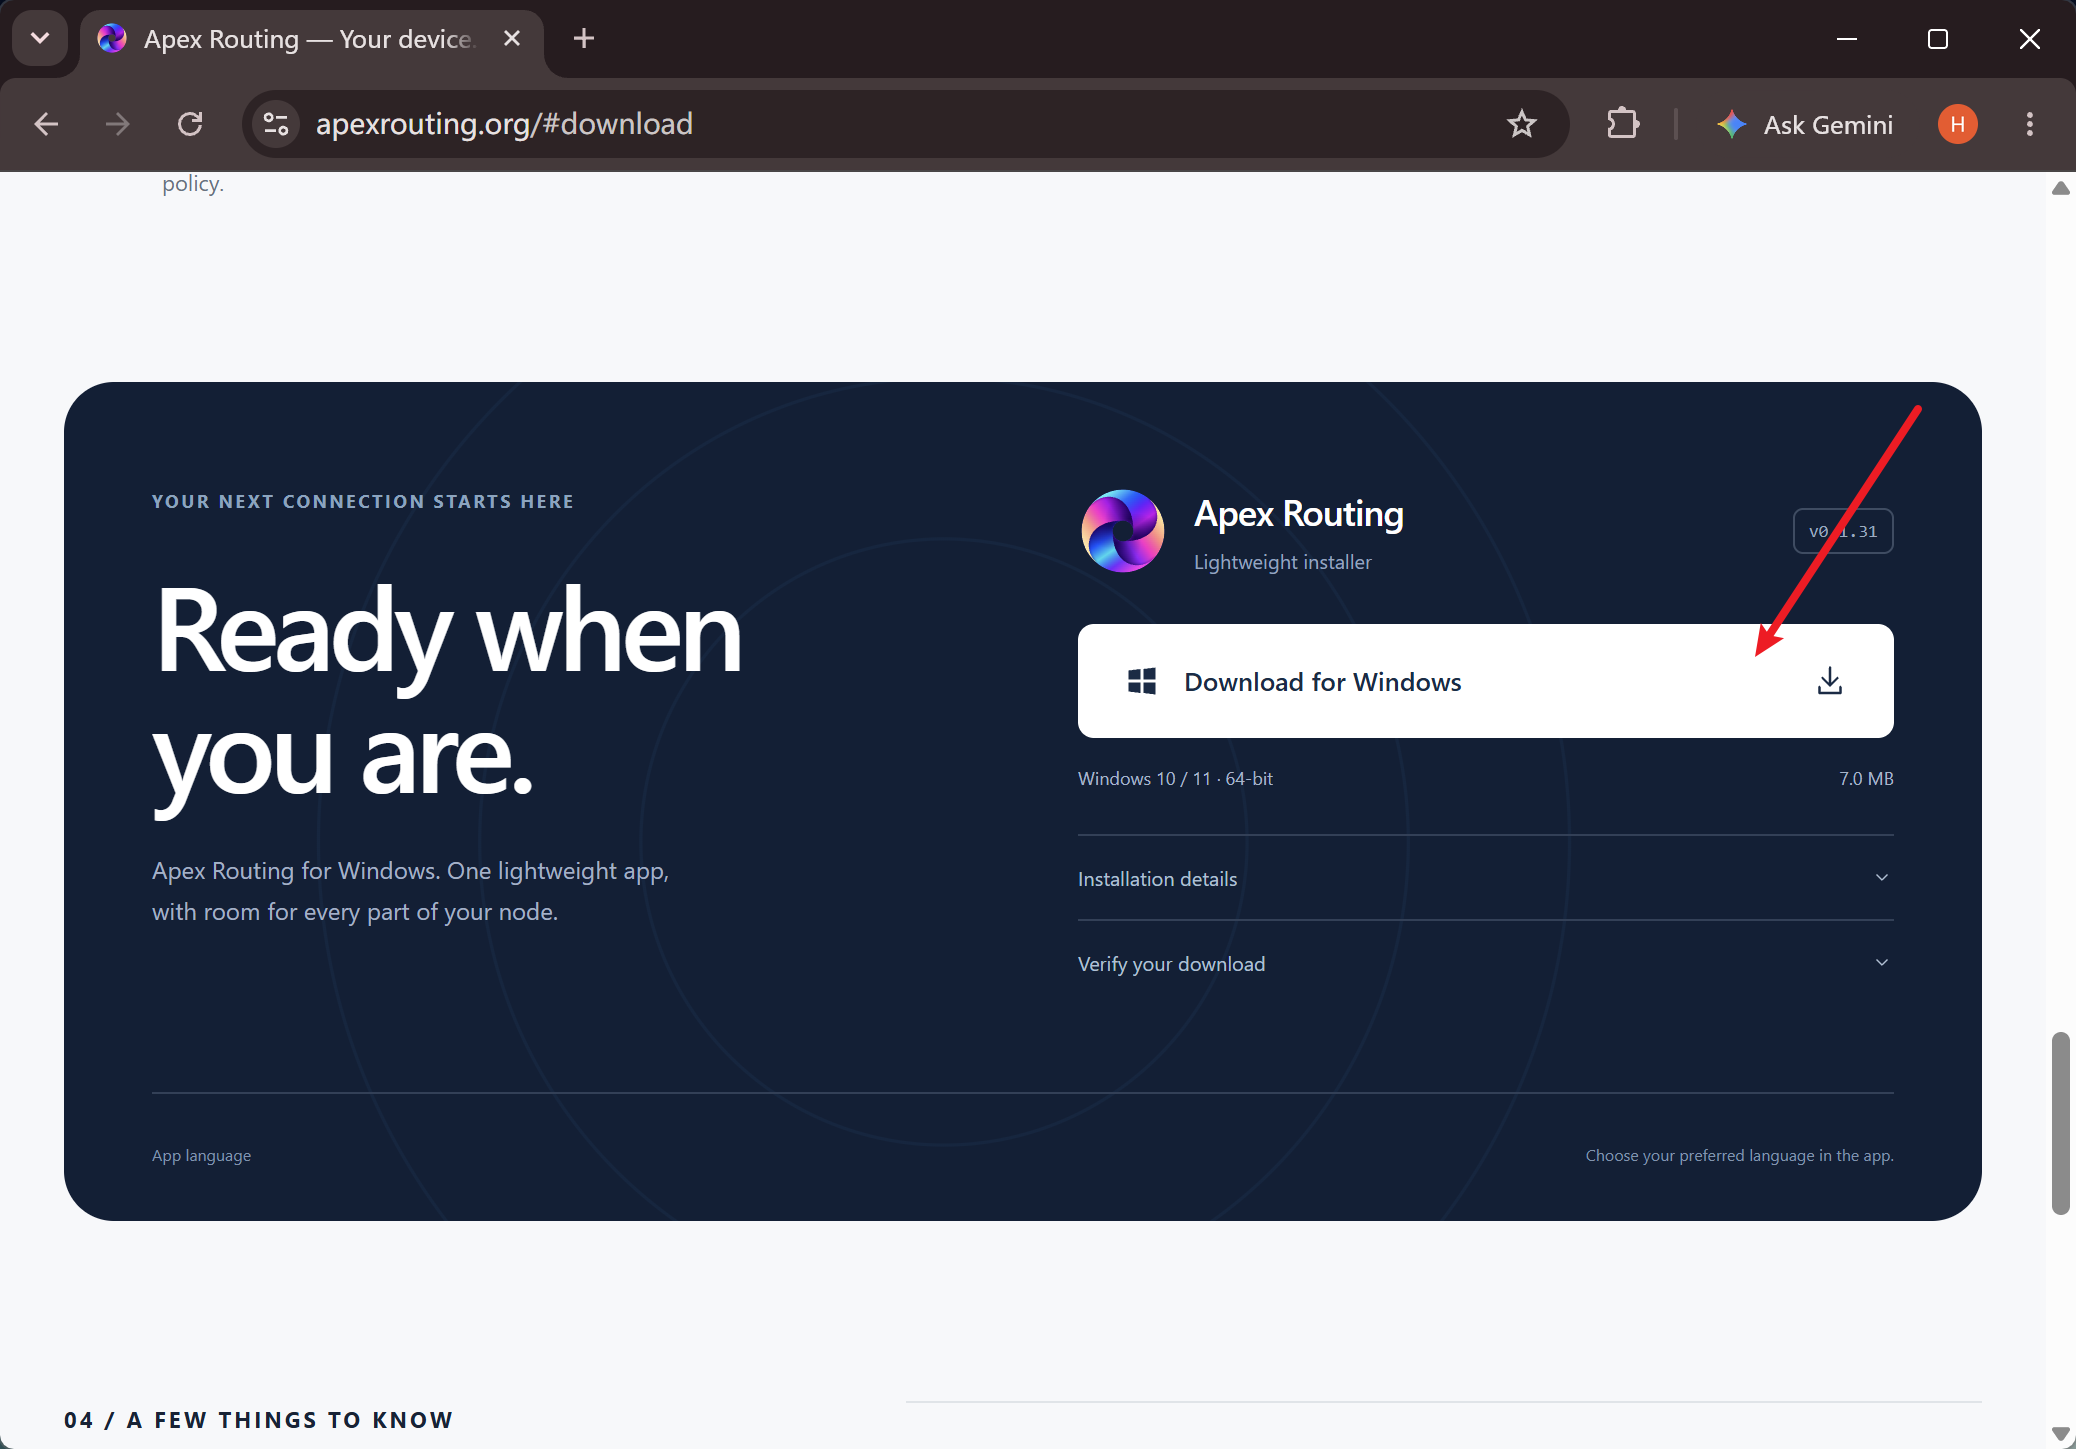
On the download page, select Download for Windows to start downloading the installer.
The Windows application is intended for 64-bit Windows 10 and Windows 11 computers.
View larger FIGURE 03 · Download the Windows installer.
PART 01 / DOWNLOAD APEX ROUTING
04Open the installer
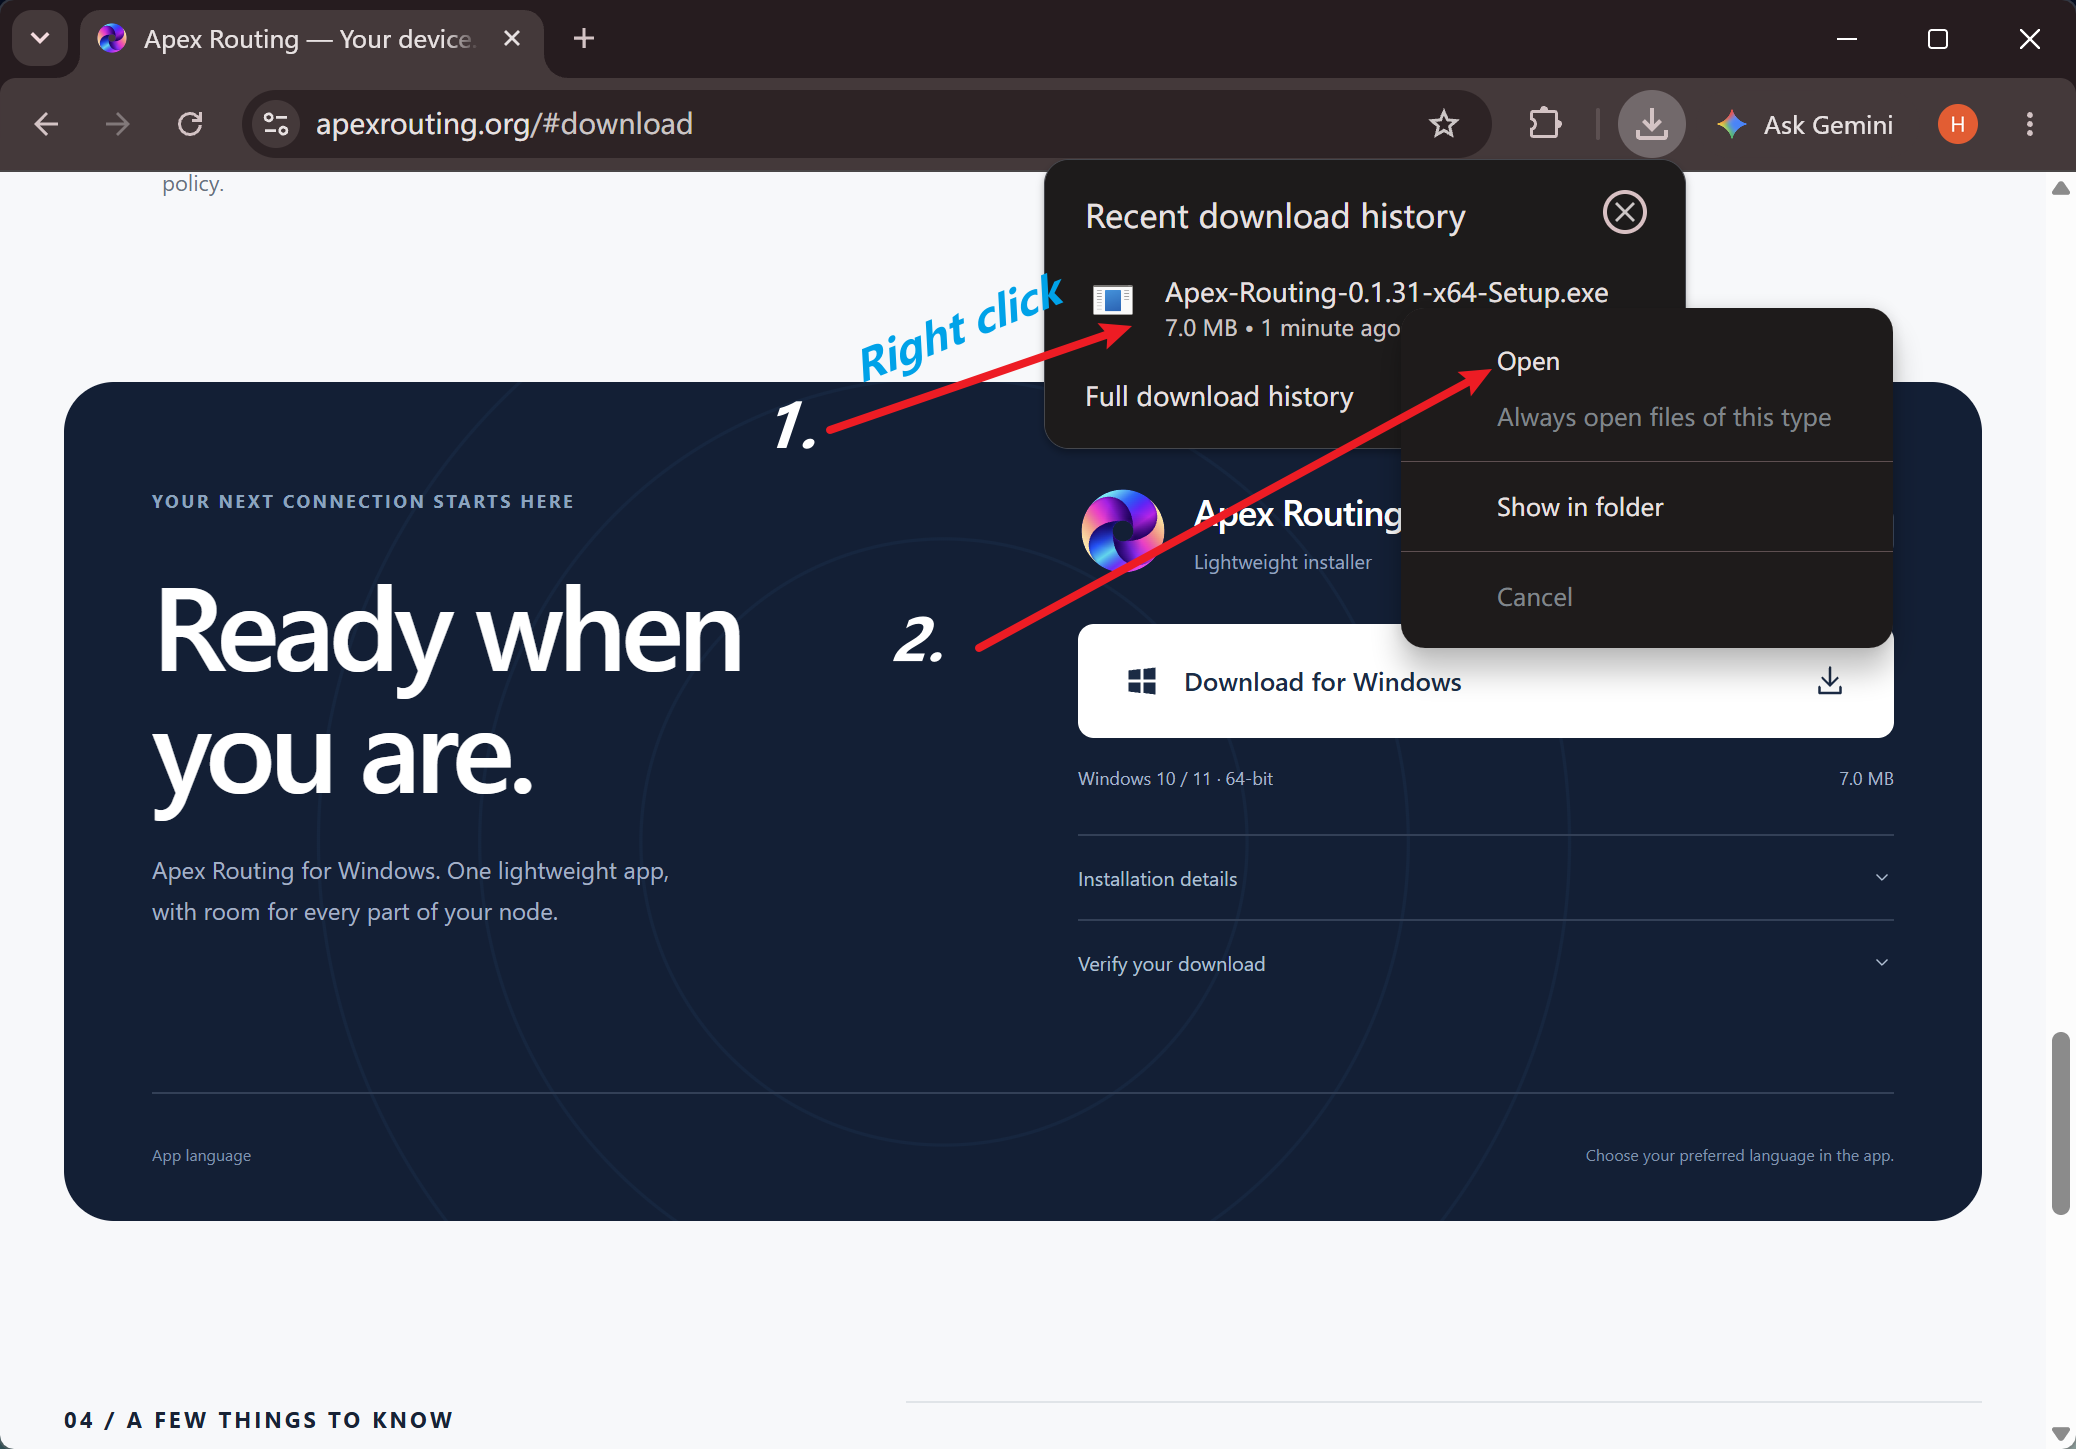
After the download finishes, open your browser’s downloads list or your computer’s Downloads folder.
Locate the Apex Routing setup file and select Open to start the installation process.
View larger FIGURE 04 · Open the downloaded installer from your browser.
PART 02 / INSTALL APEX ROUTING
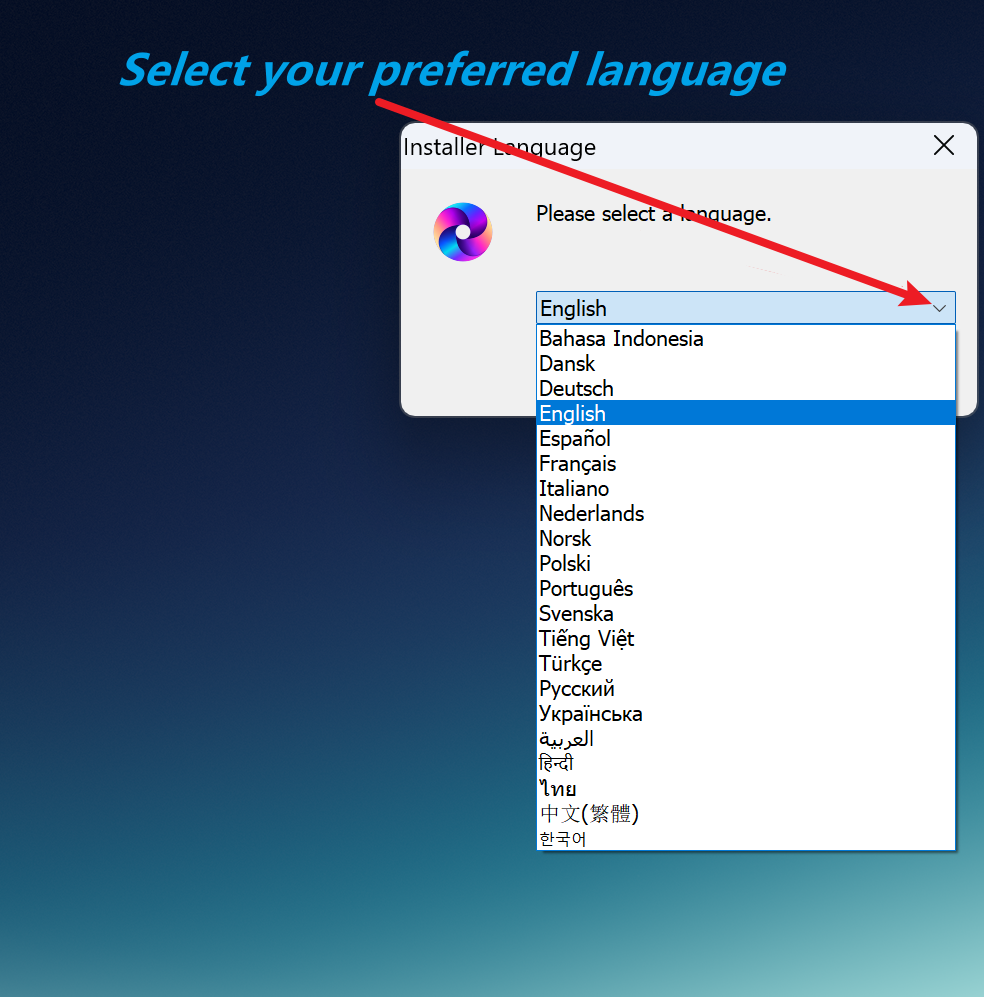
05Choose your installation language
When the installer opens, choose the language you would like to use during setup.
Open the language list and select your preferred option.
View larger FIGURE 05 · Choose your preferred setup language.
PART 02 / INSTALL APEX ROUTING
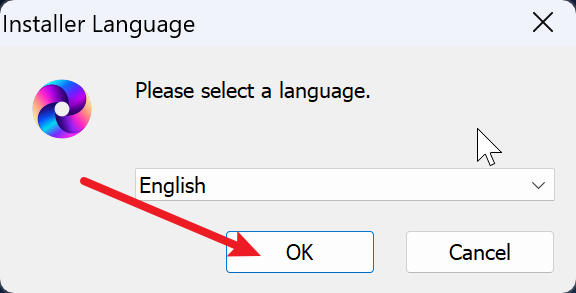
06Confirm the language selection
After selecting the language, click OK.
The installation wizard will continue using the language you selected.
View larger FIGURE 06 · Select OK to confirm your language.
PART 02 / INSTALL APEX ROUTING
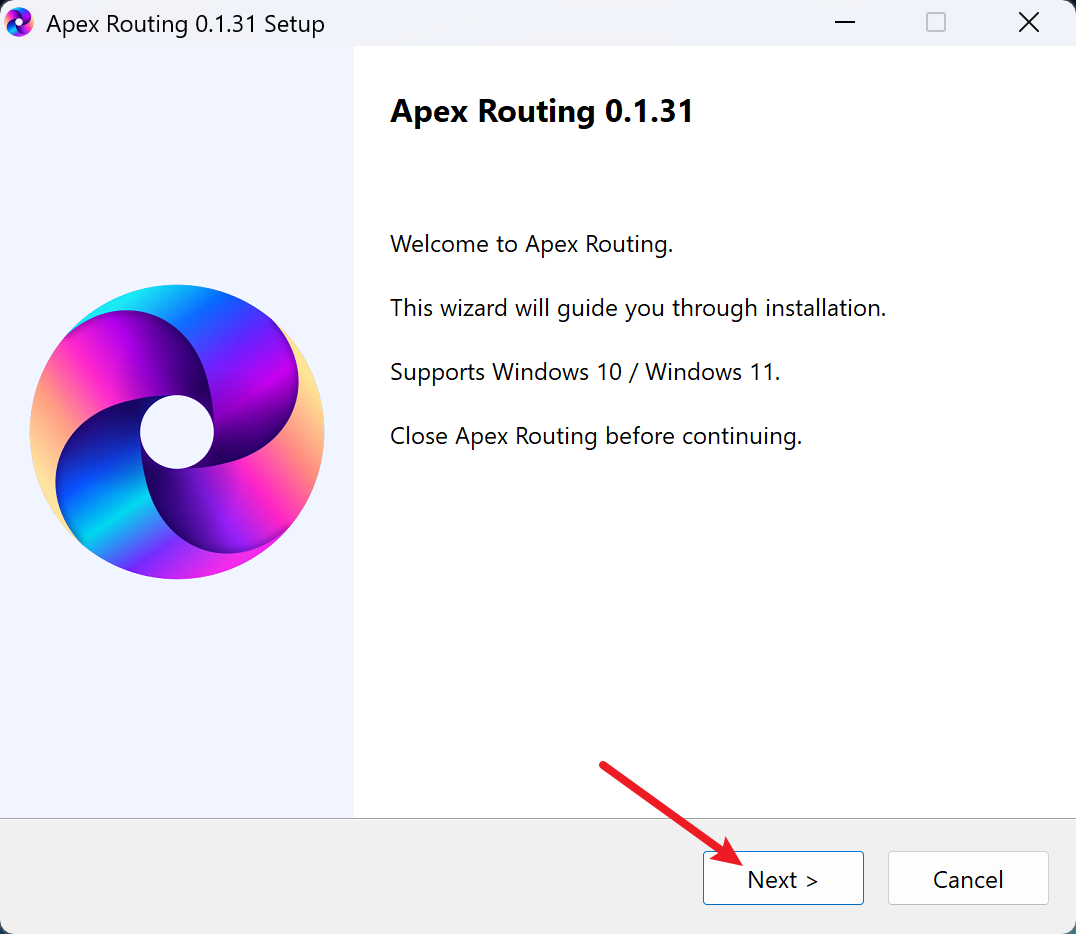
07Begin the setup wizard
The Apex Routing Setup Wizard will guide you through the remaining installation steps.
If another instance of Apex Routing is open, close it before you proceed. Then click Next.
View larger FIGURE 07 · Select Next on the welcome screen.
PART 02 / INSTALL APEX ROUTING
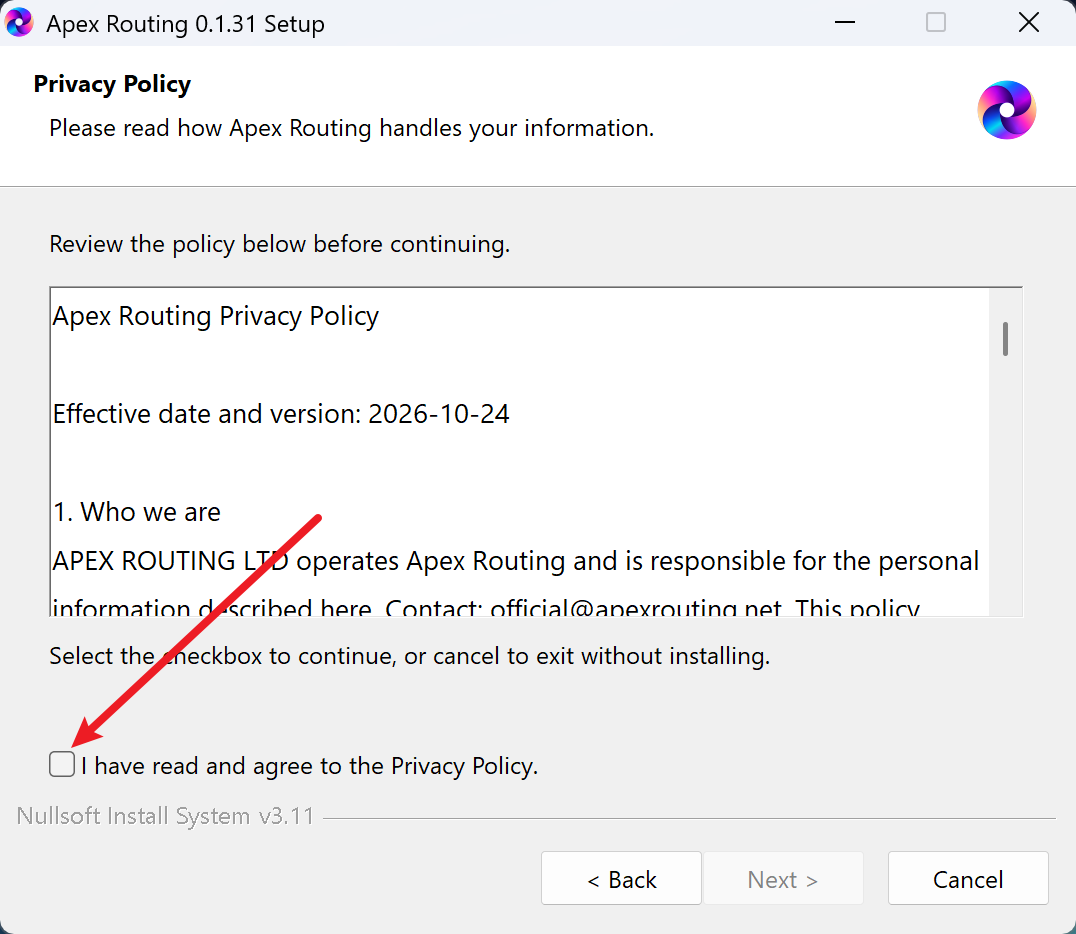
08Review the Privacy Policy
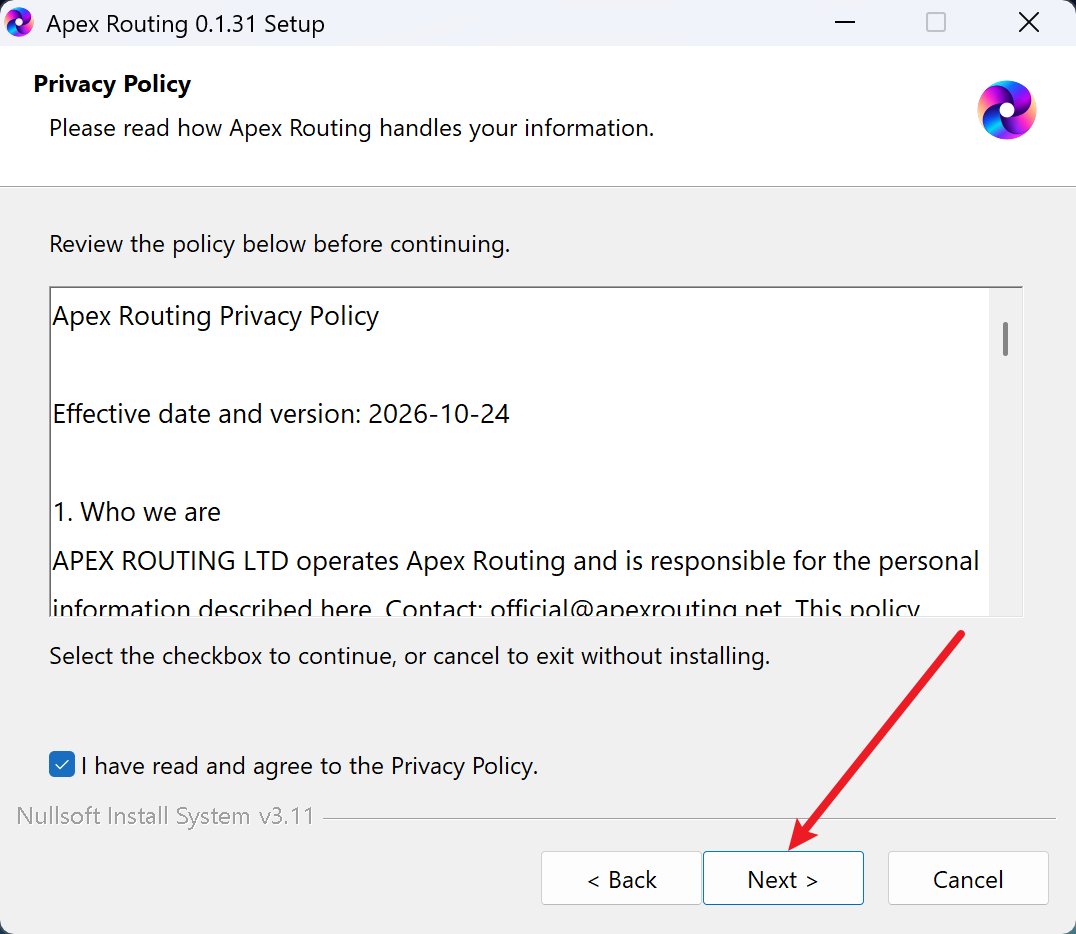
Please read the Apex Routing Privacy Policy carefully before continuing.
If you agree to its terms, check I have read and agree to the Privacy Policy.
View larger FIGURE 08 · Review and accept the Privacy Policy if you agree.
PART 02 / INSTALL APEX ROUTING
09Continue the installation
Once the Privacy Policy checkbox is selected, the Next button becomes available.
Click Next and follow any additional instructions on screen.
View larger FIGURE 09 · Continue after accepting the Privacy Policy.
PART 02 / INSTALL APEX ROUTING
10Finish installation and launch the app
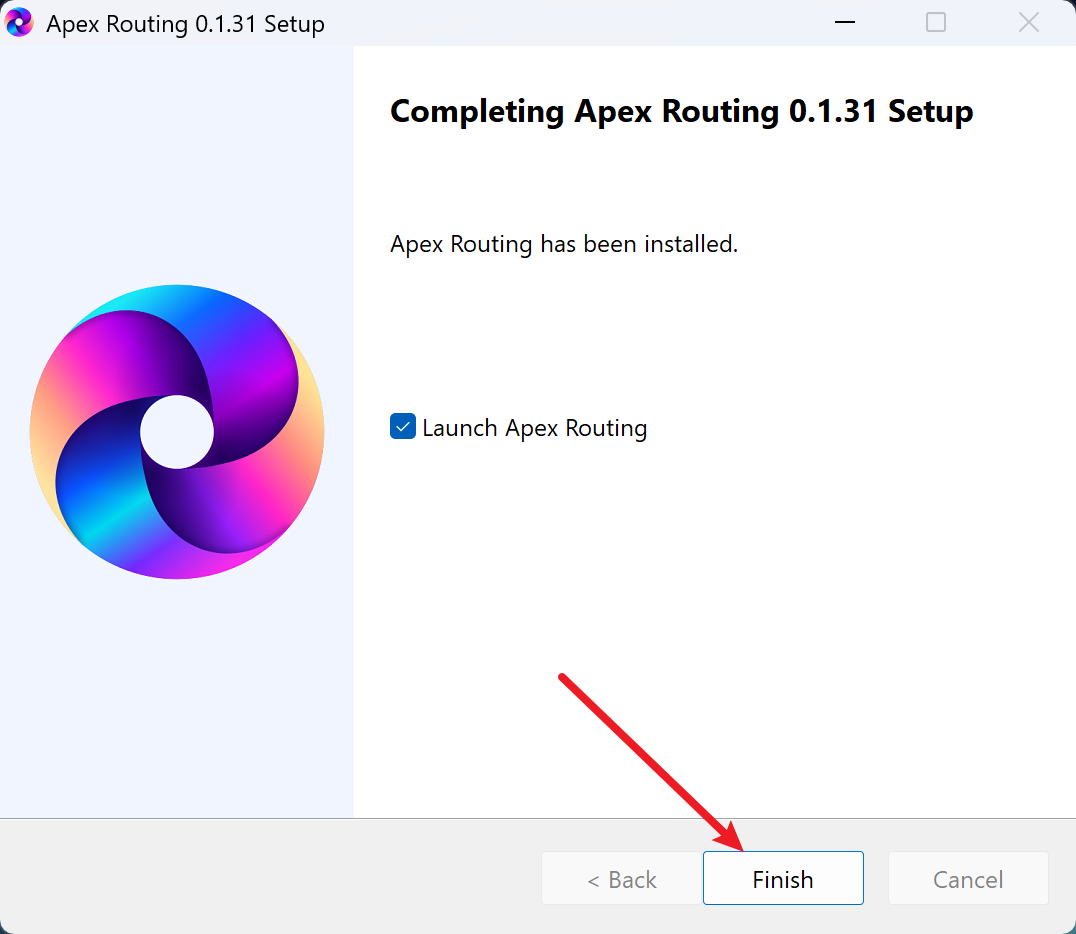
When setup is complete, you will see the final installation screen.
Leave Launch Apex Routing selected if you would like to open the app right away, then click Finish.
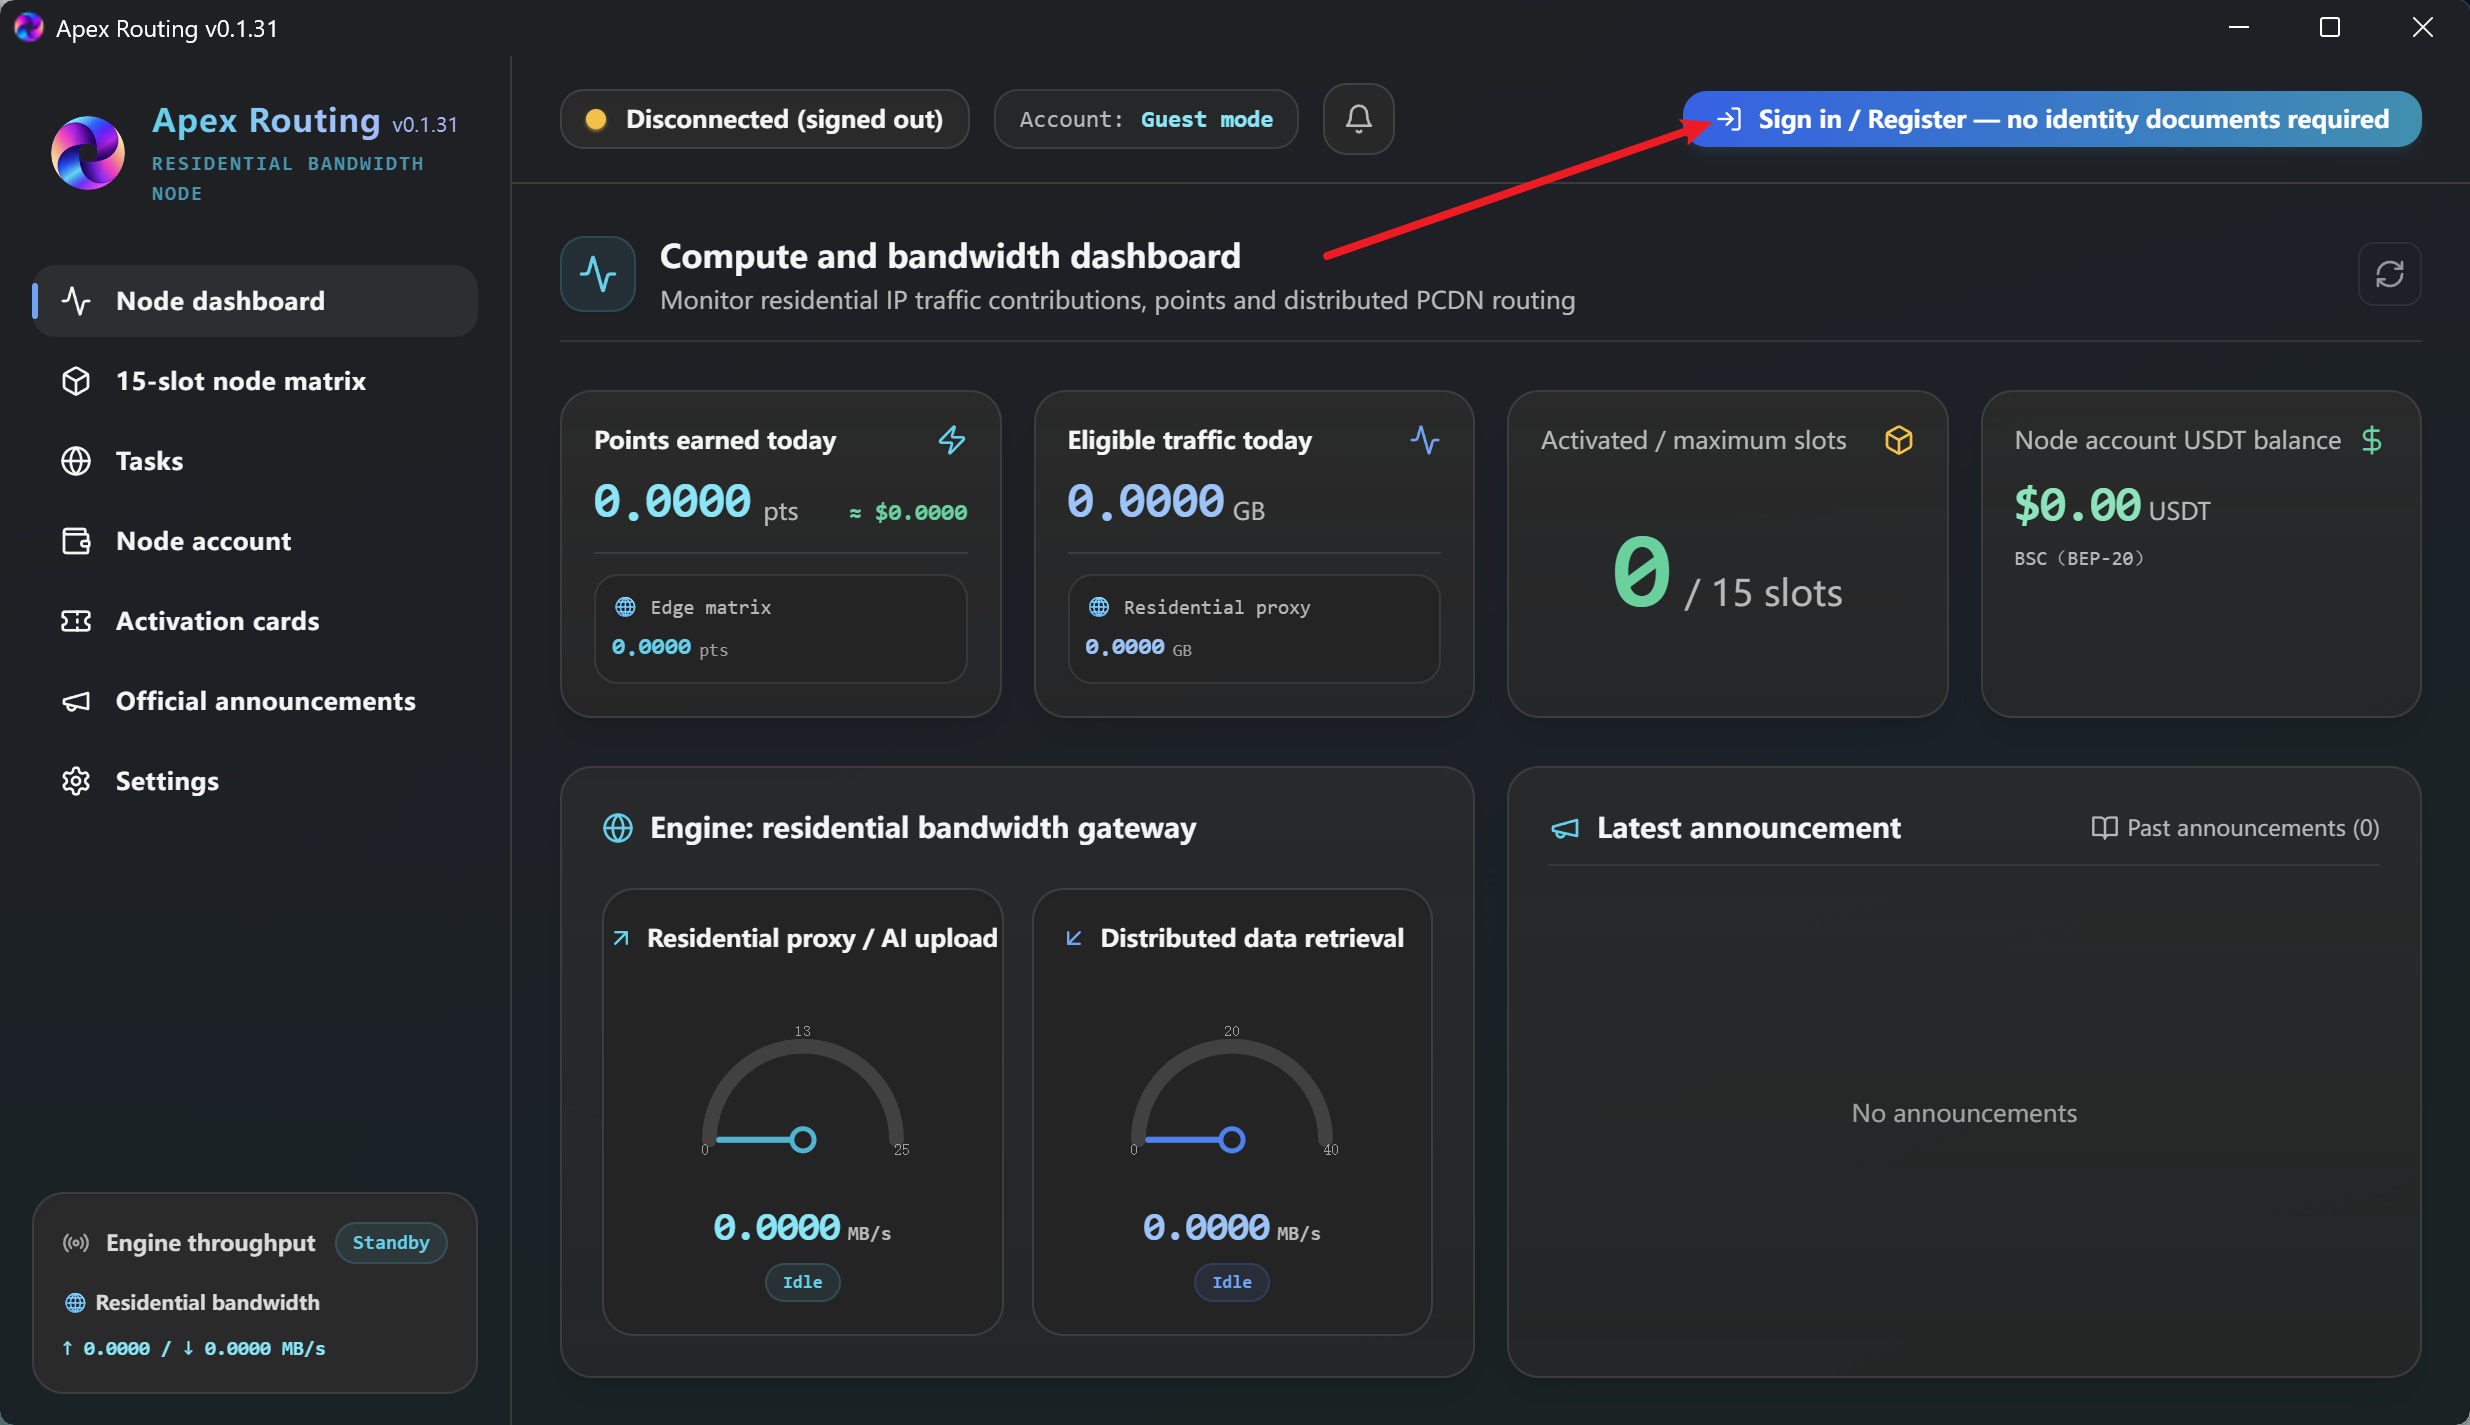
When Apex Routing opens, you will see the main application dashboard.
If you are a new user, click Sign in / Register at the top of the window to open the account and device-linking screen.
View larger FIGURE 11 · Open Sign in / Register from the dashboard.
PART 03 / CREATE YOUR ACCOUNT
12Enter your email and request a code
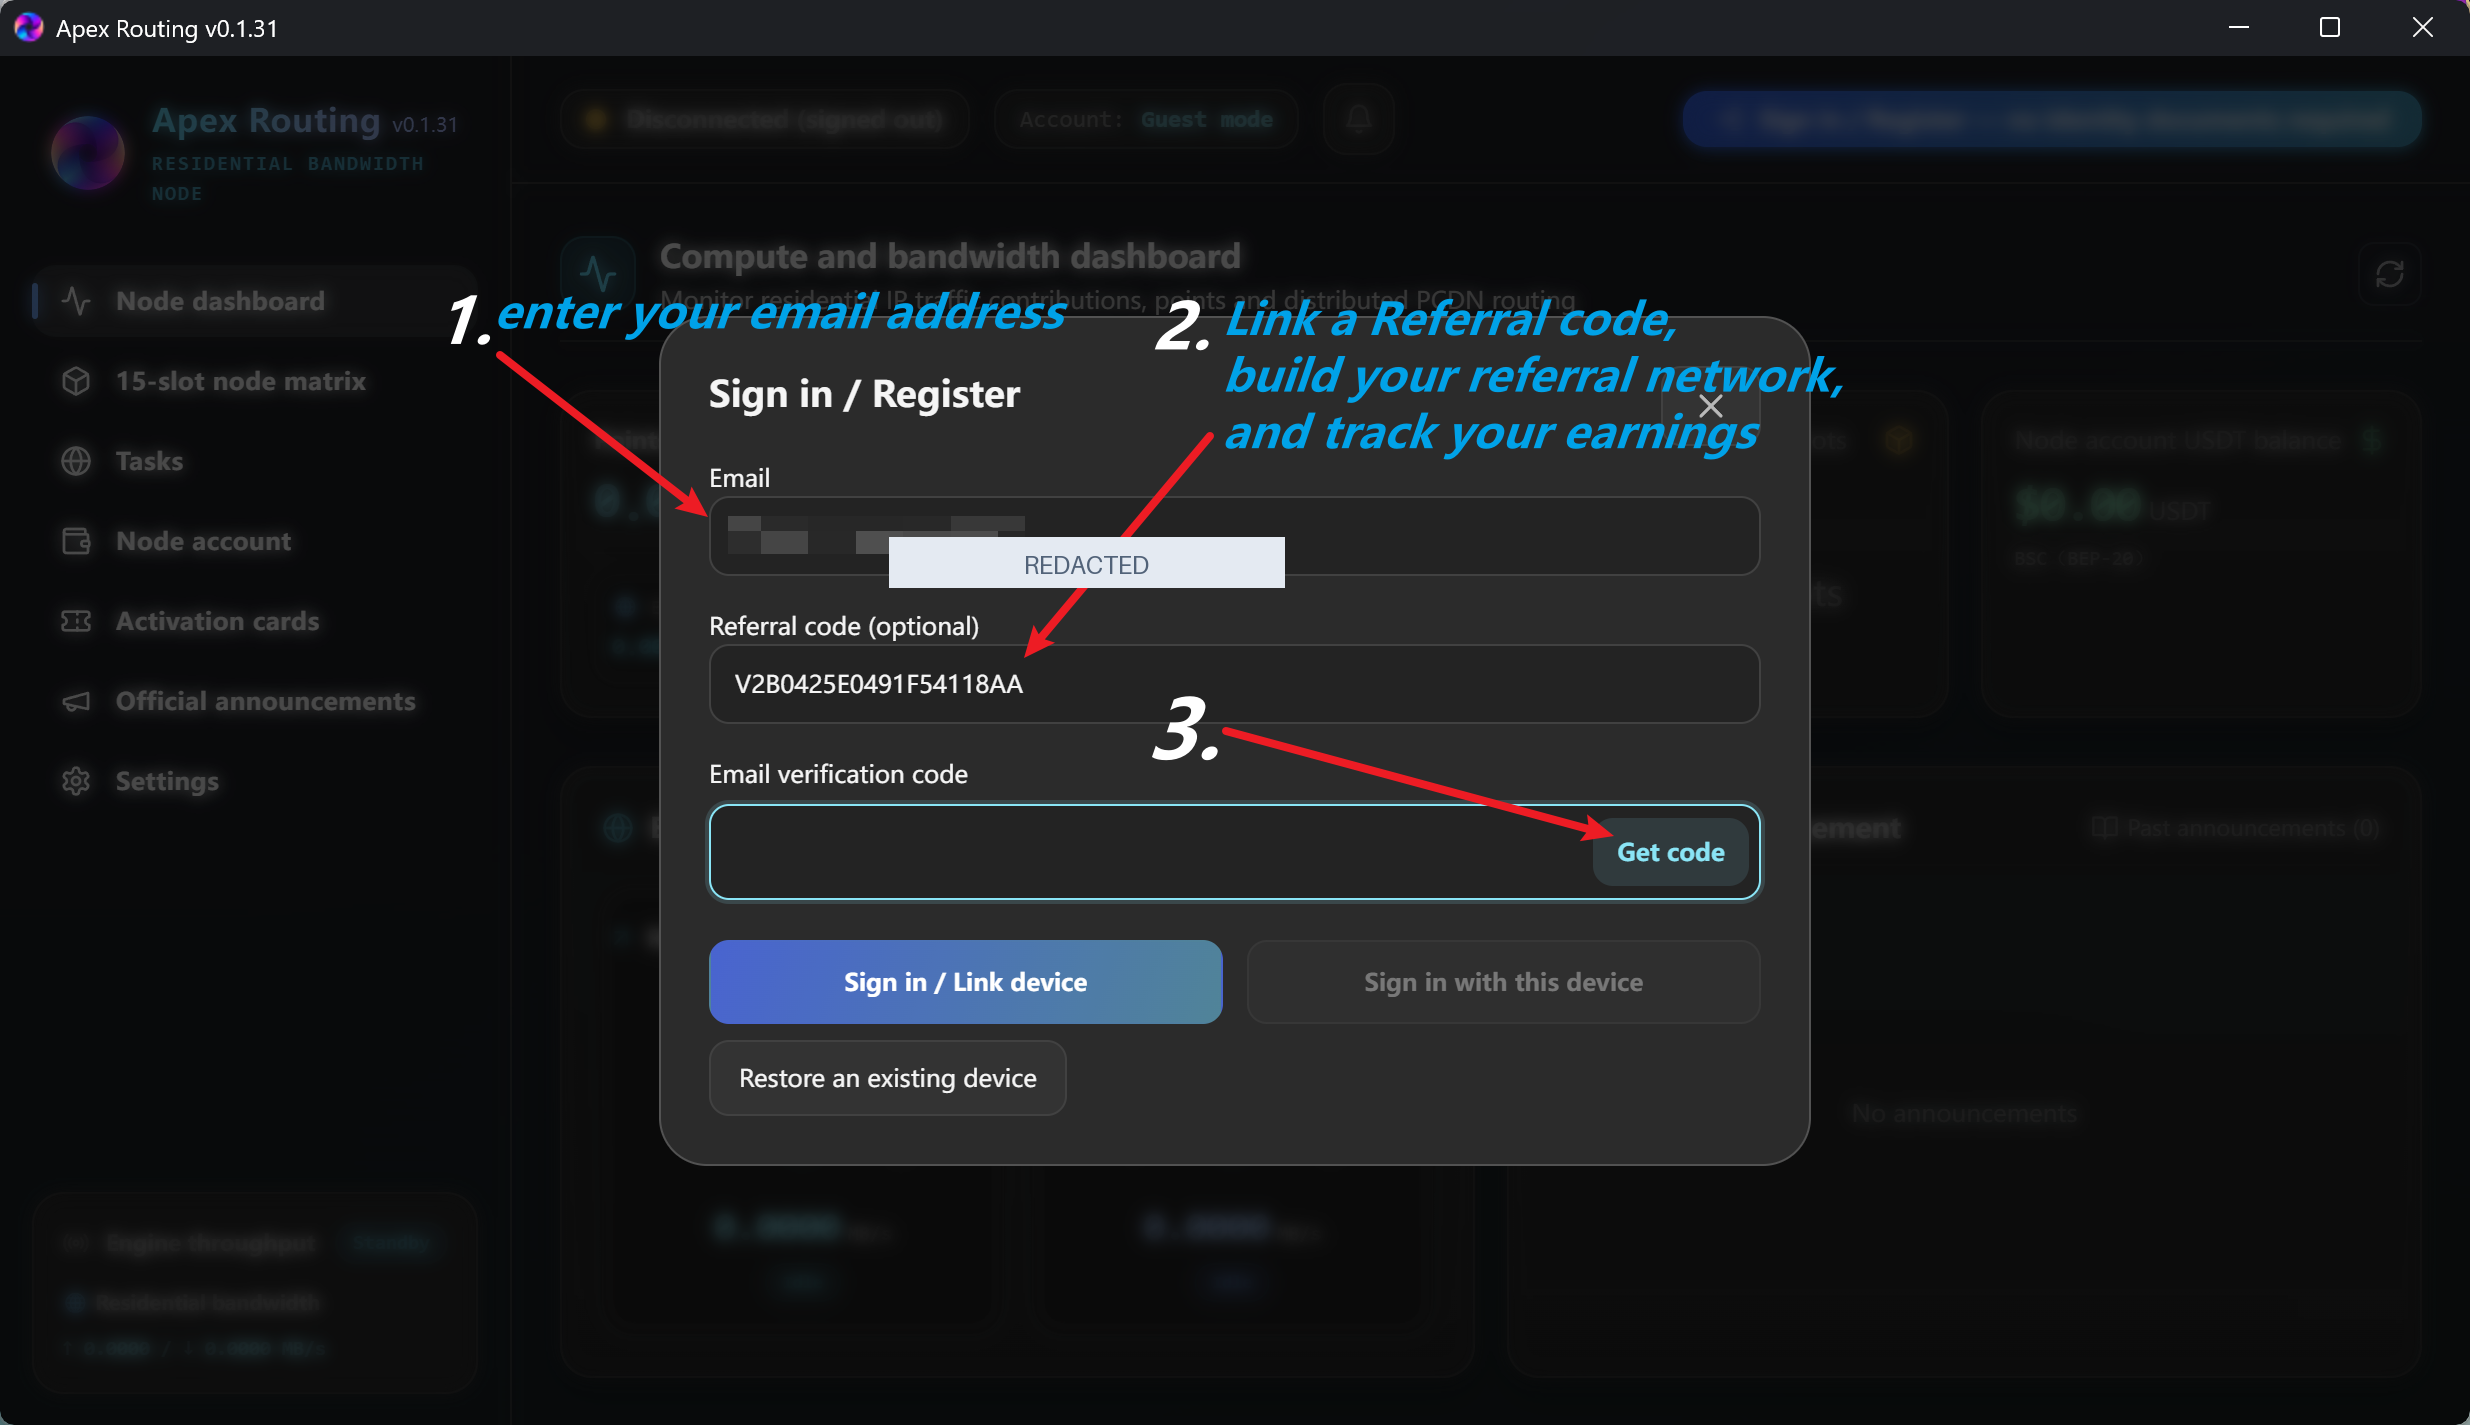
Enter an email address you can access. This address will receive a one-time verification code.
The Referral code field is optional. As shown in the screenshot, it lets you link a referral code, build your referral network, and track your earnings. You can use the code printed below.
Select Get code to request an email verification message.
REFERRAL CODE SHOWN IN THIS GUIDE · OPTIONAL
V2B0425E0491F54118AA
View larger FIGURE 12 · Enter your email, optionally add a referral code, and select Get code.Sensitive details hidden
PART 03 / CREATE YOUR ACCOUNT
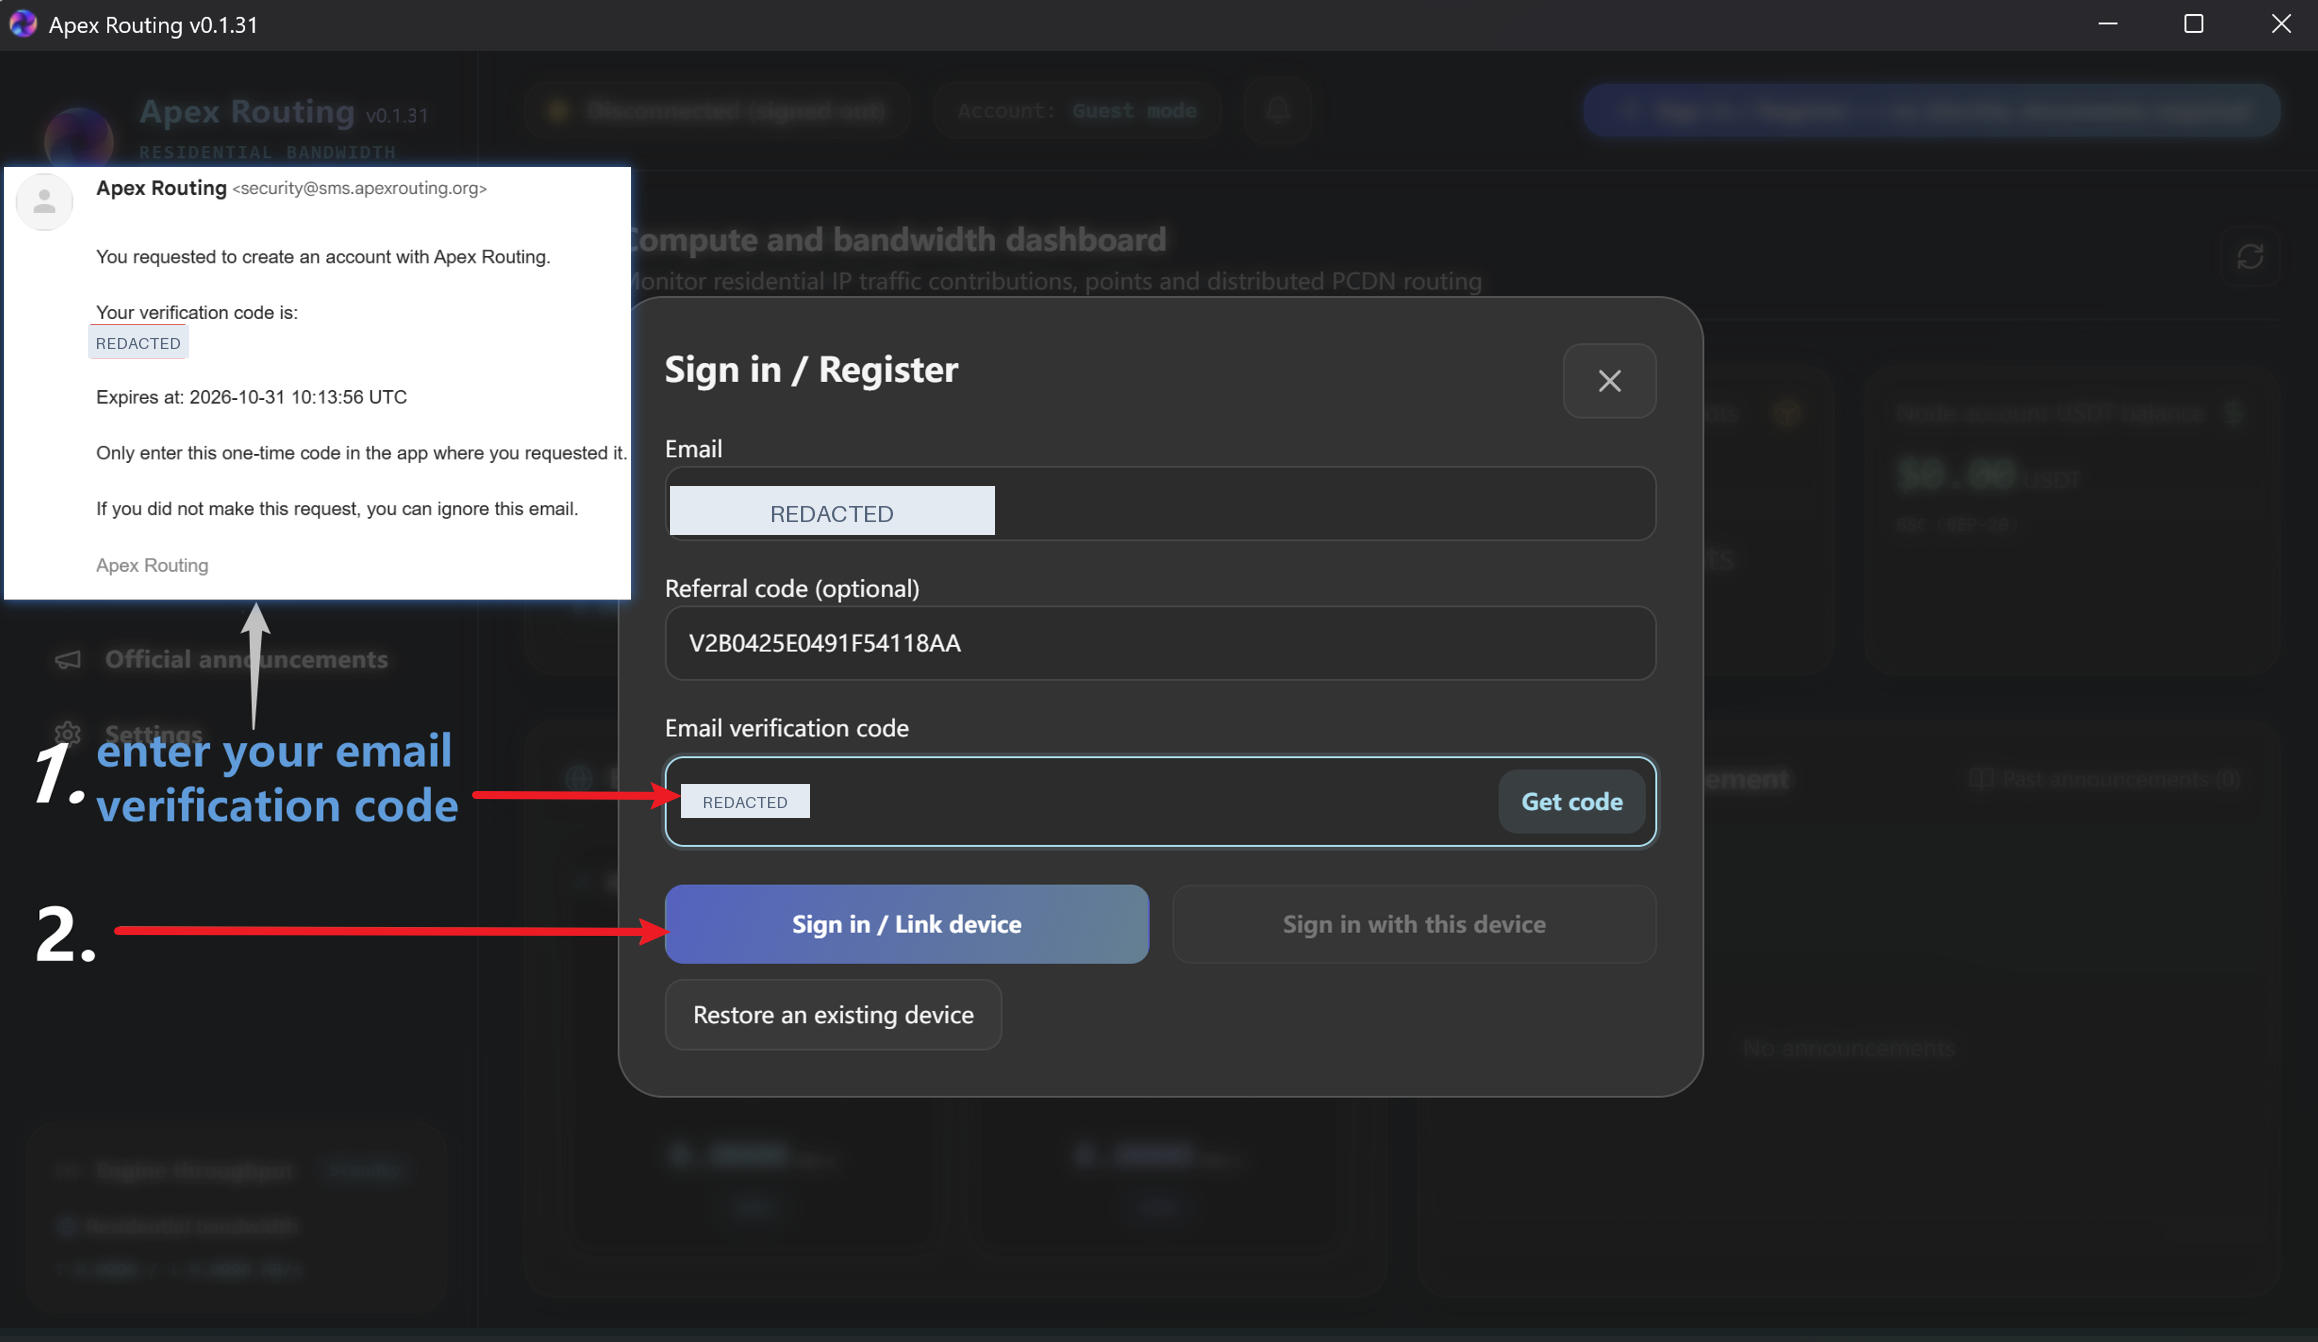
13Verify your email and link this device
Open your email inbox and find the verification message sent by Apex Routing. Copy the one-time code.
Return to Apex Routing and enter the code in Email verification code. Then select Sign in / Link device.
Please enter the code before it expires. If the message is not in your inbox, check your Spam or Junk folder.
View larger FIGURE 13 · Enter the email code and select Sign in / Link device.Sensitive details hidden
You’re ready to explore Apex Routing.
After verification and device linking are complete, you can review the dashboard, node information, available tasks, and device settings. We recommend familiarizing yourself with the interface before proceeding with node activation or task management.
Foundation / GUIDE 02
Your node dashboard
Understand status, activity and bandwidth at a glance.
Welcome to Apex Routing. Your Node Dashboard brings together the key information displayed by the application in one place. This guide will help you recognize each section and understand what its readings mean.
IN THIS GUIDE
SIX KEY AREAS
• Dashboard overview and navigation
• Node status and operating mode indicators
• Daily points, eligible traffic, active slots, and account balance
• Bandwidth activity gauges and engine throughput
• Latest announcements
ILLUSTRATED WITH REAL APPLICATION SCREENSHOTS
Each image is placed next to the section it explains. The screenshots show the application in standby; displayed values may differ on your device.
Apex Routing · Windows application · Dashboard guide
NODE DASHBOARD / SCREEN TOUR
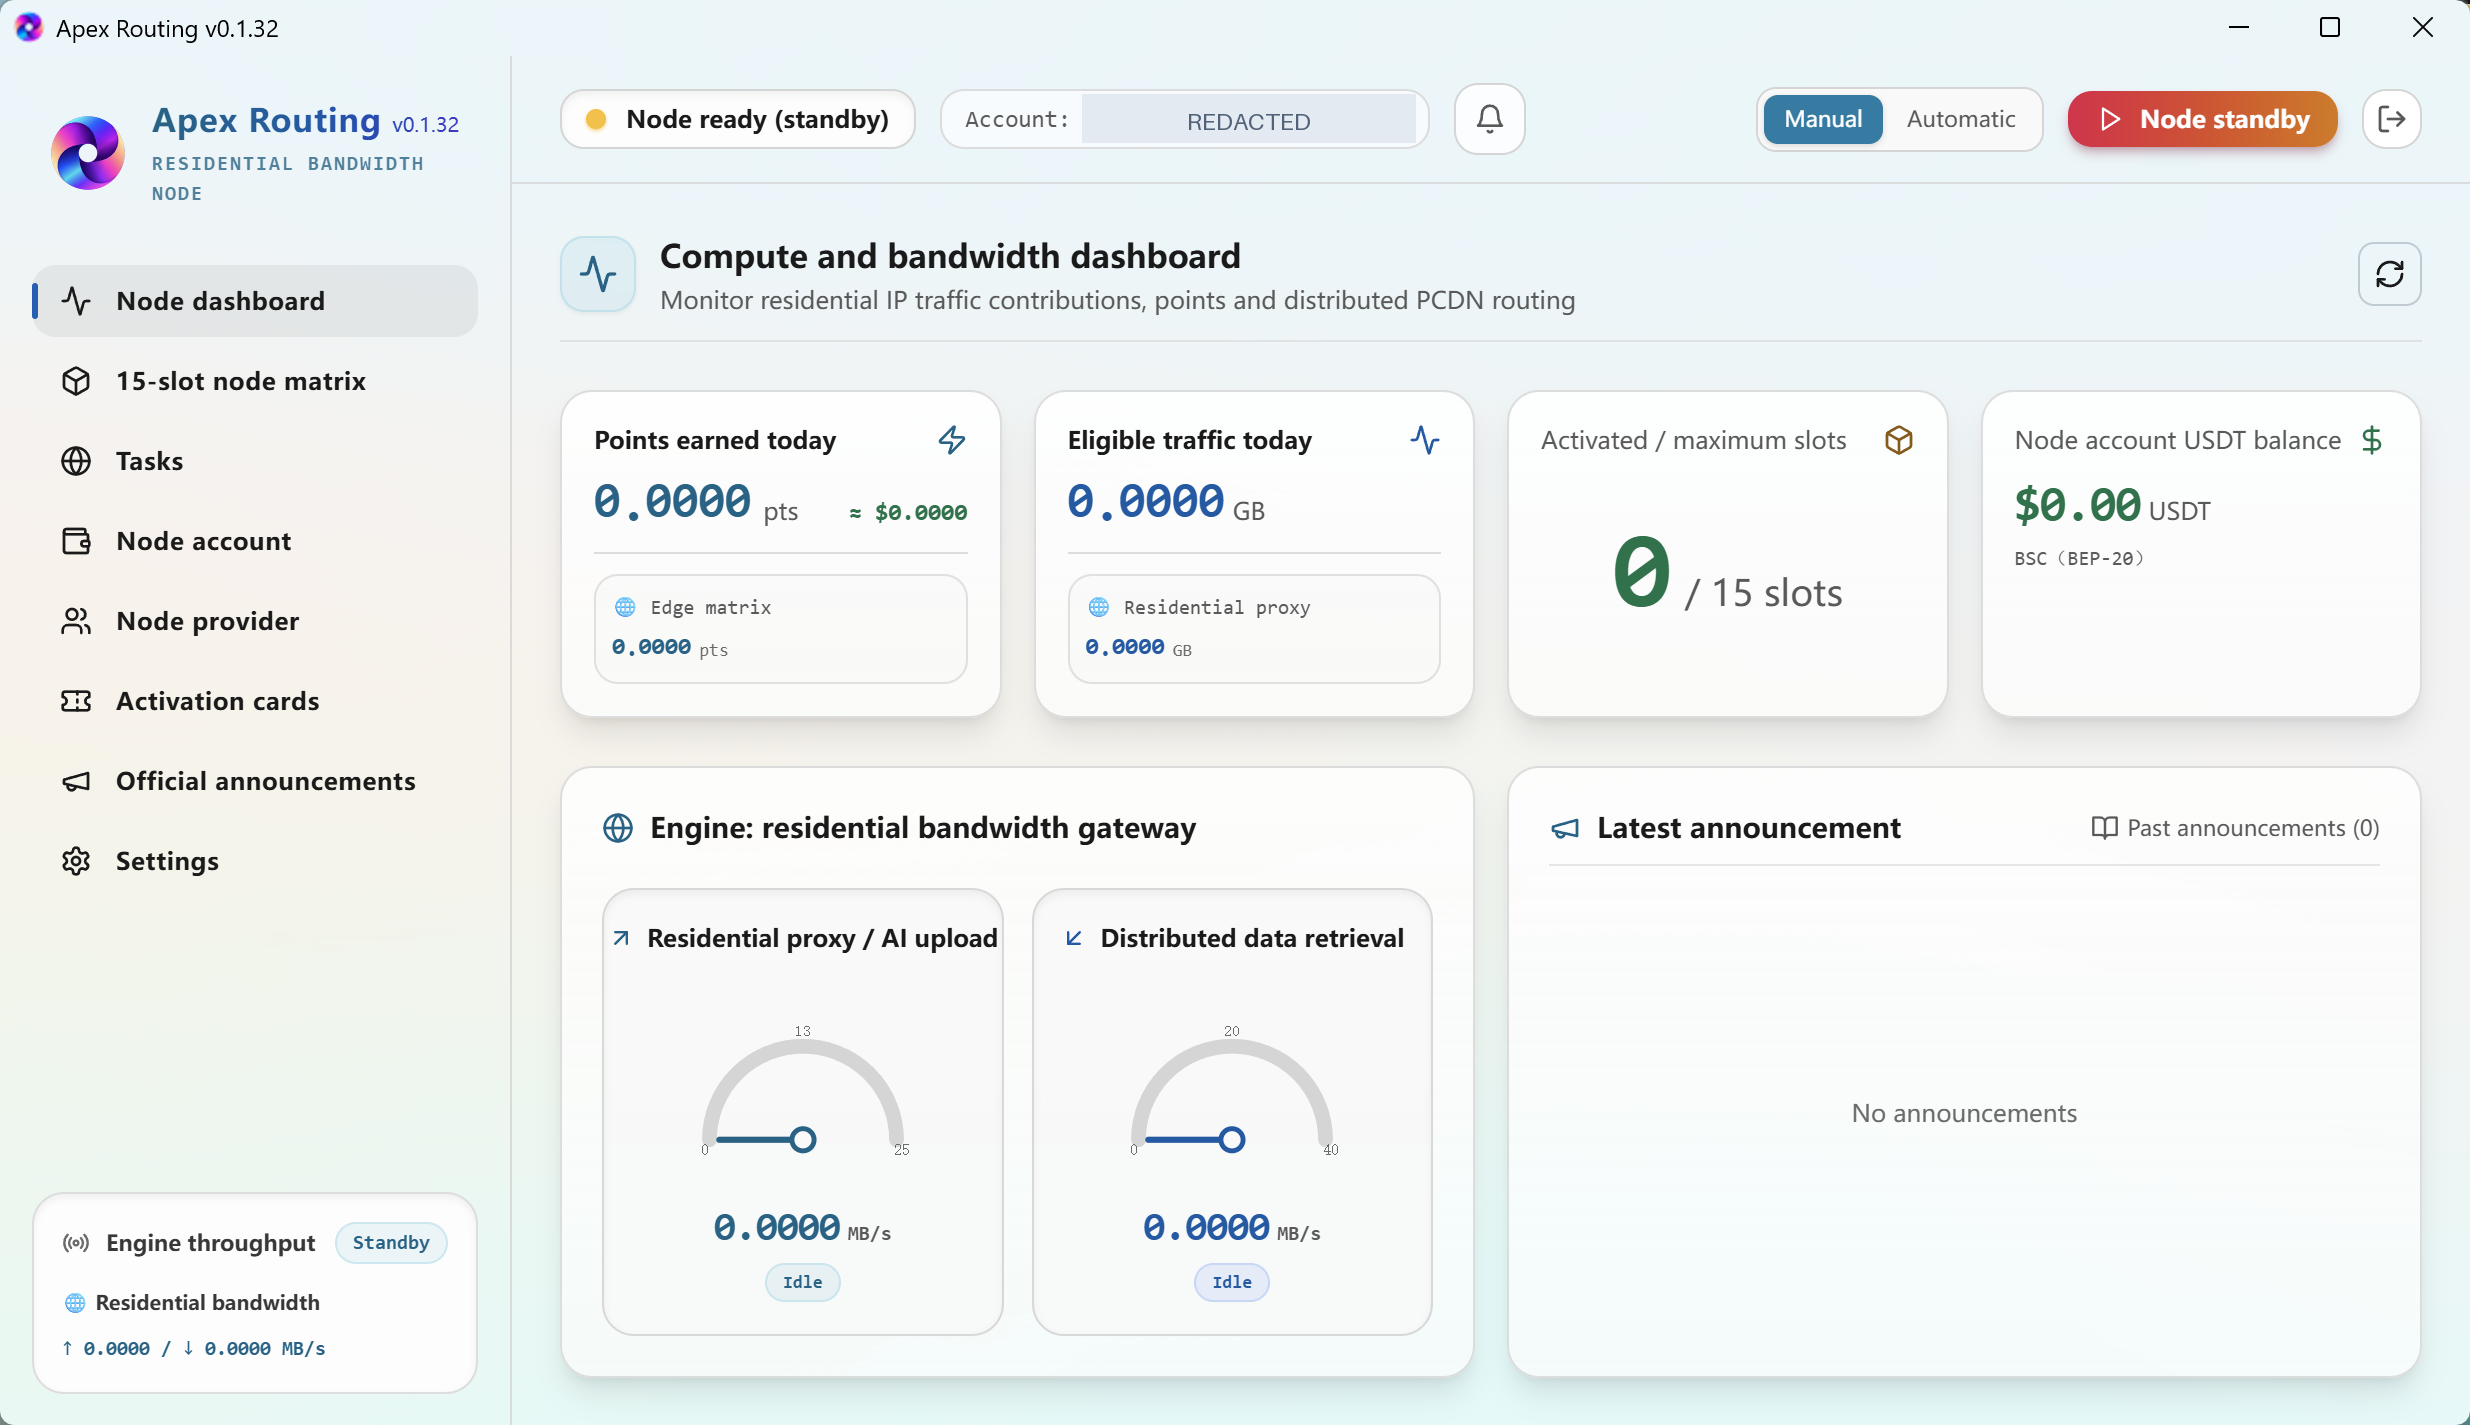
01Open the Node Dashboard
Open Apex Routing and select Node dashboard from the navigation menu on the left.
This is the main overview screen. It brings together your node status, daily activity, slot count, account balance, bandwidth readings, and the latest announcement in one view.
View larger FIGURE 01 · The full Node Dashboard and its main sections.Sensitive details hidden
AT A GLANCE
• Use the left navigation menu to move between areas of the application.
• The dashboard provides a snapshot of the current device and its displayed activity.
NODE DASHBOARD / SCREEN TOUR
02Check the Top Status Bar
At the top of the window, look for the node status label. In this example, Node ready (standby) indicates that the application shows the node as ready but standing by.
The same bar displays the signed-in account, a notification icon, Manual and Automatic mode options, and the current Node standby control.
View larger FIGURE 02 · The top bar shows device status, account, mode selection, and standby.Sensitive details hidden
READING THE INDICATORS
• Standby is a state shown by the application; it is not an indication of active task traffic.
• Manual and Automatic appear as distinct operating-mode options.
NODE DASHBOARD / SCREEN TOUR
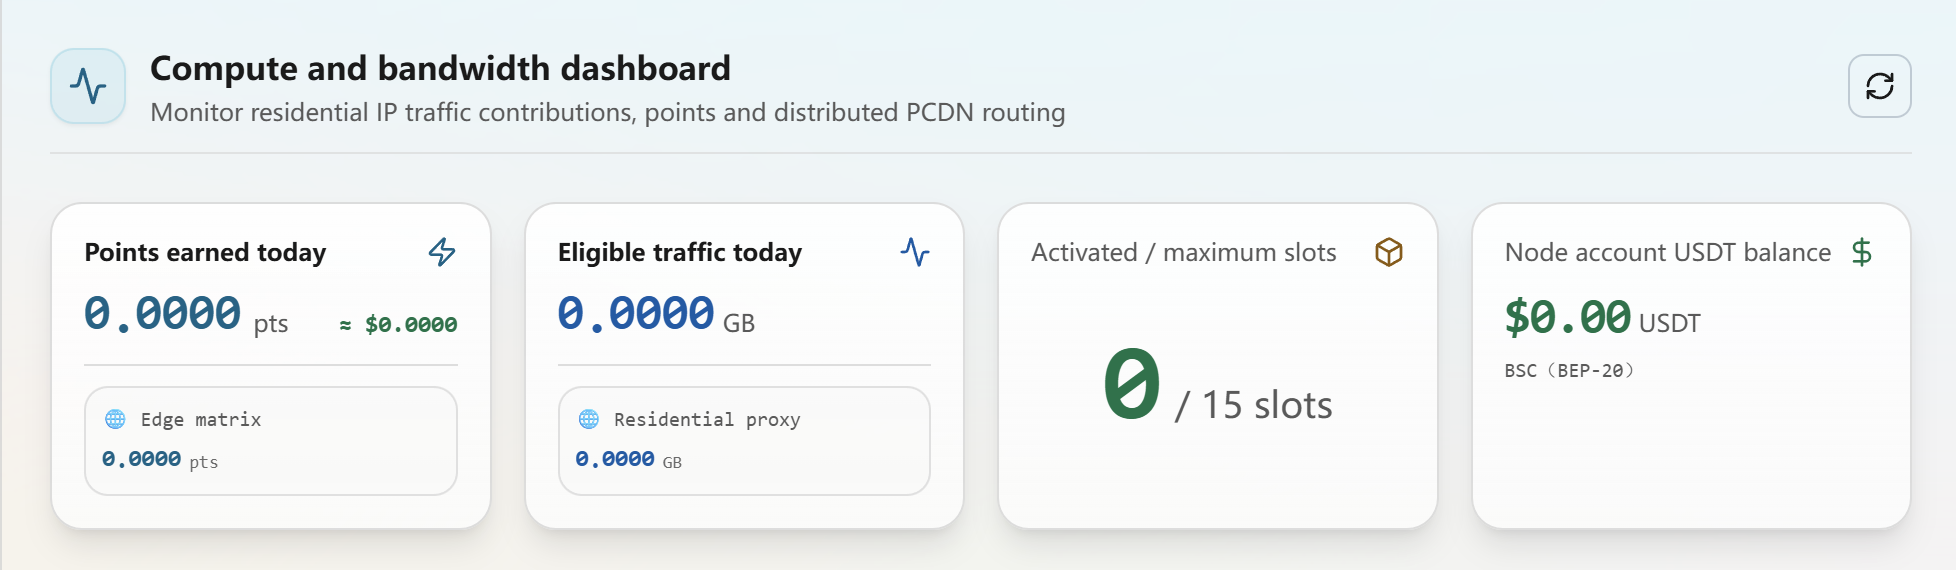
03Review Your Daily Summary
The four summary cards beneath the dashboard heading show Points earned today, Eligible traffic today, Activated / maximum slots, and Node account USDT balance.
Points are shown in pts, eligible traffic in GB, and the account balance in USDT. The slot counter shows how many of the available 15 slots are activated. The example screenshot displays zeros in all four cards.
View larger FIGURE 03 · The dashboard’s daily points, traffic, slot count, and USDT balance.
NODE DASHBOARD / SCREEN TOUR
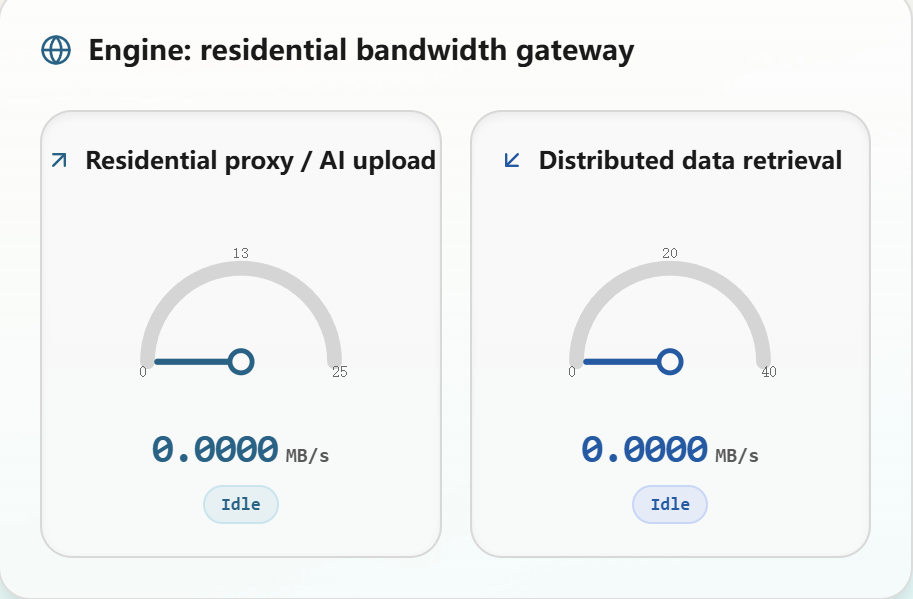
04Monitor Bandwidth Activity
Under Engine: residential bandwidth gateway, you will find two separate gauges: Residential proxy / AI upload on the left and Distributed data retrieval on the right.
Each gauge shows a transfer rate in MB/s and an activity indicator. In this screenshot, both gauges read 0.0000 MB/s and show Idle.
View larger FIGURE 04 · The two bandwidth activity gauges.
WHAT THE READINGS SHOW
• The gauges show activity reported by the Apex Routing application.
• A zero reading with Idle means no activity is shown at the time of the screenshot.
NODE DASHBOARD / SCREEN TOUR
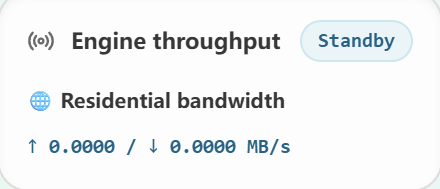
05Read the Engine Throughput Summary
The small Engine throughput panel at the bottom of the left sidebar gives you a compact view of engine status and residential bandwidth rates.
Here, the panel shows Standby, with upload and download both at 0.0000 MB/s.
View larger FIGURE 05 · The sidebar engine throughput panel.
NODE DASHBOARD / SCREEN TOUR
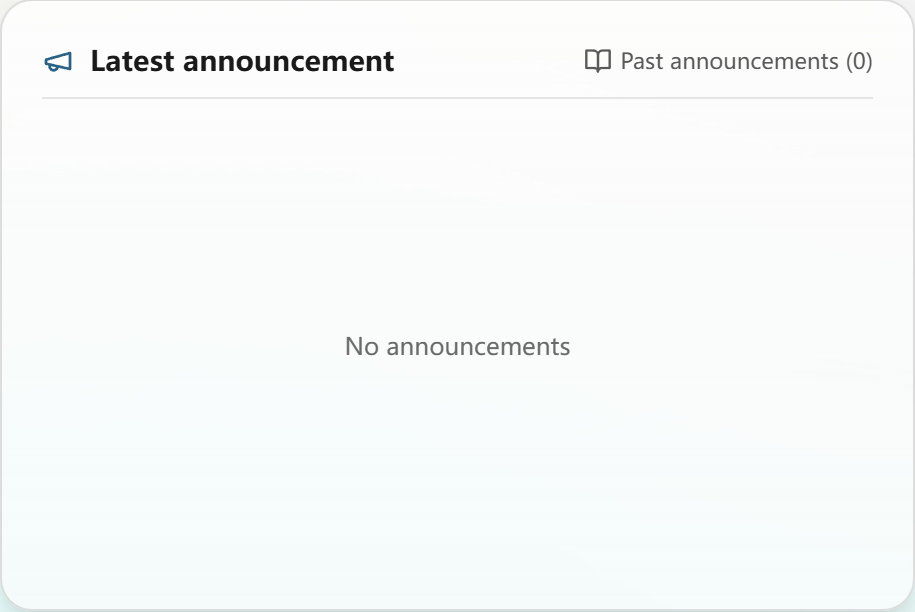
06View the Latest Announcement
The Latest announcement panel is located on the right side of the dashboard, beside the bandwidth activity gauges.
It is reserved for the latest notice shown in the application. When no announcement is available, the panel displays No announcements. The Past announcements label shows the available history count.
View larger FIGURE 06 · The latest announcement panel and announcement history count.
You’re Familiar with the Dashboard!
You now know where to find the key status and activity information on your Node Dashboard.
Thank you for choosing Apex Routing. We’re glad to have you with us!
Foundation / GUIDE 03
Device settings, security & recovery
Set your preferences and protect your device access.
This guide will walk you through the Settings page, where you can review your system preferences, configure startup behavior, view your device ID, and manage device recovery and backup status.
Before you begin: • Make sure you are signed in to Apex Routing. • Open the Apex Routing desktop application on your Windows device. • Use the actual interface shown in your app, as available options may vary by version.
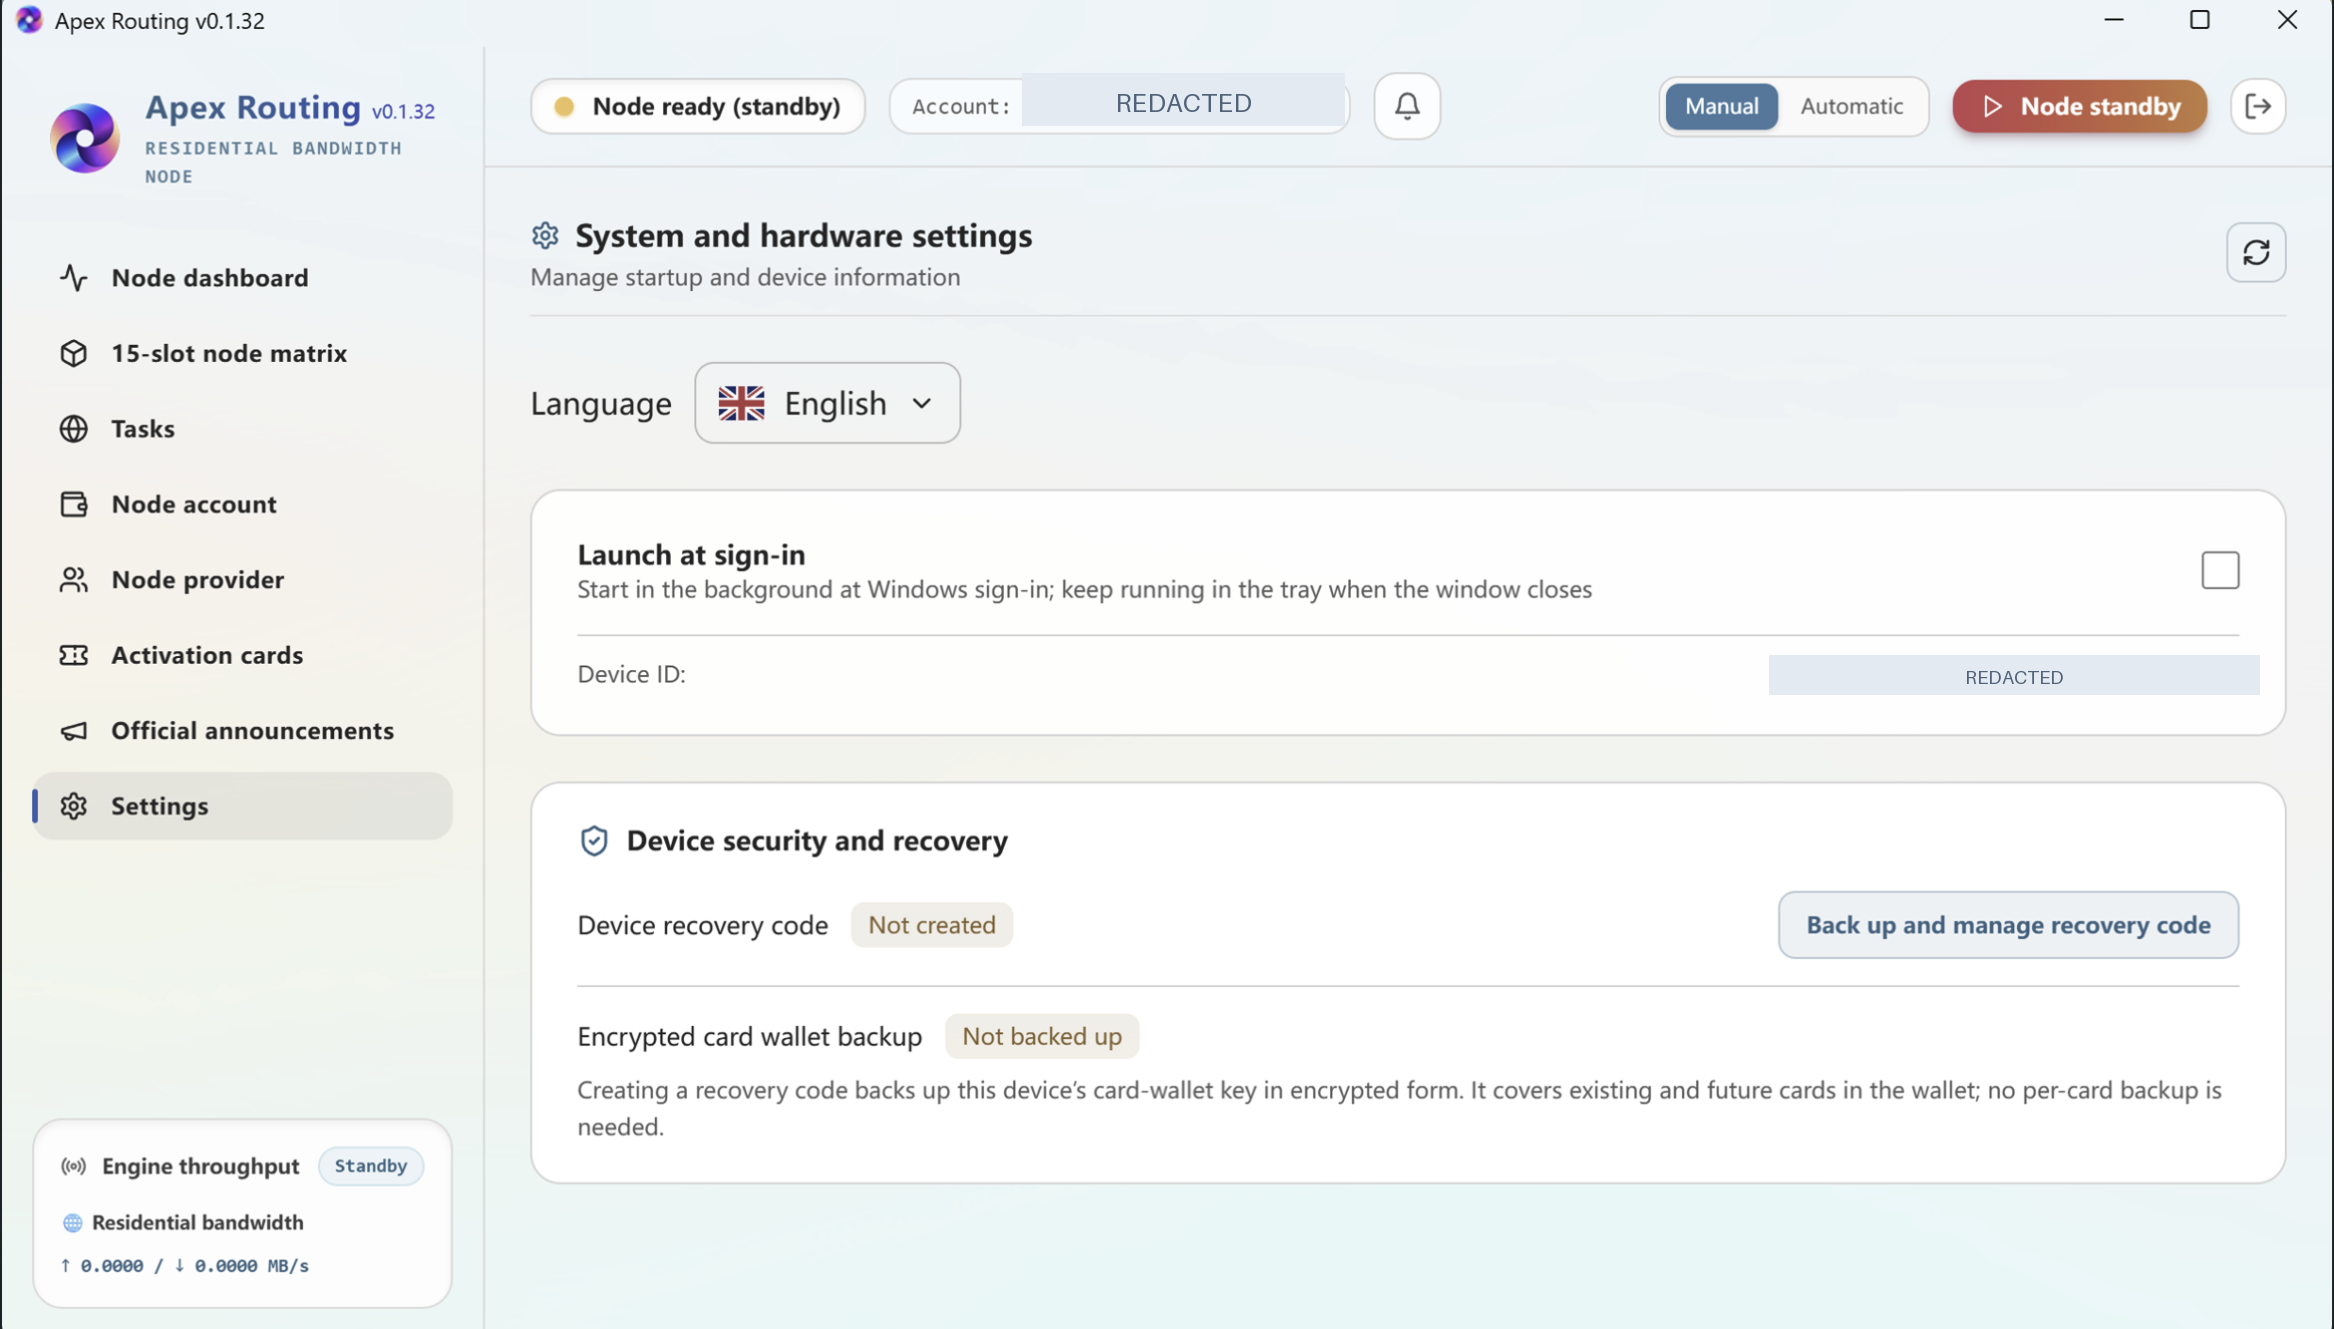
01Open Device Settings
From the left-hand navigation menu, click Settings to open the System and hardware settings page. This page provides access to language preferences, launch behavior, device information, and recovery tools.
View larger Figure 1. Open the Settings page to access system and hardware options.Sensitive details hidden
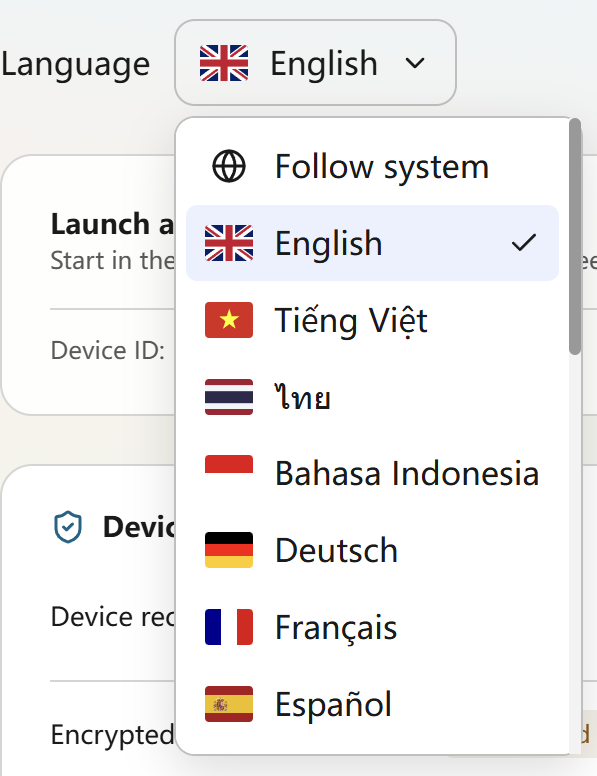
02Choose Your Preferred Language
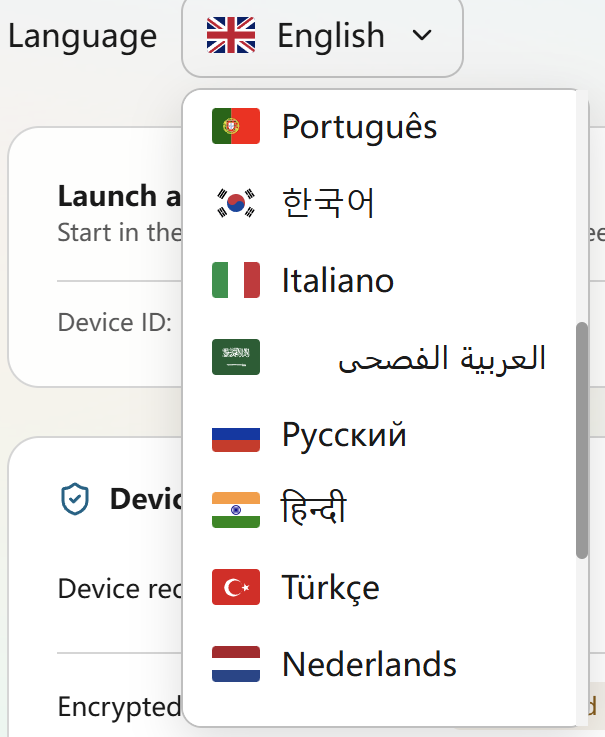
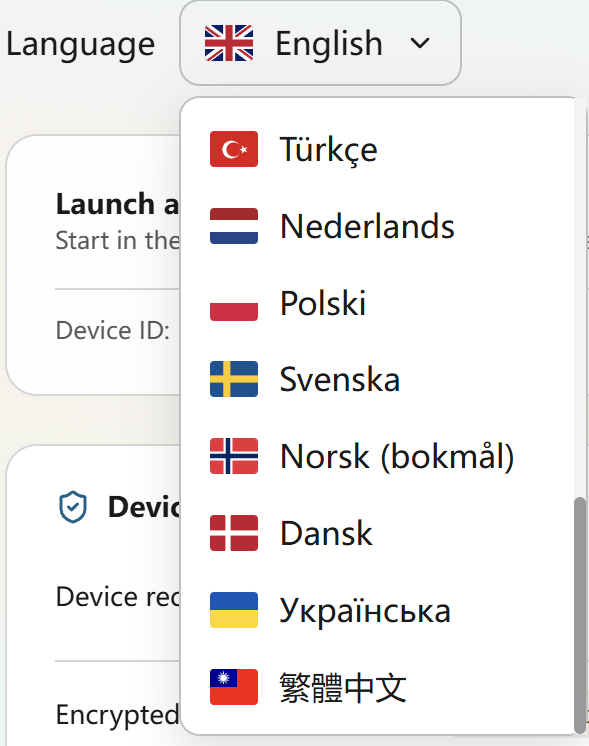
Under Language, click the drop-down menu to view the list of supported languages. You can scroll through the available options and select the language you would like to use in the application.
View larger Figure 2. Open the language menu to view the first group of available languages.View larger Figure 3. Scroll the language list to view additional supported languages.View larger Figure 4. Continue scrolling to review the remaining language options.
03Configure Launch at Sign-In
In the Launch at sign-in section, review the startup preference shown on the page. This option controls whether Apex Routing starts in the background when you sign in to Windows and remains available in the system tray after the window is closed.
View larger Figure 5. Review the Launch at sign-in option and its description.
04Locate Your Device ID
Below the startup setting, you can find the Device ID assigned to the current computer. This identifier is displayed for device-specific management and reference within the application.
View larger Figure 6. Locate the Device ID shown for the current device.Sensitive details hidden
05Open Device Recovery
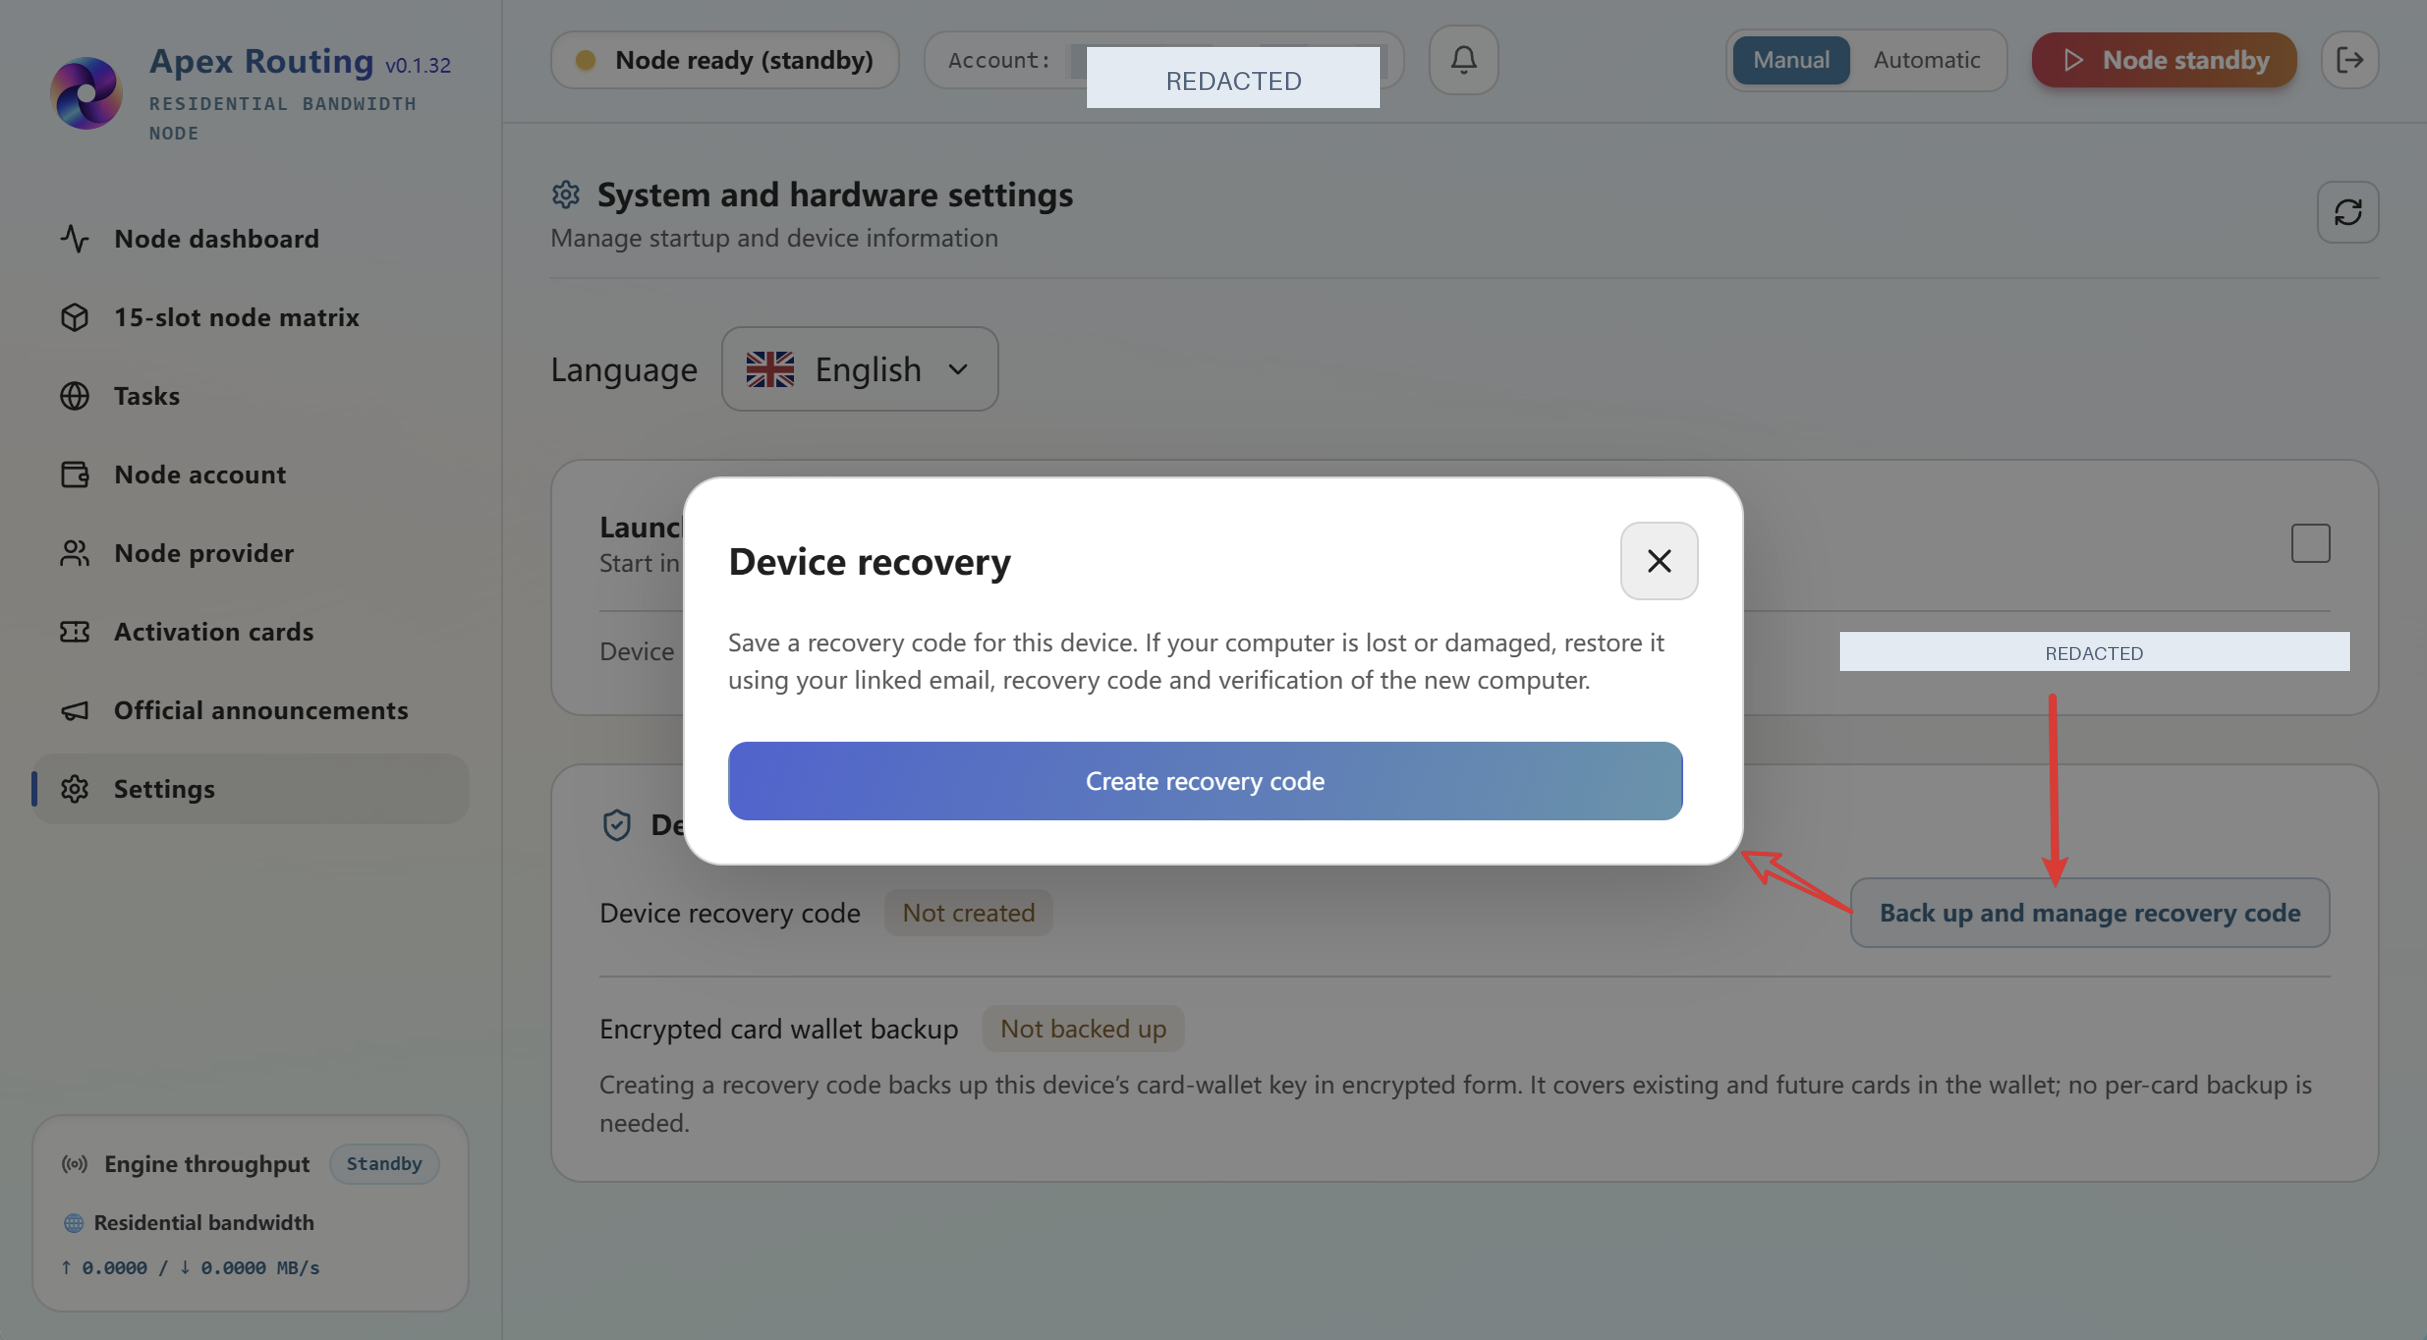
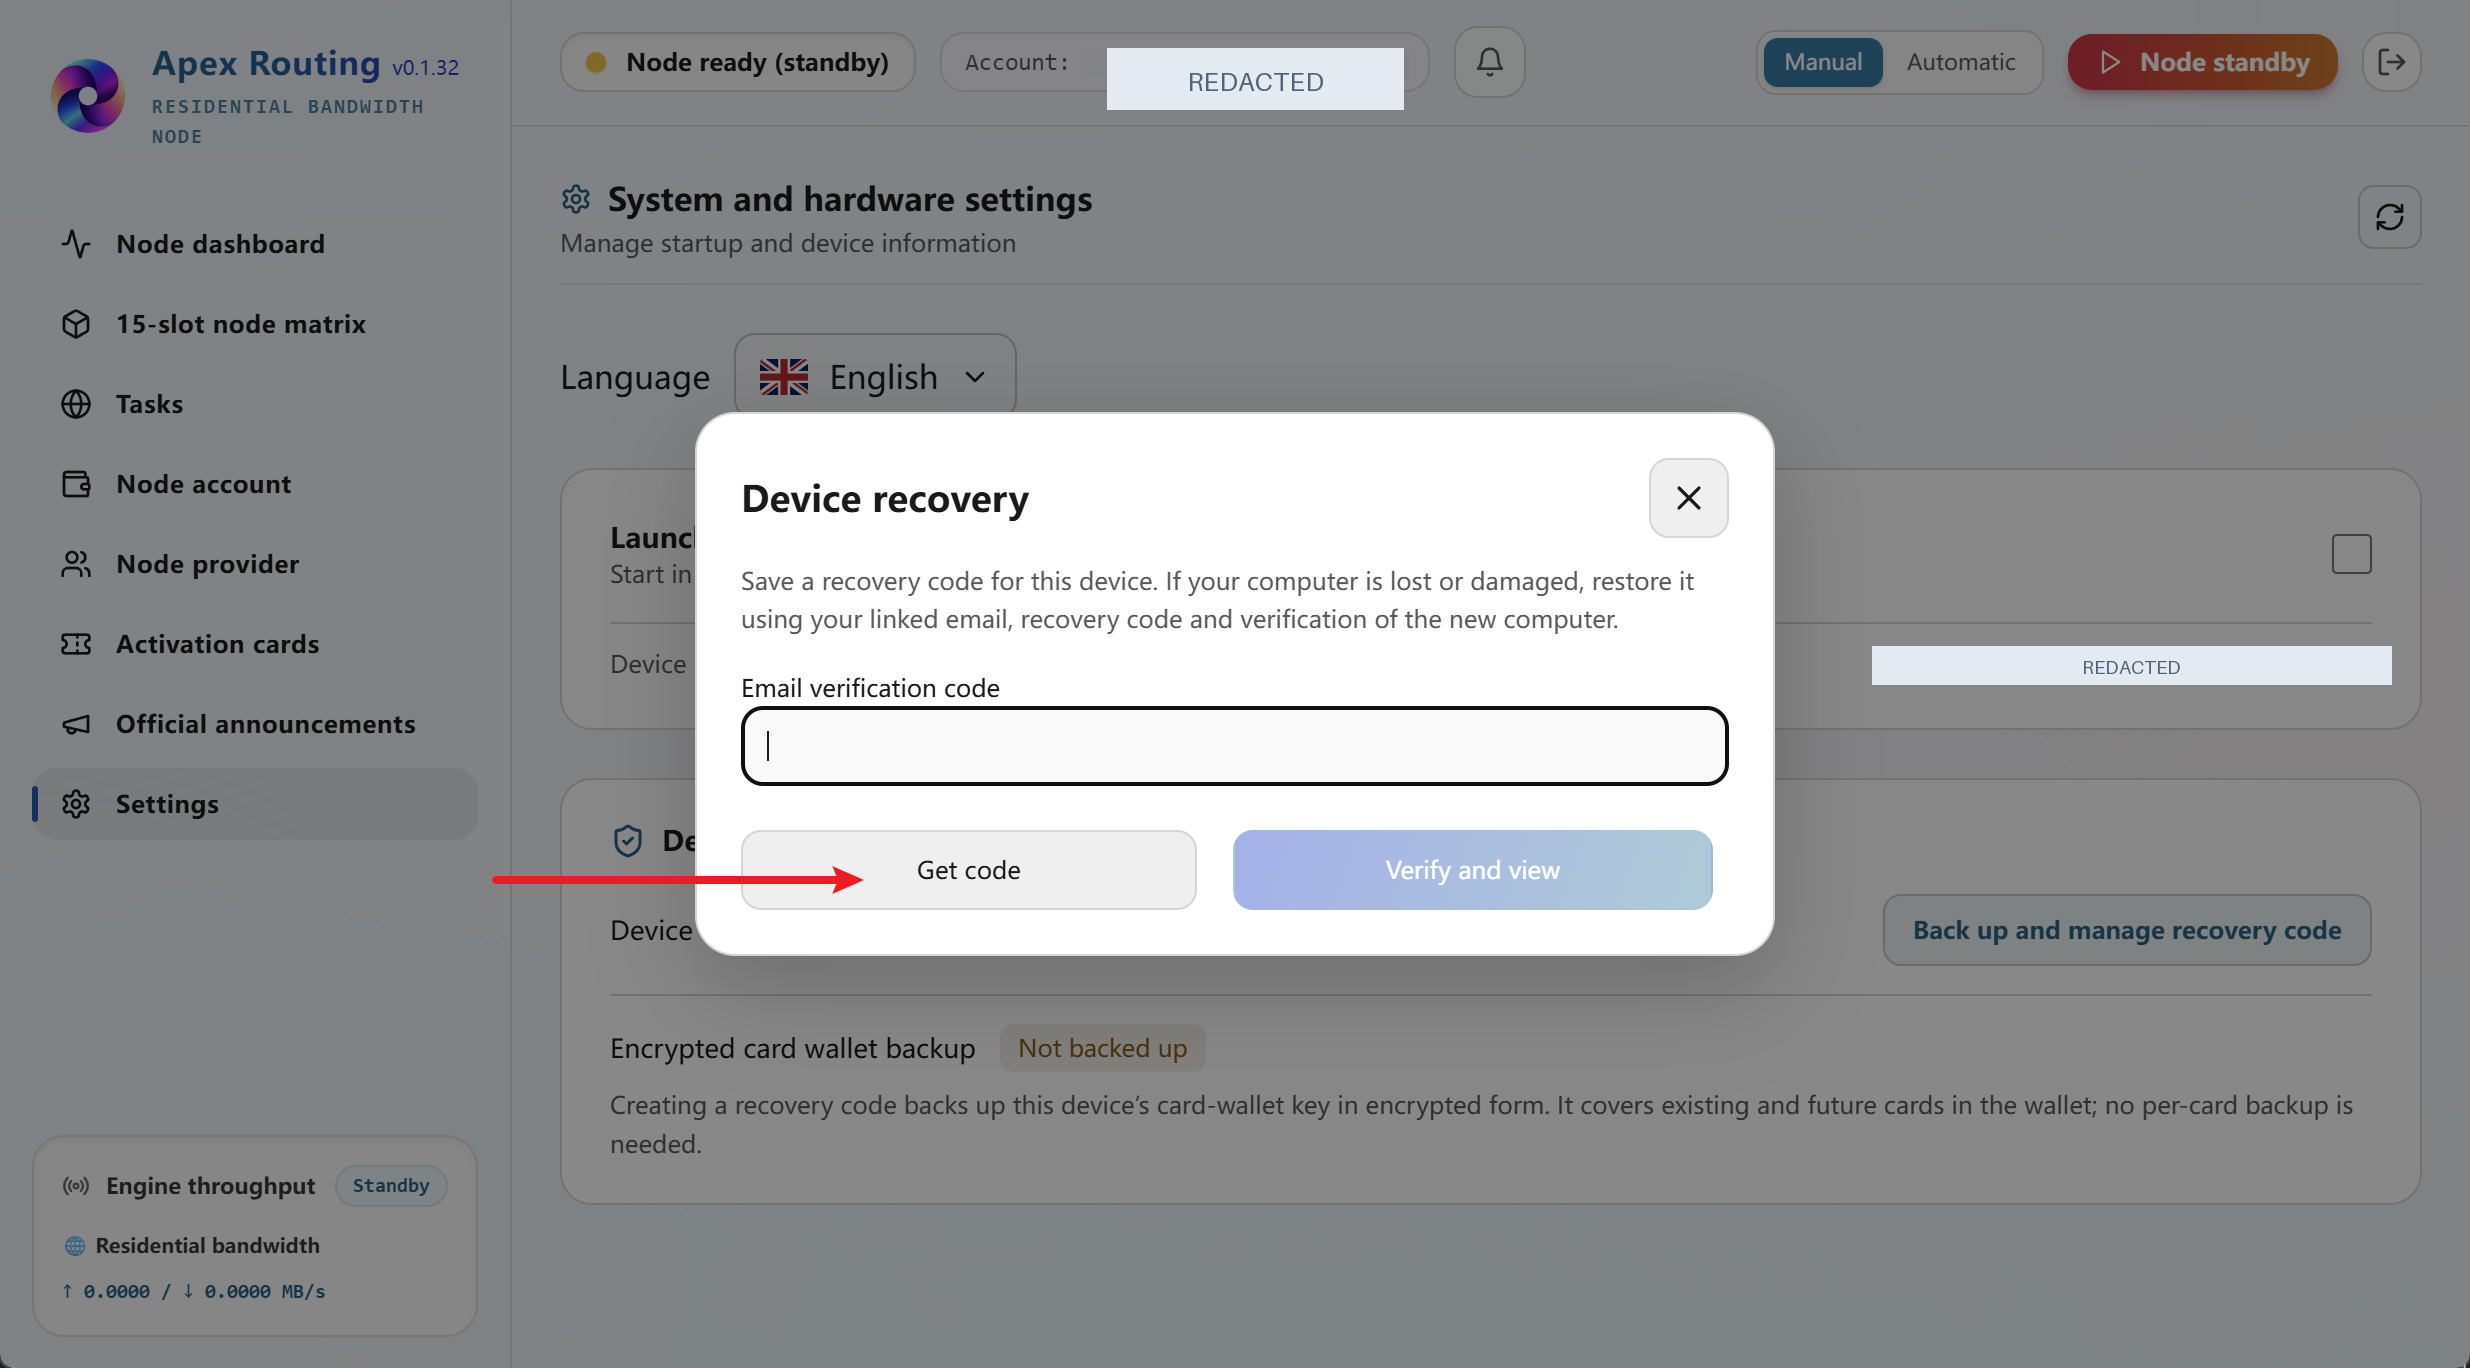
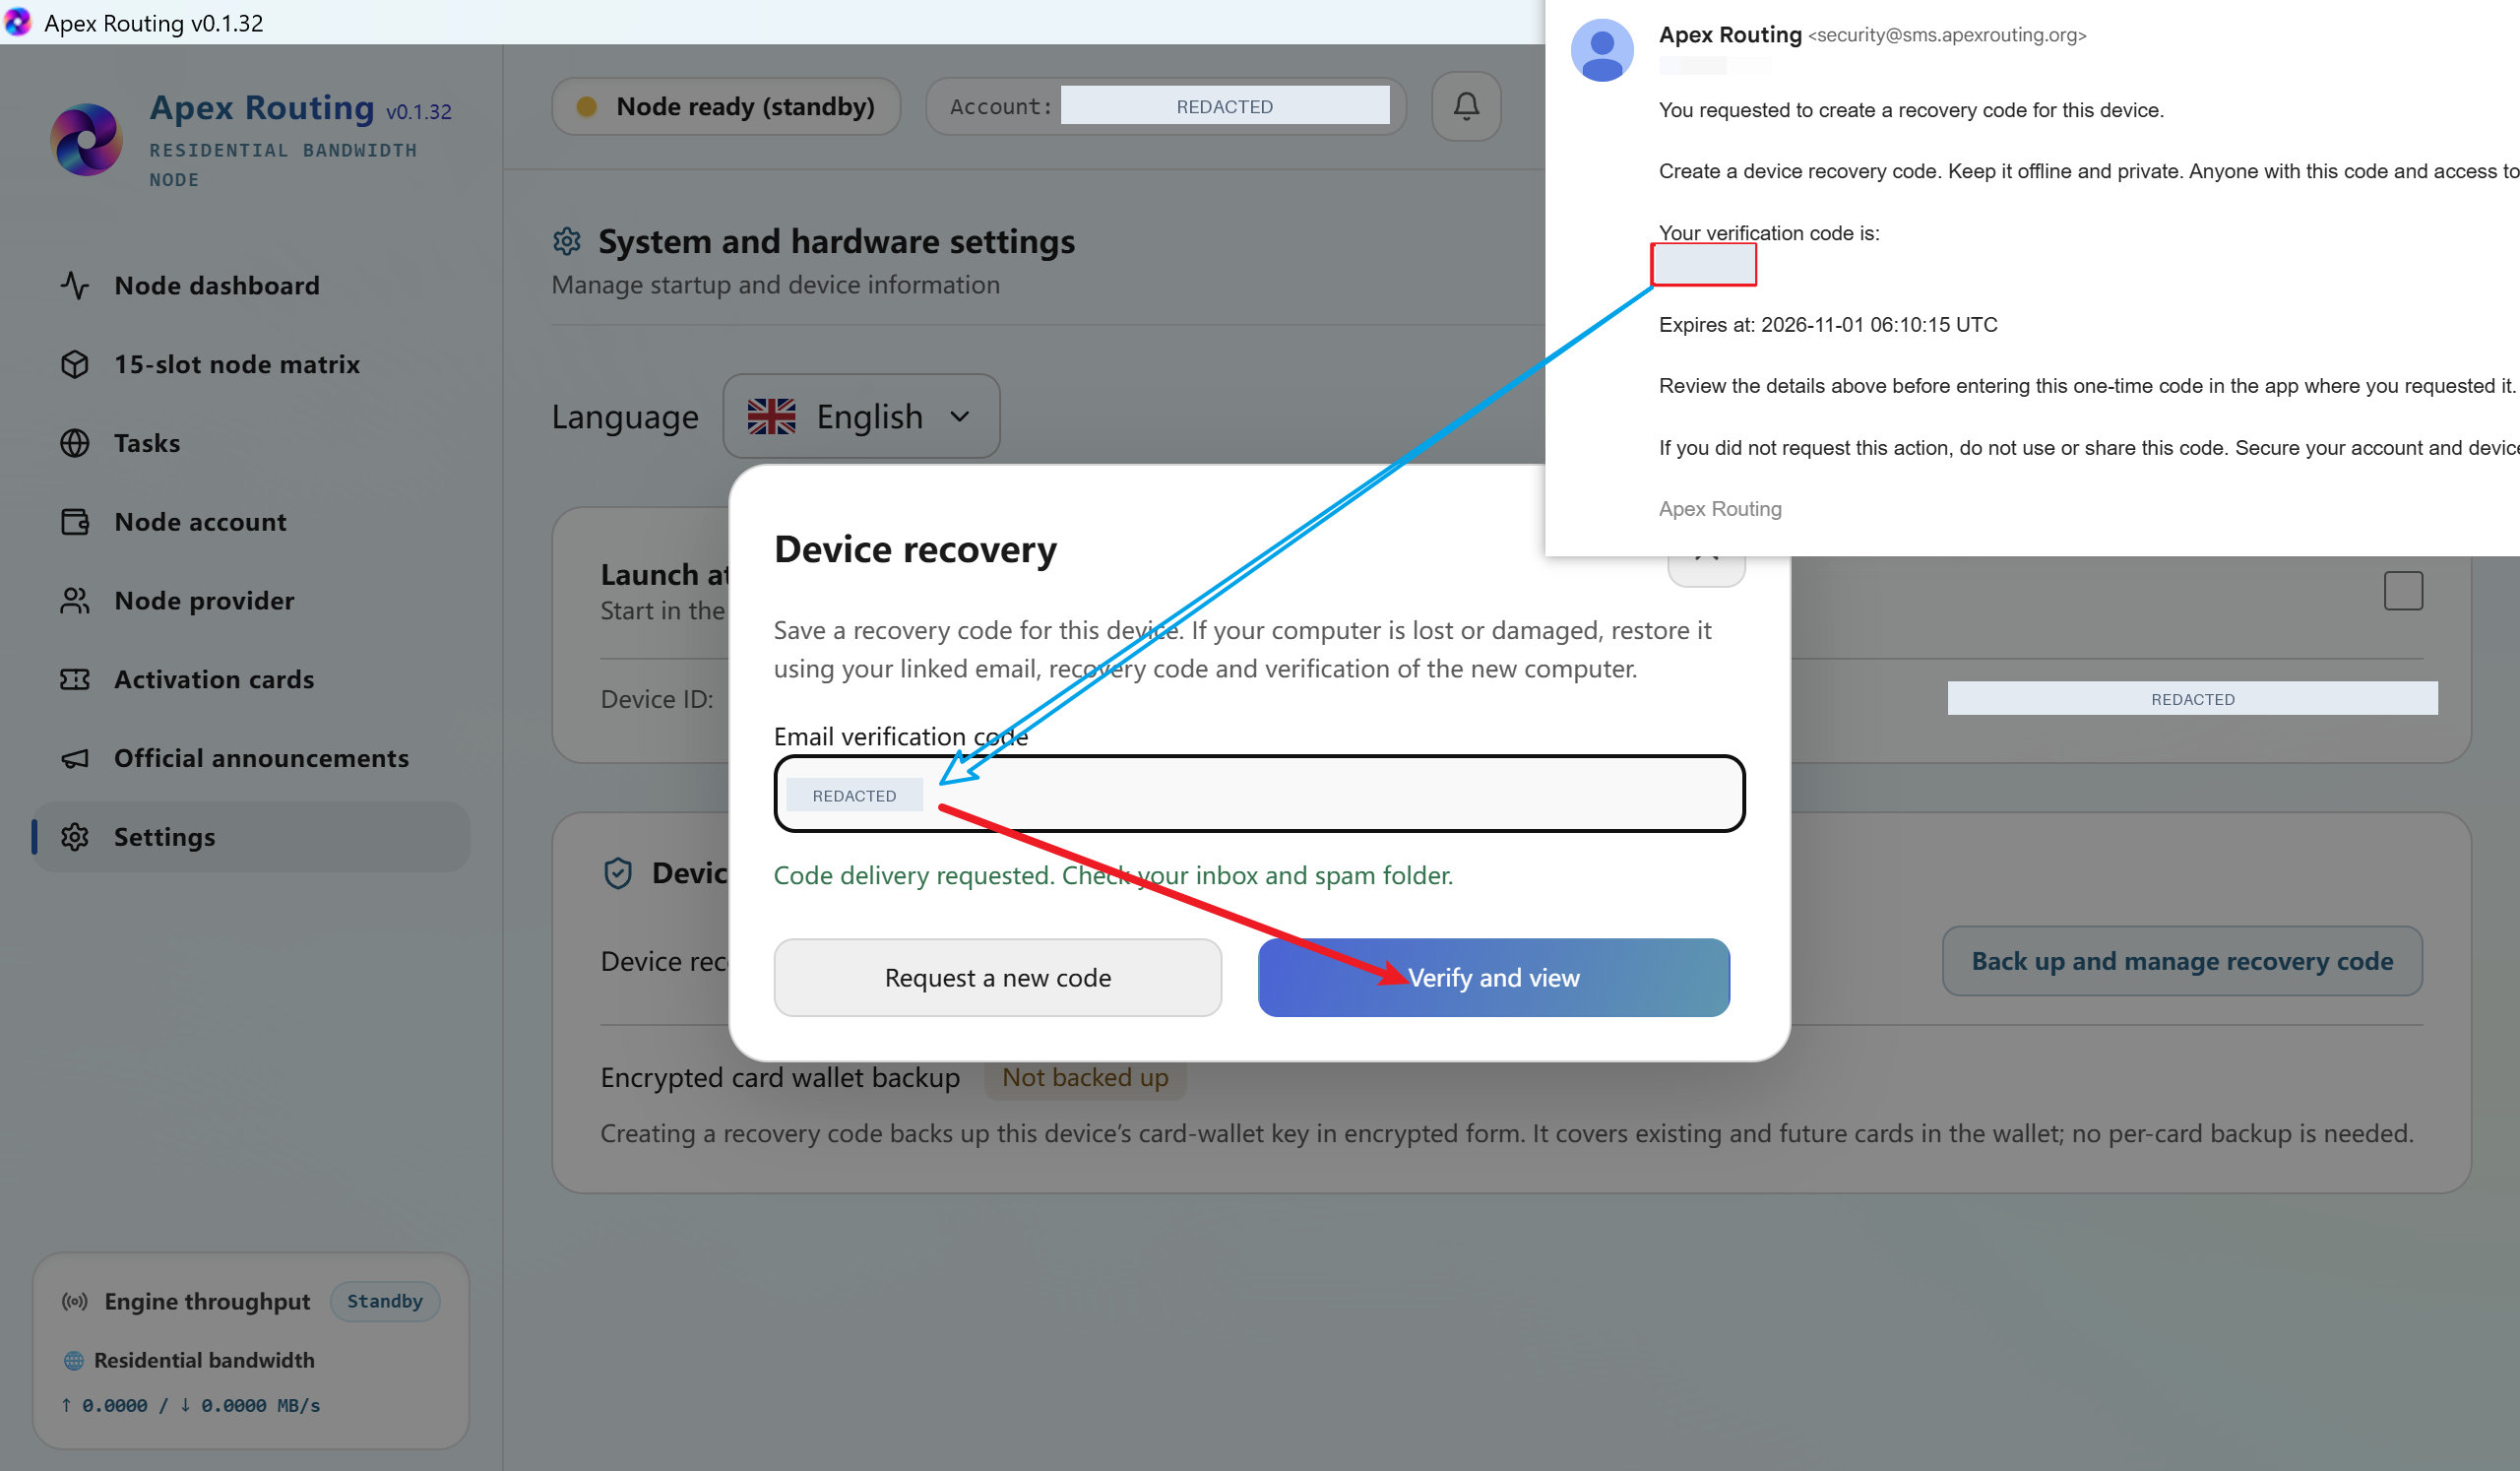
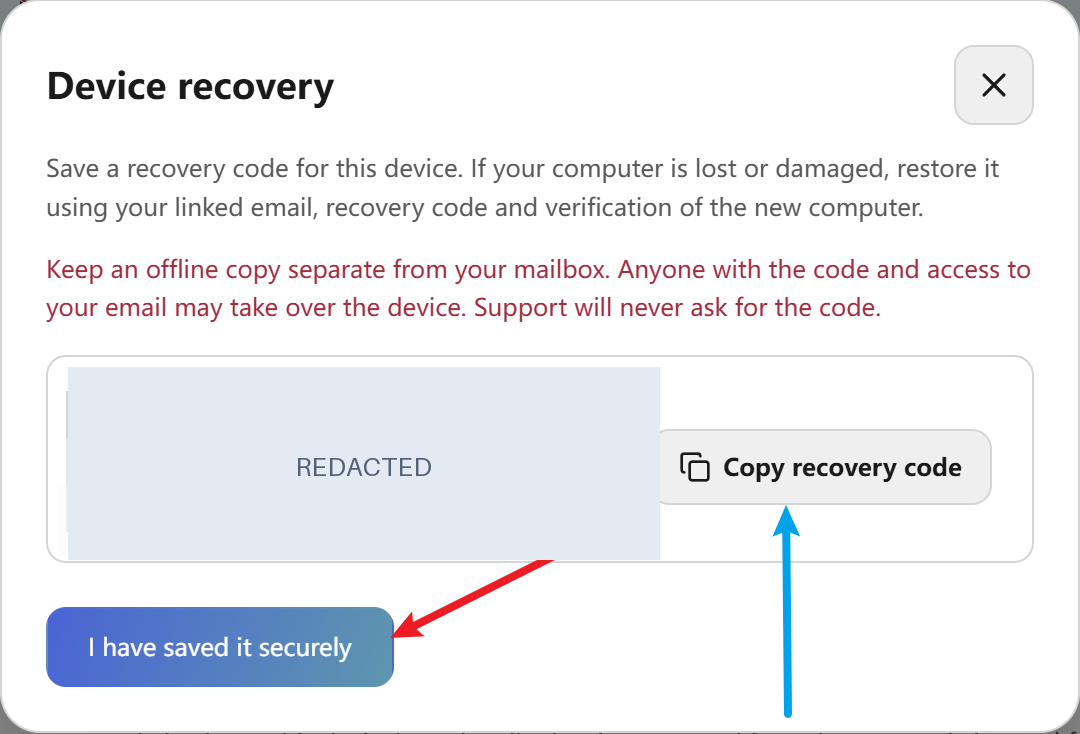
In the Device security and recovery section, click Back up and manage recovery code to open the device recovery dialog. The dialog explains that a recovery code can be used to verify ownership and recover the device on a new computer. Follow the on-screen prompts to request the code, review the information shown, and copy the recovery code if needed.
View larger Figure 7. Open the Device recovery dialog from the Settings page.Sensitive details hiddenView larger Figure 8. Request the recovery code from the Device recovery dialog.Sensitive details hiddenView larger Figure 9. Review the recovery code instructions presented in the dialog.Sensitive details hiddenView larger Figure 10. Copy the recovery code and confirm that you have saved it securely.Sensitive details hidden
06Review Your Recovery and Backup Status
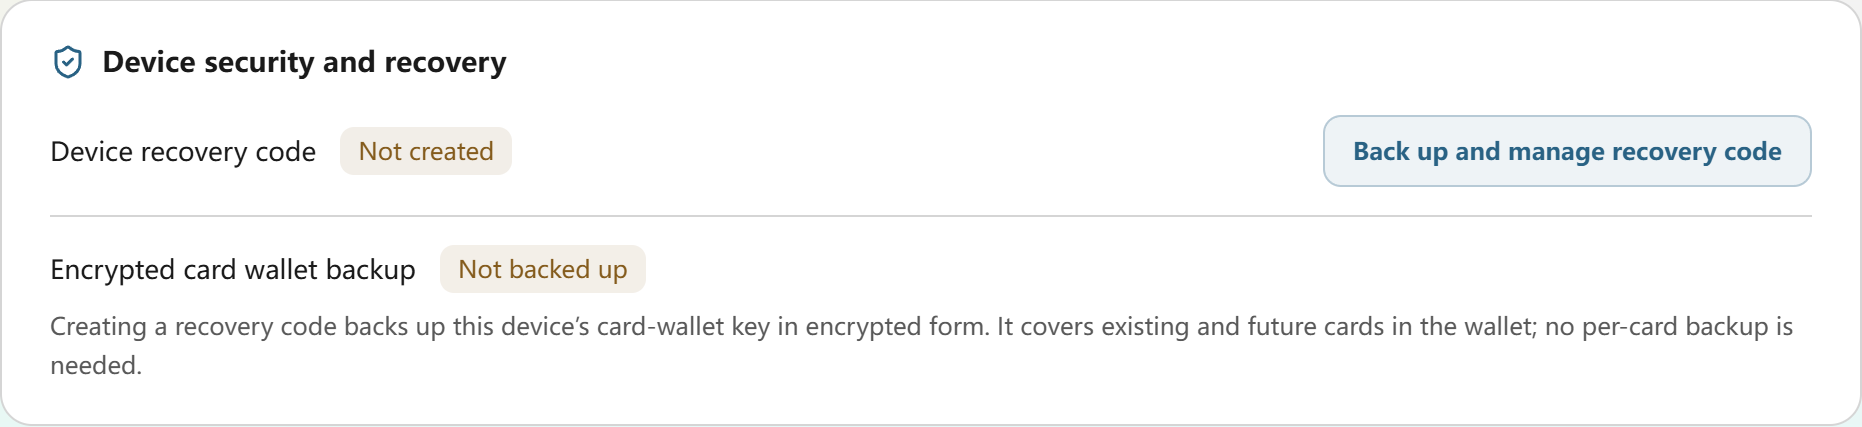
Return to the Device security and recovery section to review the current status for Device recovery code and Encrypted card wallet backup. These indicators help you confirm whether recovery and wallet backup actions have been completed on the current device.
View larger Figure 11. Review the current recovery code and encrypted card wallet backup status.
07You're All Set!
You have now completed the Device Settings, Security & Recovery guide.
Thank you for choosing Apex Routing. We're delighted to support you and truly appreciate your trust.
— The Apex Routing Team
Momentum / GUIDE 04
Slot activation & task management
Activate a slot and learn Manual and Automatic task modes.
Welcome to Apex Routing! This guide explains how to rent and activate a node slot for a 365-day term, confirm its running status, and understand the two available task-handling modes.
BEFORE YOU BEGIN
A valid activated slot is required before tasks can run. Keep the computer powered, connected to the internet, and awake, with Apex Routing running in the foreground or background. Do not shut down the PC, enter sleep/hibernation, or exit the app during active tasks.
NODE SLOT RENTAL | 365-DAY ACCESS Each 100 USDT activation payment provides one node slot with 365 days of rental access after successful activation. Renew the rental term after expiry to continue using that slot.
01Open the 15-Slot Node Matrix
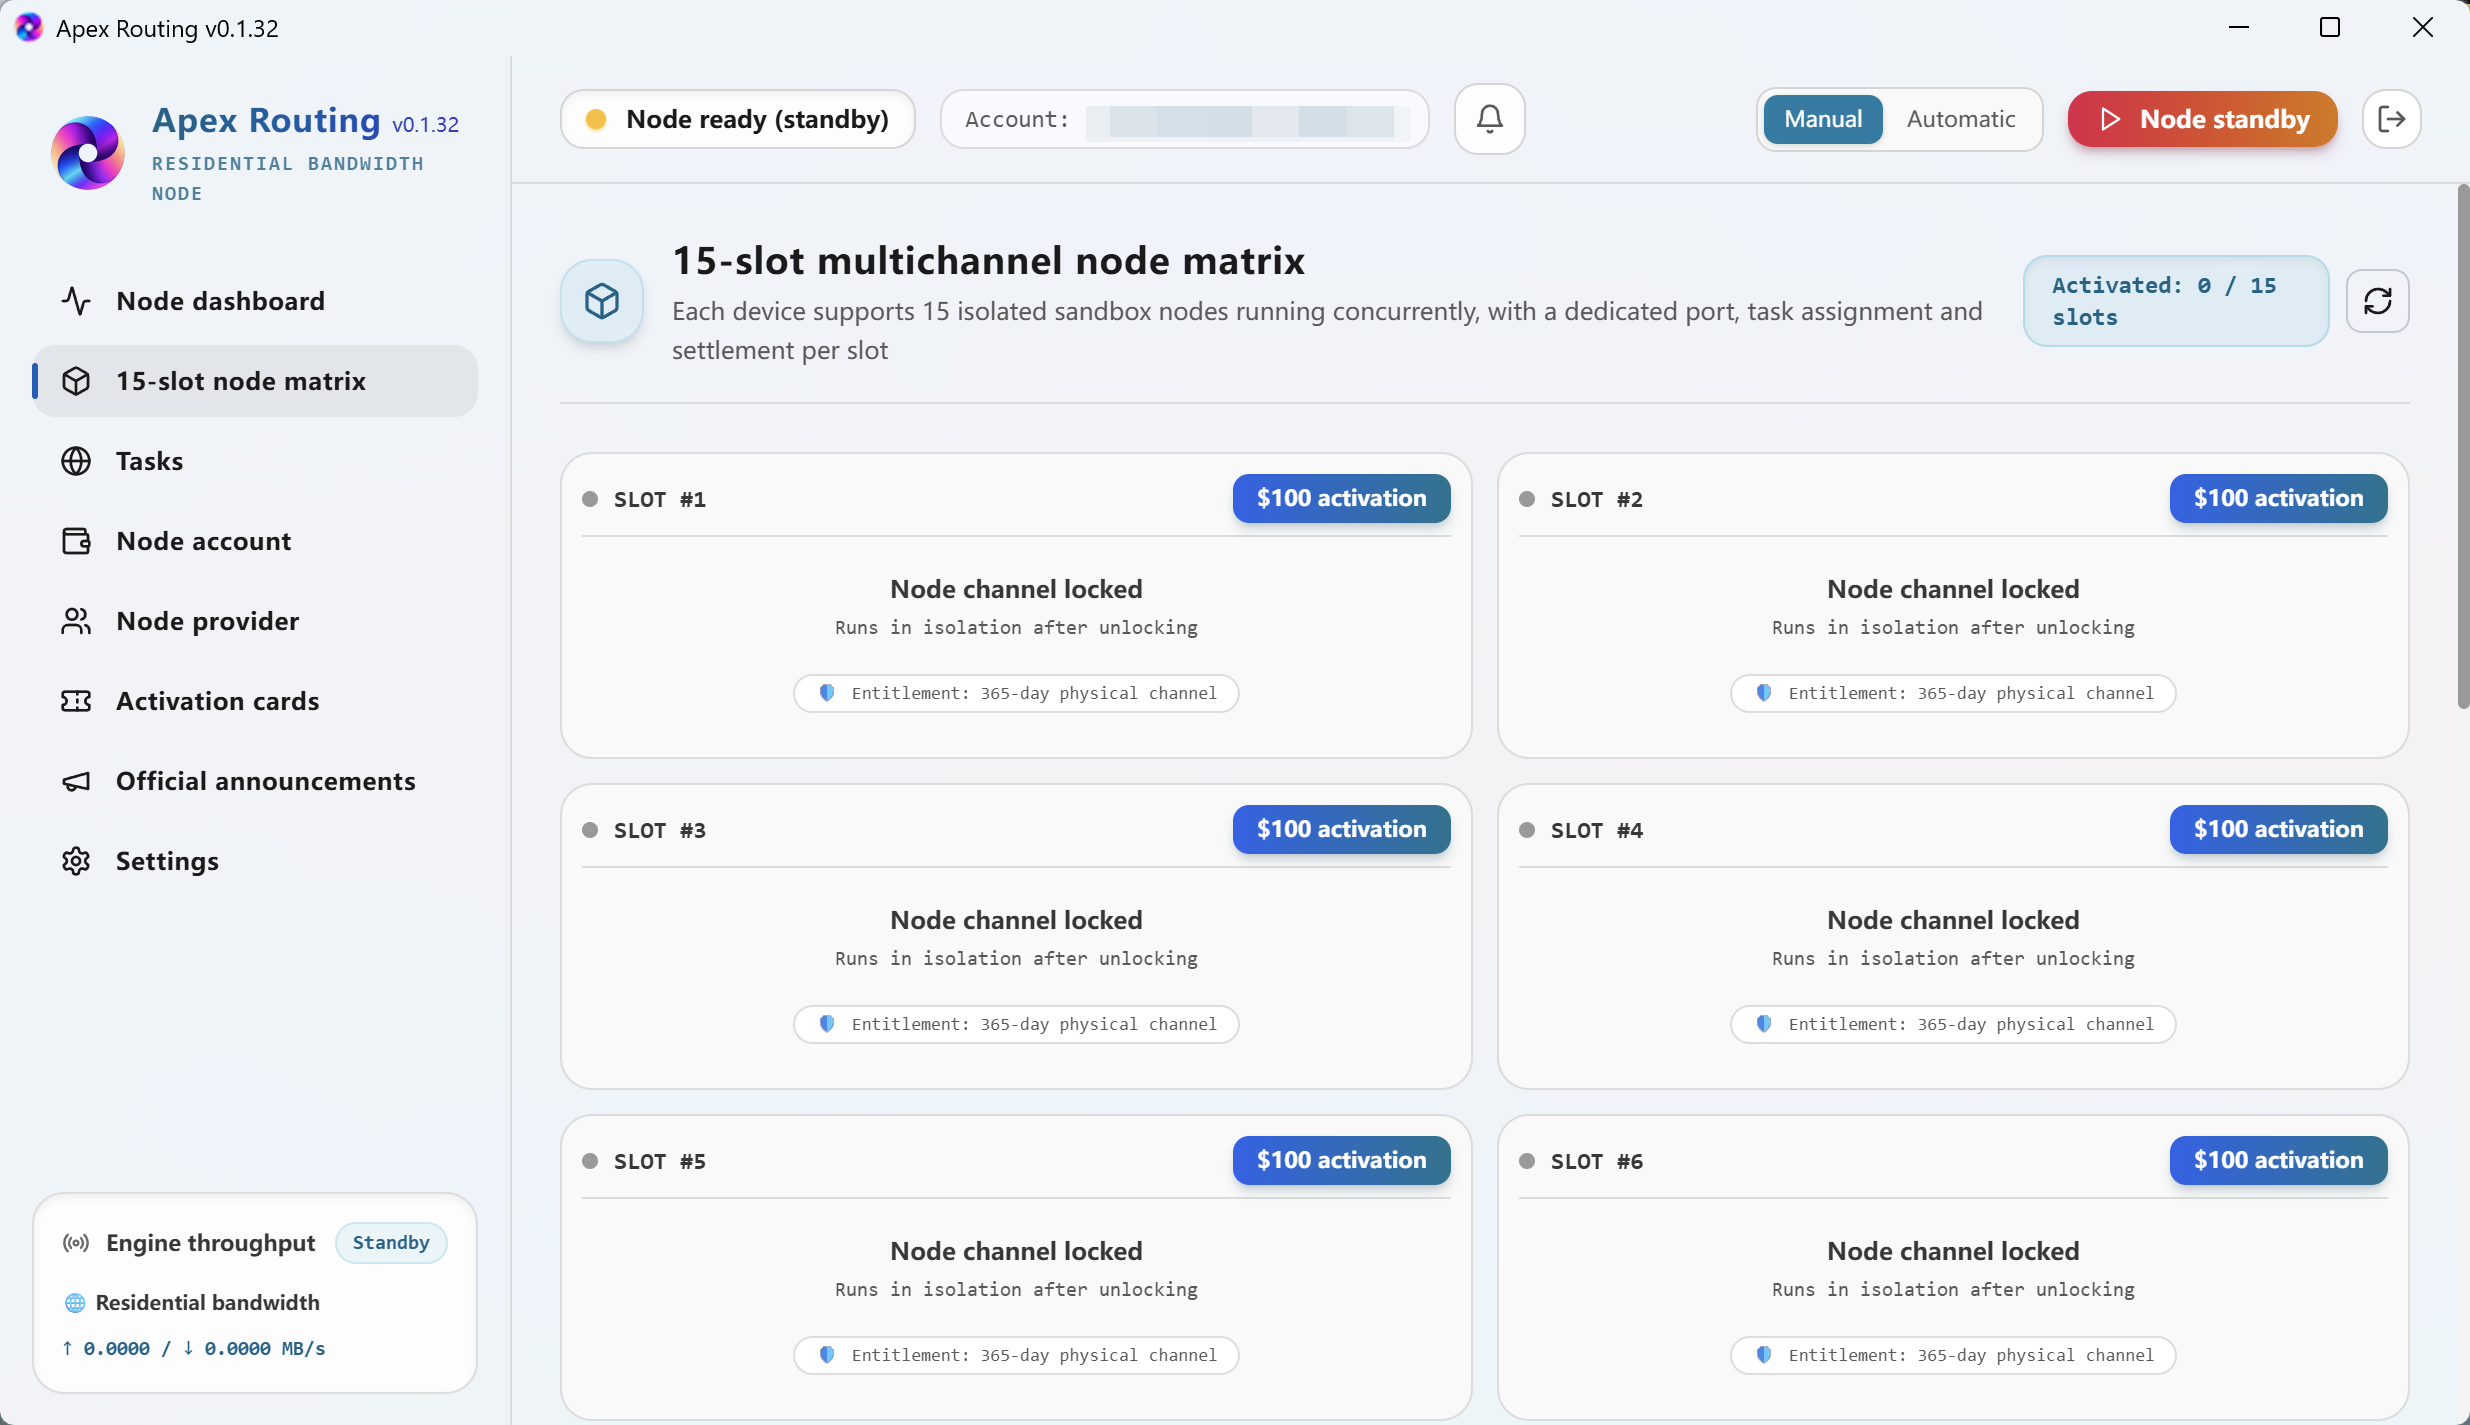
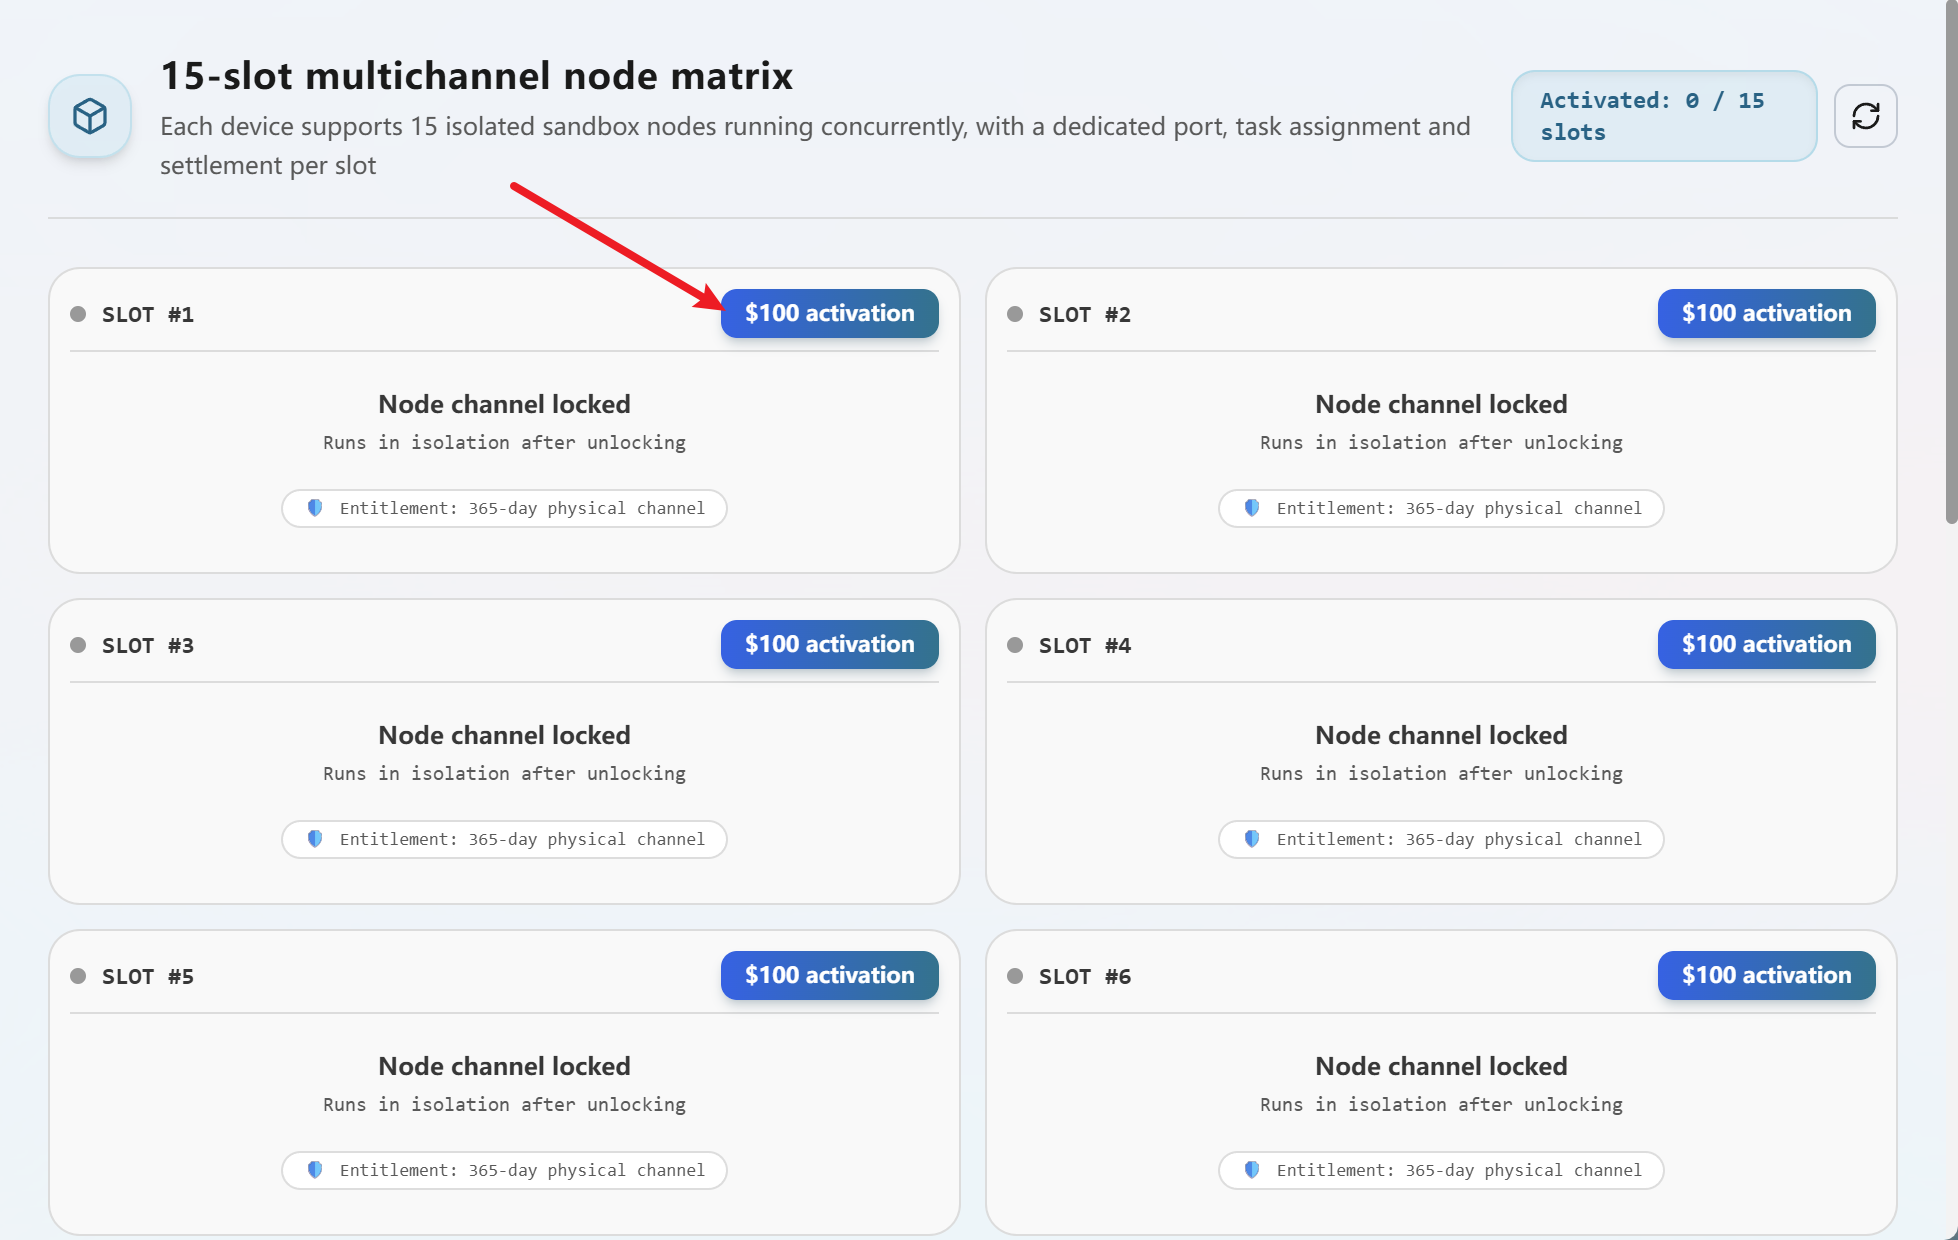
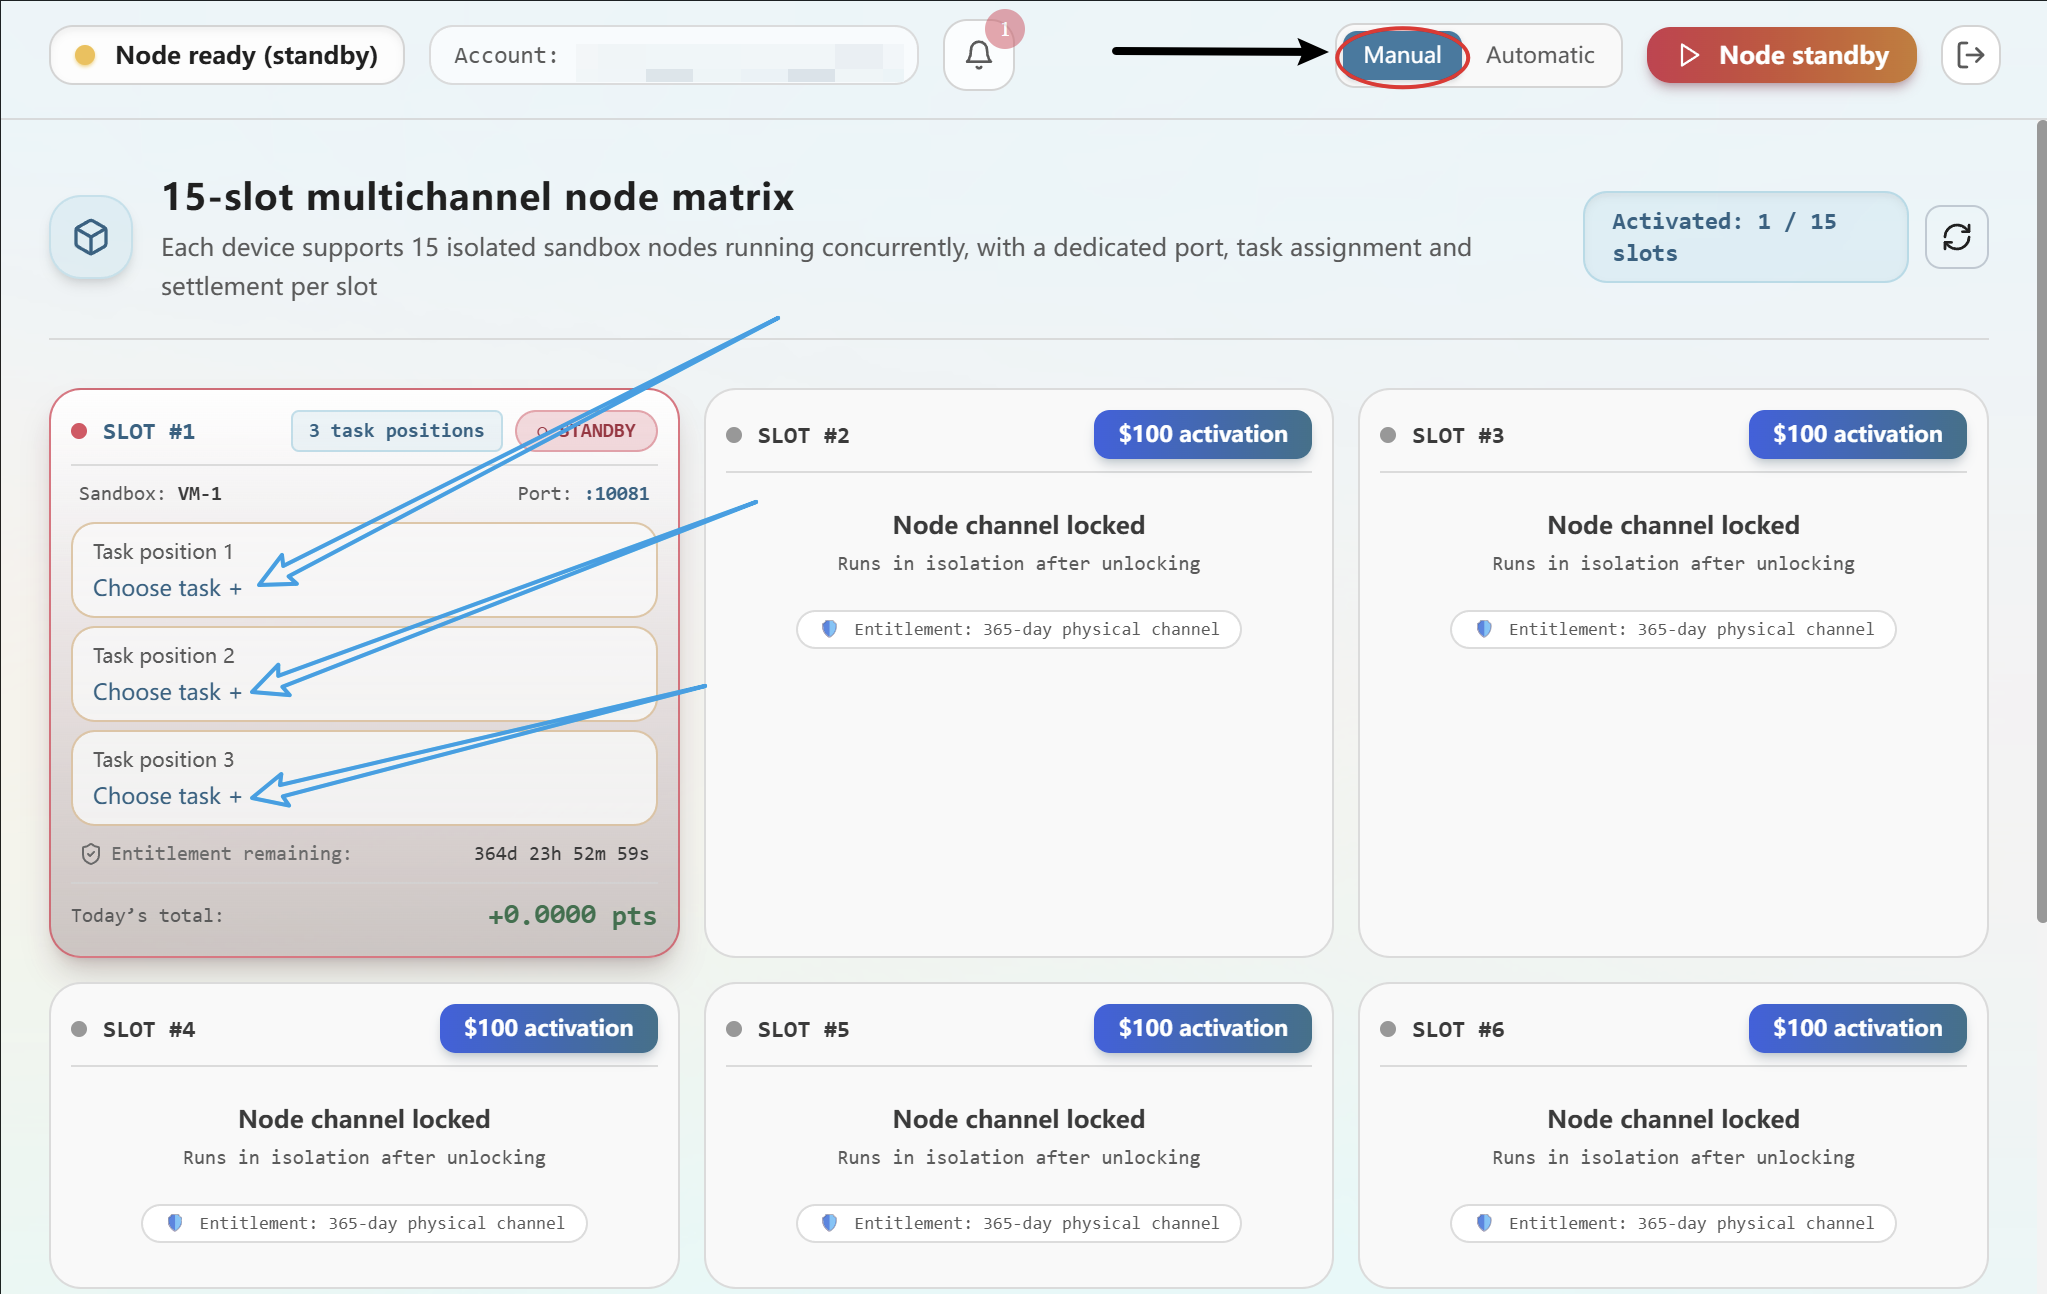
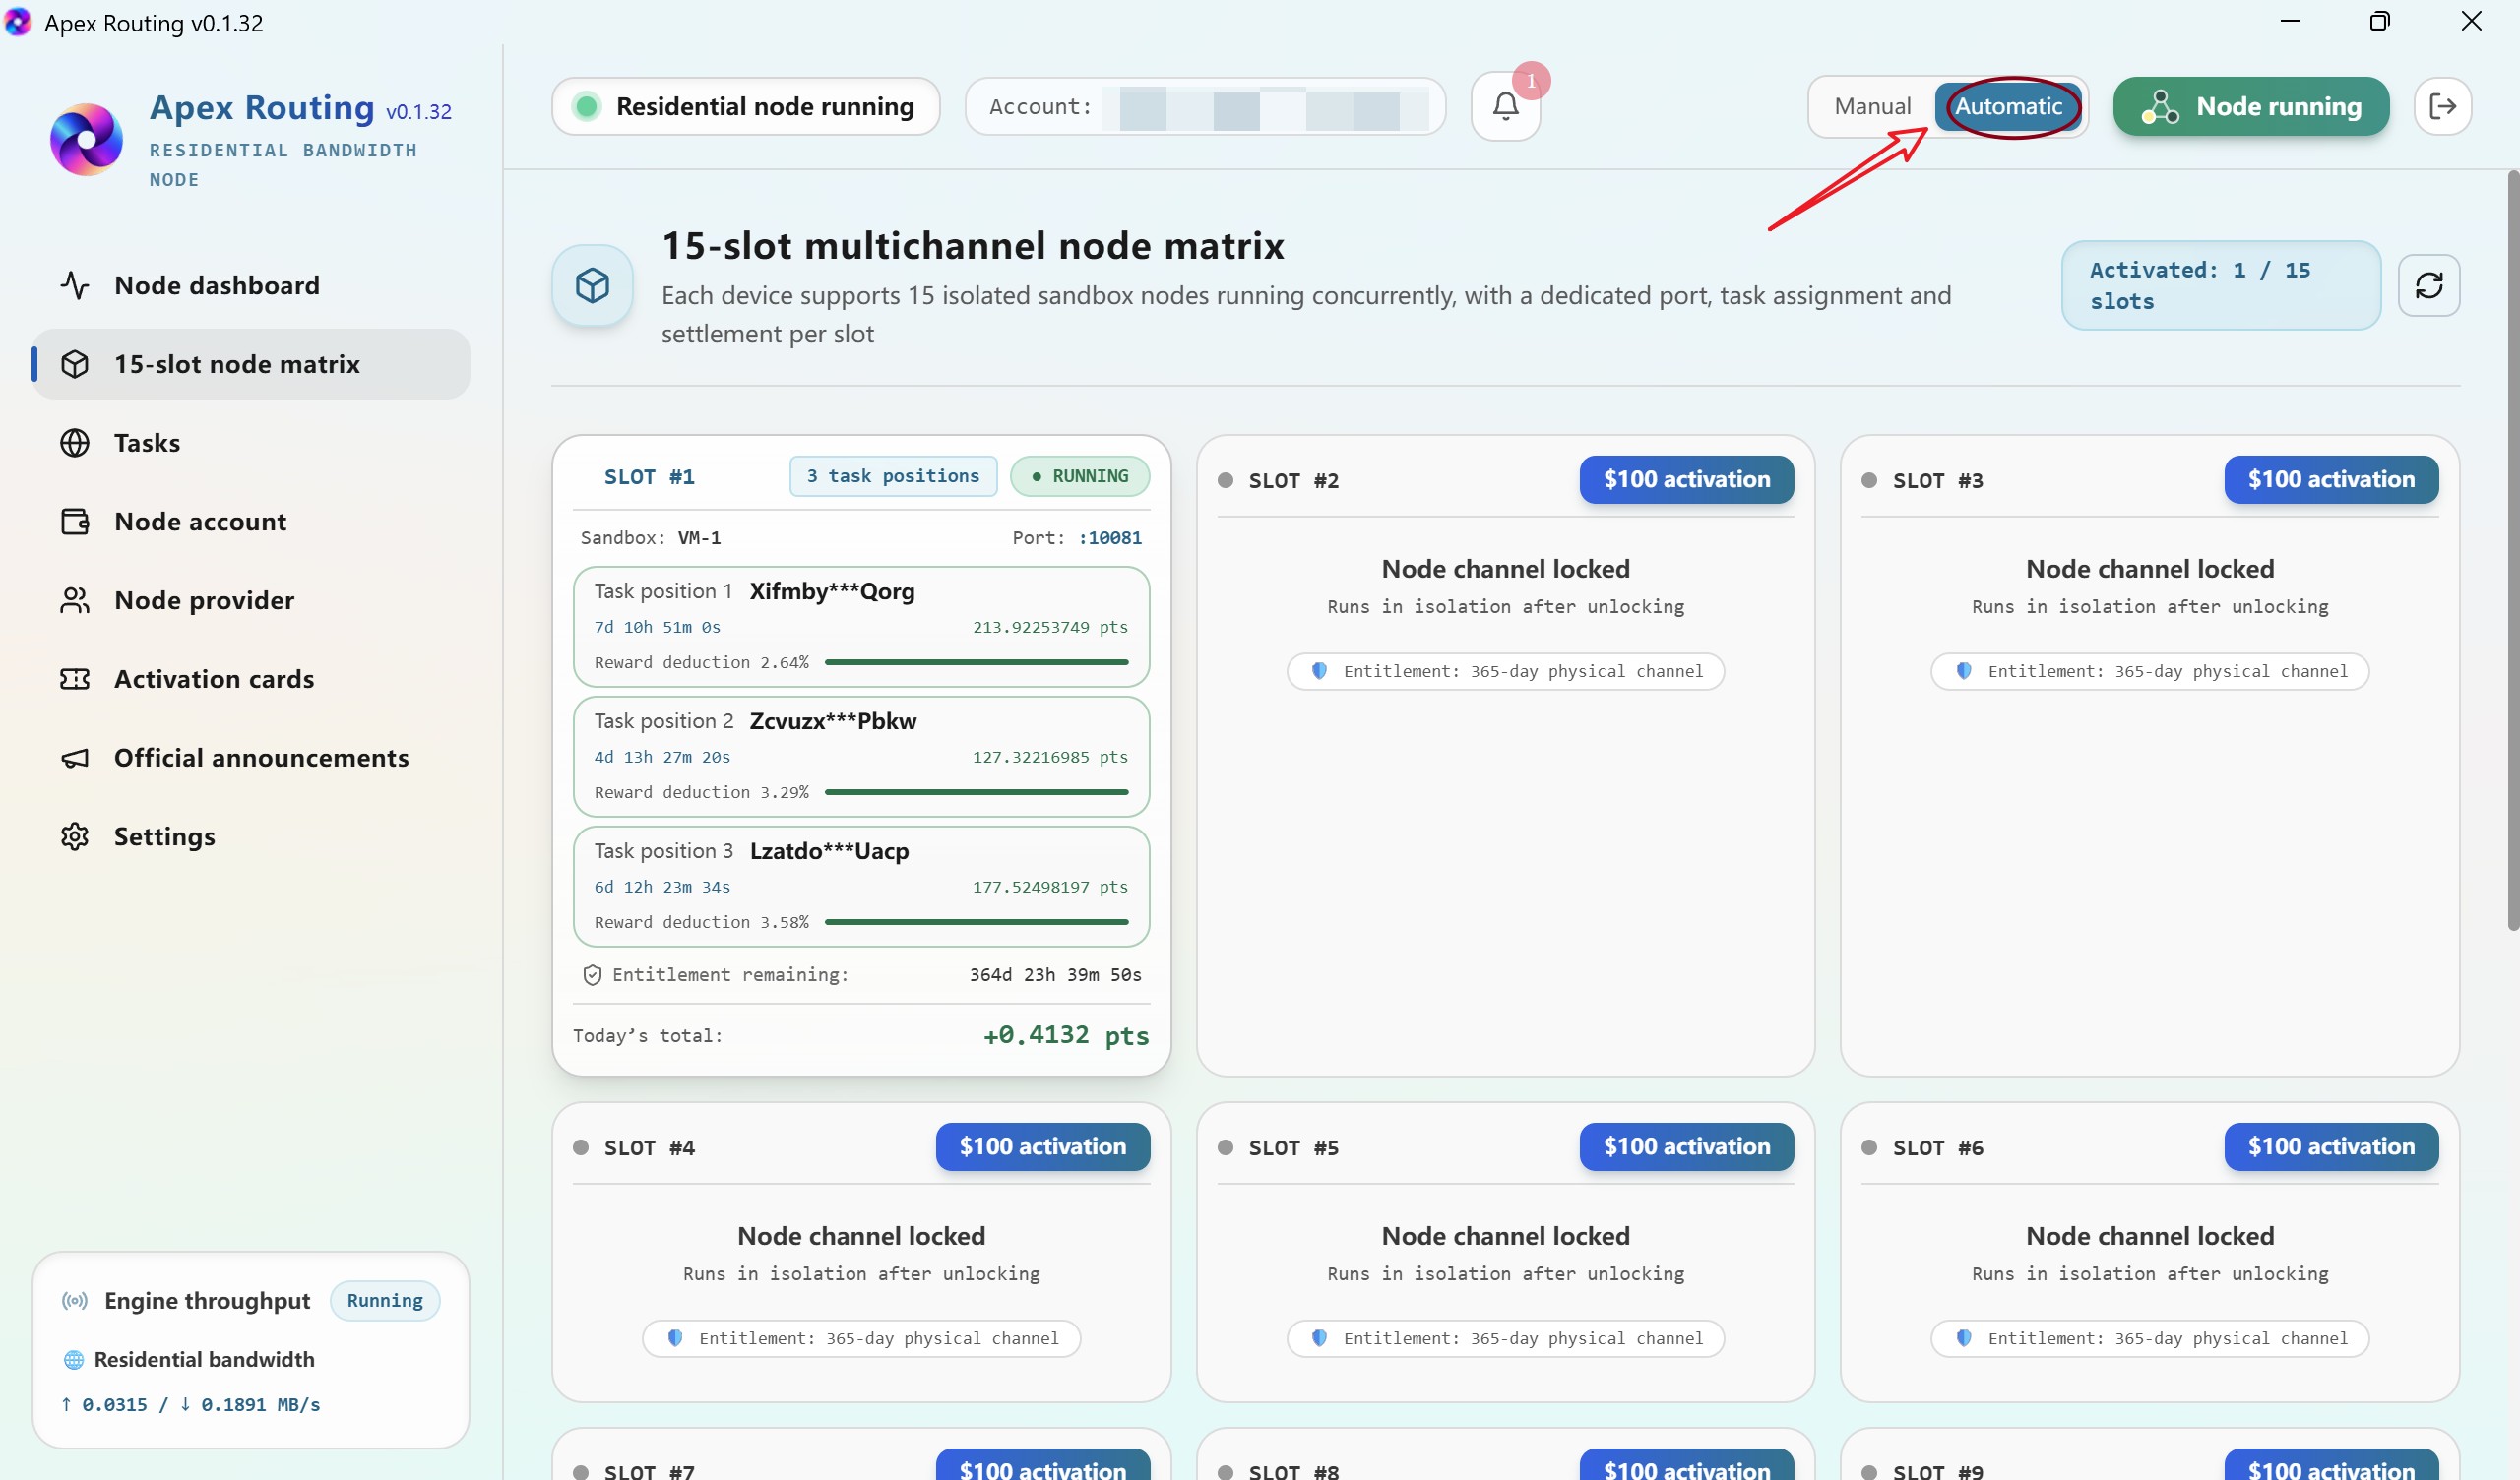
Select 15-slot node matrix from the left navigation menu. Locked slots display an activation button. Each activated slot provides up to three concurrent task positions during its 365-day rental term. The matrix supports up to 15 isolated slots per device, each with its own task positions and settlement information.
Choose the node slot you want to rent and select its $100 activation button. The 100 USDT shown is the fee for 365 days of slot access. The dialog provides Activate with USDT and Activate with a card; the accompanying screenshots demonstrate the USDT flow.
View larger Select an available slot for activation
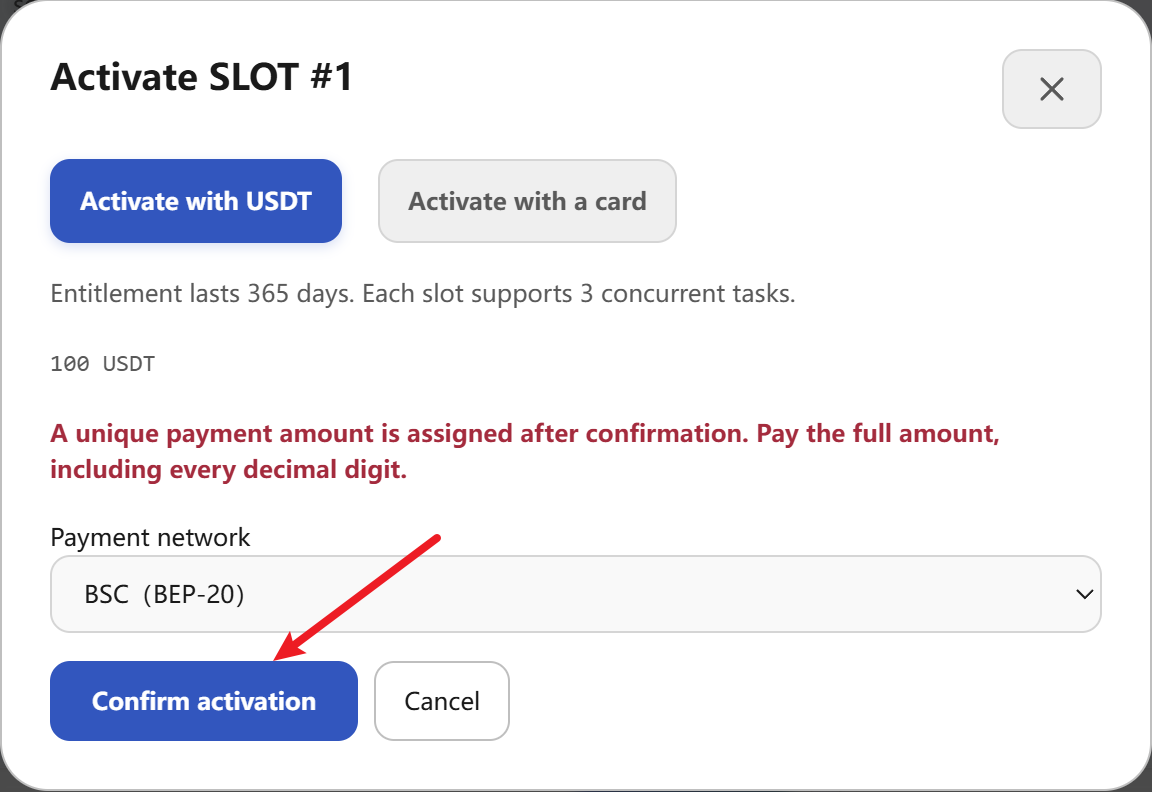
On the activation dialog, review the 365-day rental entitlement, the three task positions, and the payment network. Select BSC (BEP-20), then click Confirm activation to generate the payment order.
View larger USDT activation selection and confirmation
ALTERNATIVE — ACTIVATE WITH A CARD
If you already have a valid rental activation code, choose Activate with a card in the same dialog and follow the on-screen instructions. The screenshots here demonstrate direct USDT payment for a 365-day slot rental. Guide 05 explains how to obtain rental activation codes with points or USDT and store them in the encrypted card wallet. A code does not provide permanent ownership, and the rental term begins only after successful activation.
03Review and Complete the Payment Order
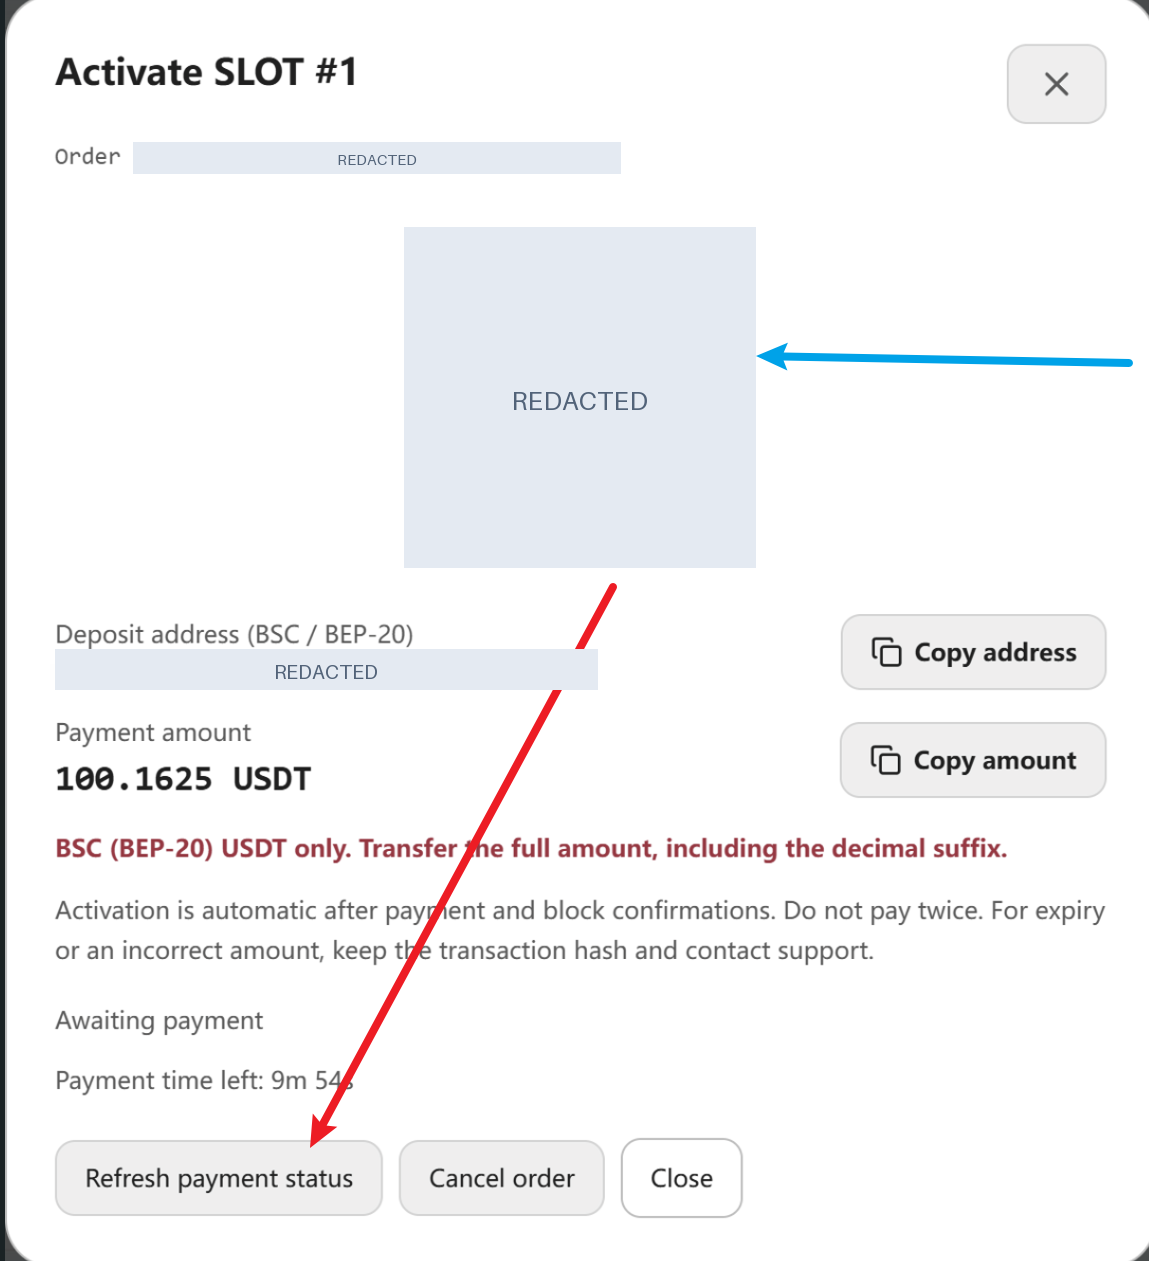
The order page displays a deposit address or QR code, the exact payment amount, and a payment time limit. The example shows 100.1625 USDT: your own order may have a different decimal suffix. Always use the amount and address displayed for your active order.
View larger Payment order and Refresh payment status controlSensitive details hidden
IMPORTANT — KEEP THE ORDER OPEN
After sending the correct BSC (BEP-20) USDT payment, allow time for payment detection and blockchain confirmations. Keep this order window open while waiting for the application to update. Do not select Cancel order or Close during this waiting period. Refresh payment status if necessary; do not make a duplicate payment.
If the order expires or an incorrect amount is sent, retain the transaction hash and contact support, as indicated by the payment window.
04Wait for the Activated Slot to Appear
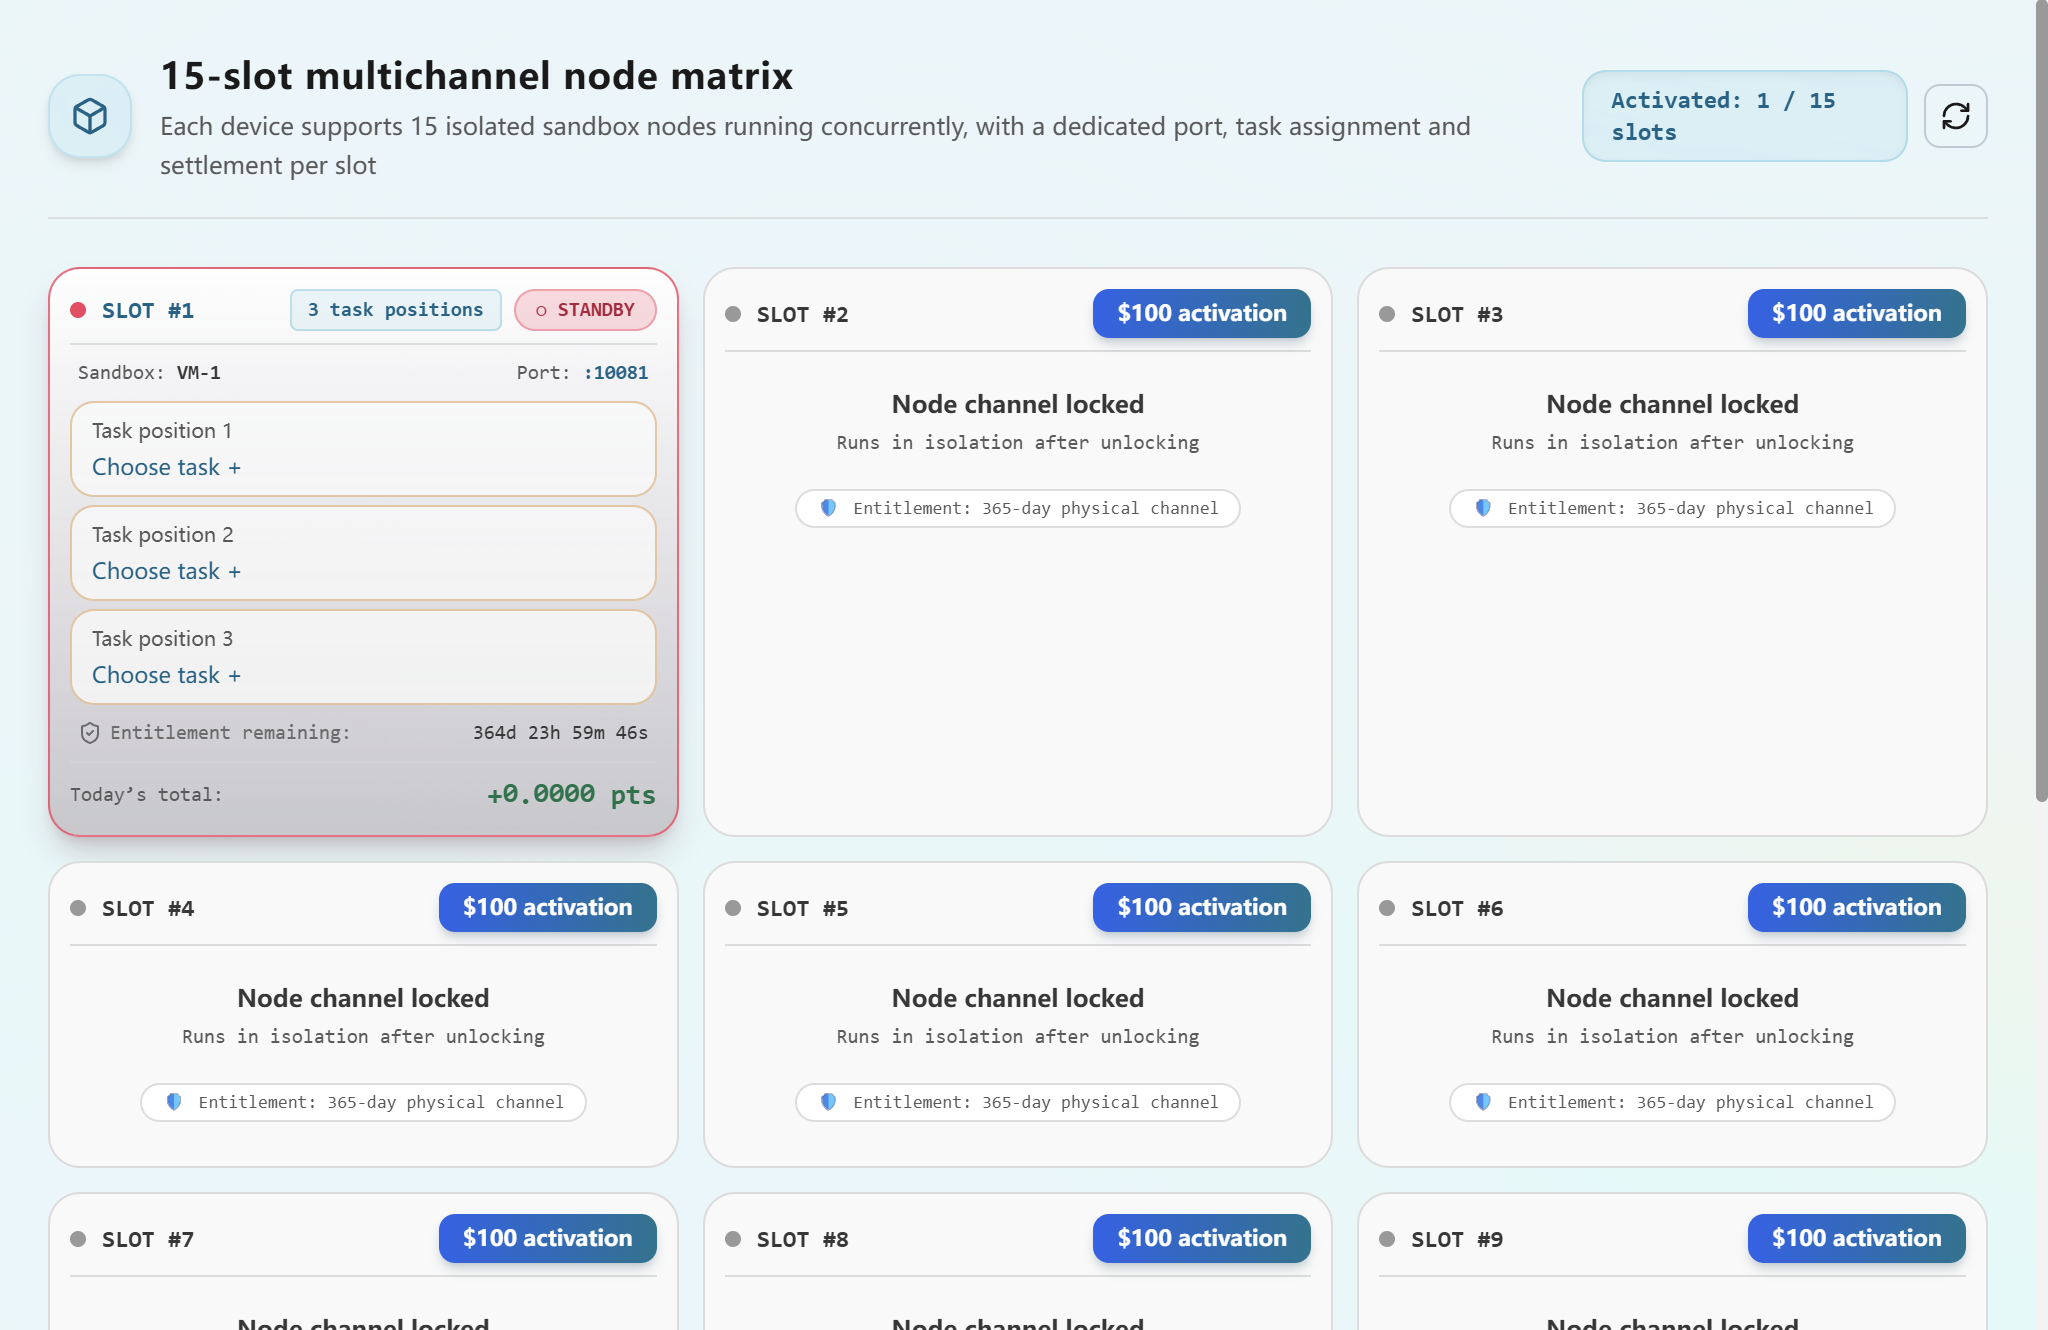
Once the slot rental payment is detected and confirmed, the application updates the node matrix. In the example, Activated: 1 / 15 appears, and SLOT #1 now shows three empty task positions. Allow the application to complete this transition rather than interrupting the order screen.
View larger Activated slot with three available task positions
ACTIVATED IS NOT THE SAME AS RUNNING
After activation, a slot can still show STANDBY. Before running tasks, use the main node control in the top bar to start the residential node and verify that the status changes to RUNNING. The Automatic-mode screenshot later in this guide shows the running indicators. Activation alone does not start a task or guarantee task availability.
An activated slot displays its sandbox, assigned port, available task positions (up to three), remaining rental term and points earned today. These indicators provide a clear view of slot capacity, status and currently assigned work.
TASK HANDLING Manual Mode
05STEP 5A Choose Manual and Open a Task Position
Select Manual in the top control bar. In your activated slot, choose an empty task position using Choose task +. Manual mode uses the full 100% compute allocation for eligible work, without the additional 30% reduction associated with Automatic mode.
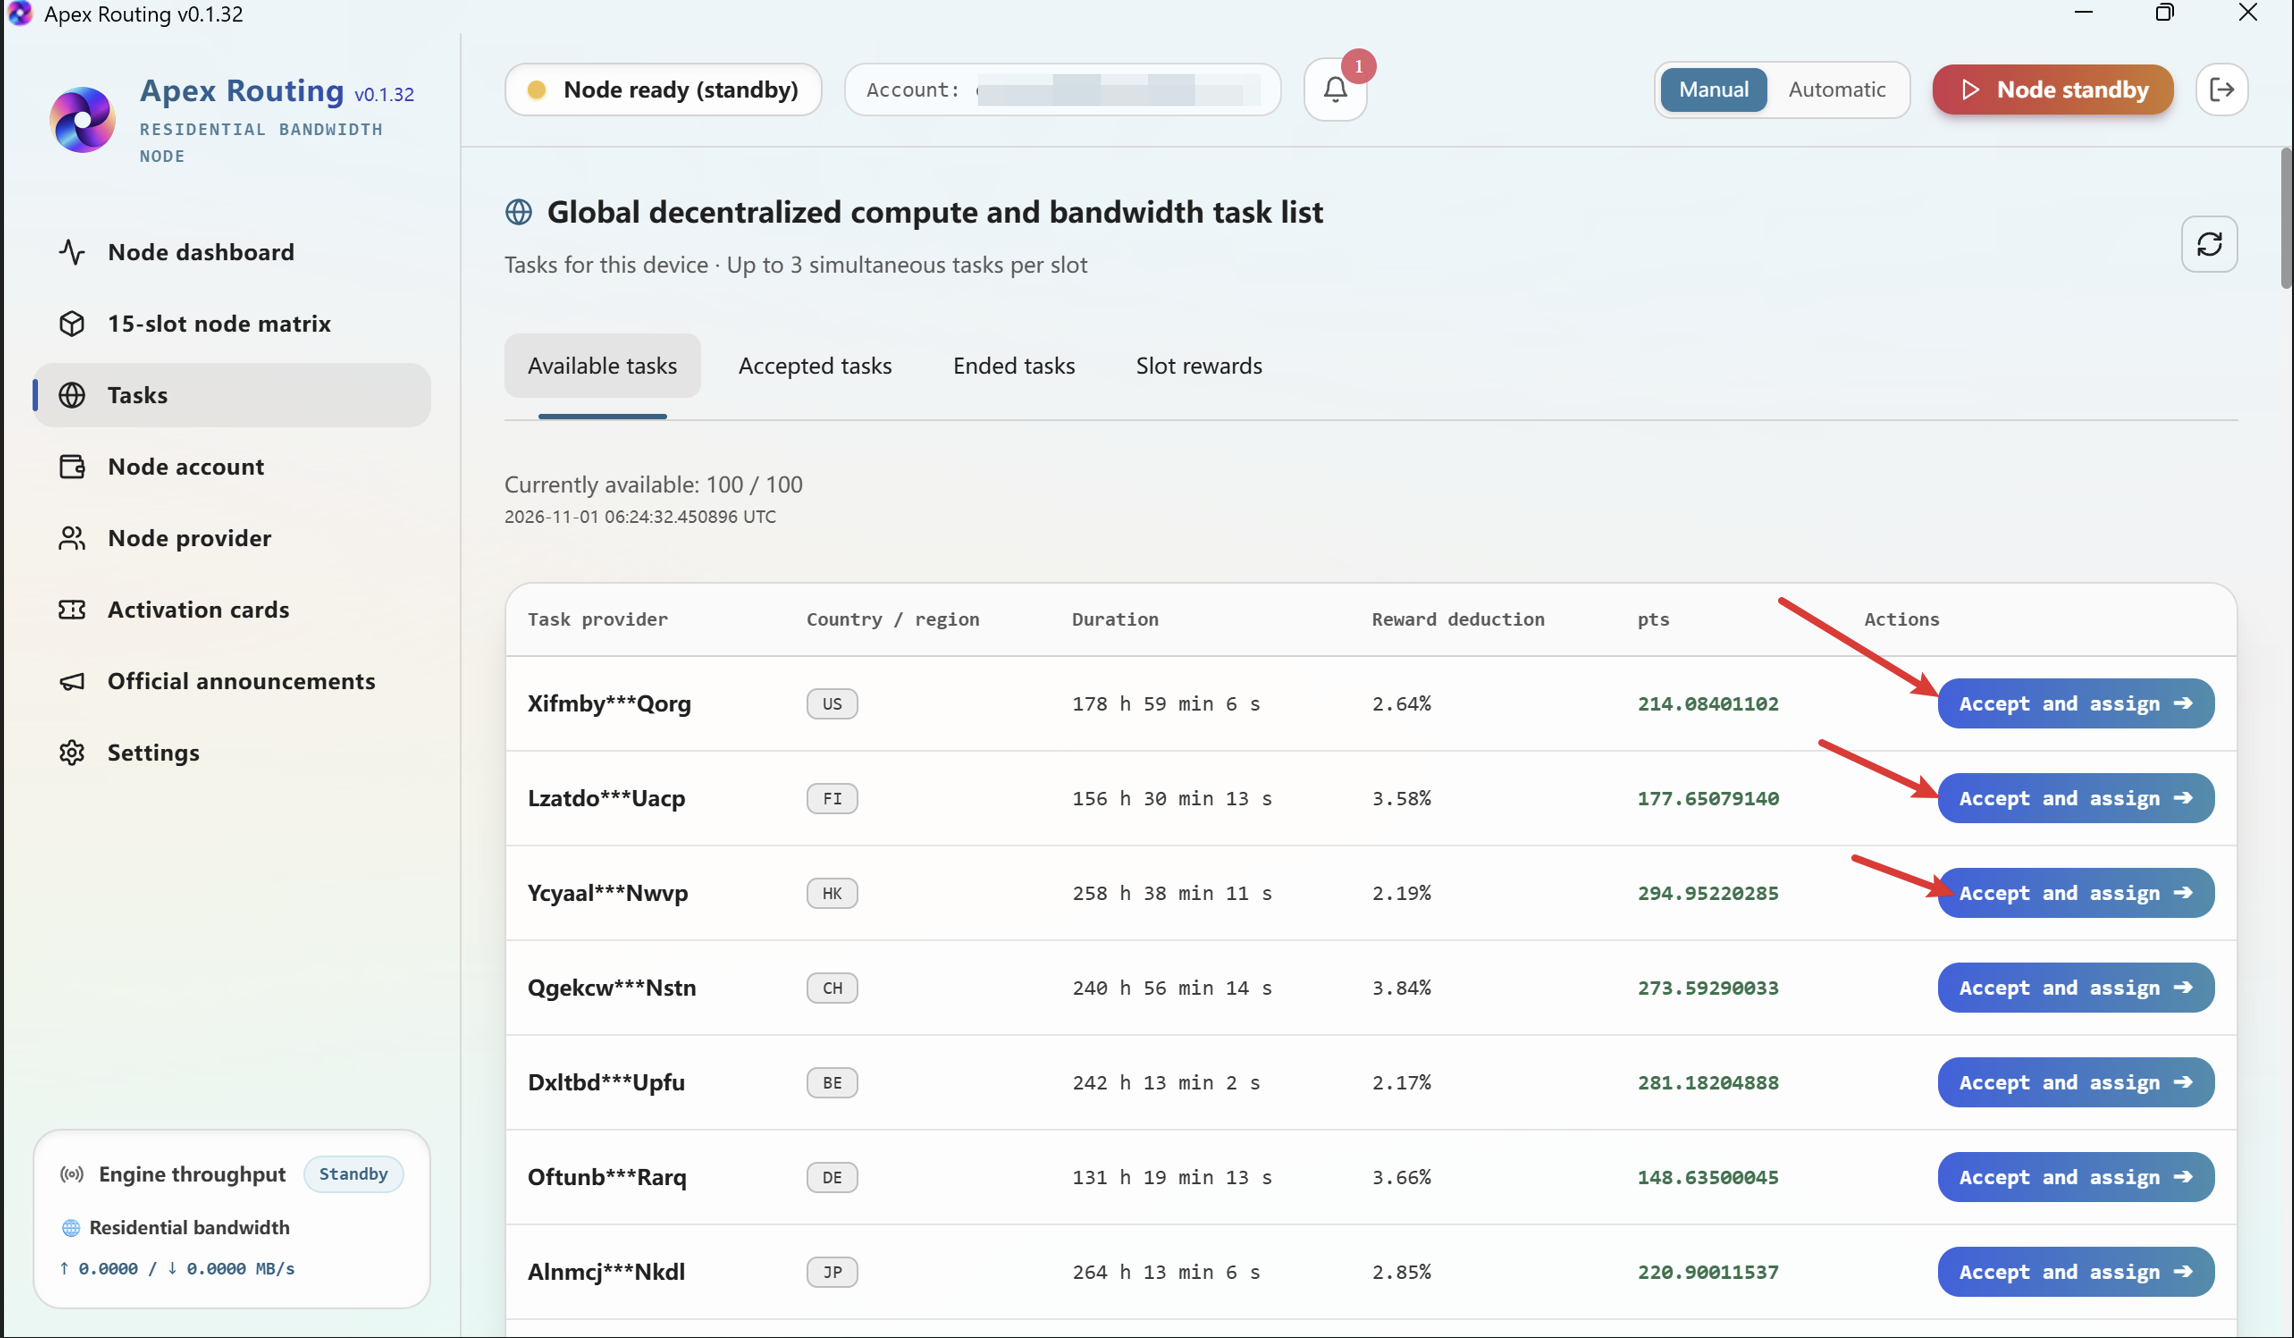
Open Tasks → Available tasks, review the provider, region, duration, reward deduction, and points, then click Accept and assign for the task you want. Each accepted task is assigned to an eligible open position.
View larger Available tasks and Accept and assign buttons
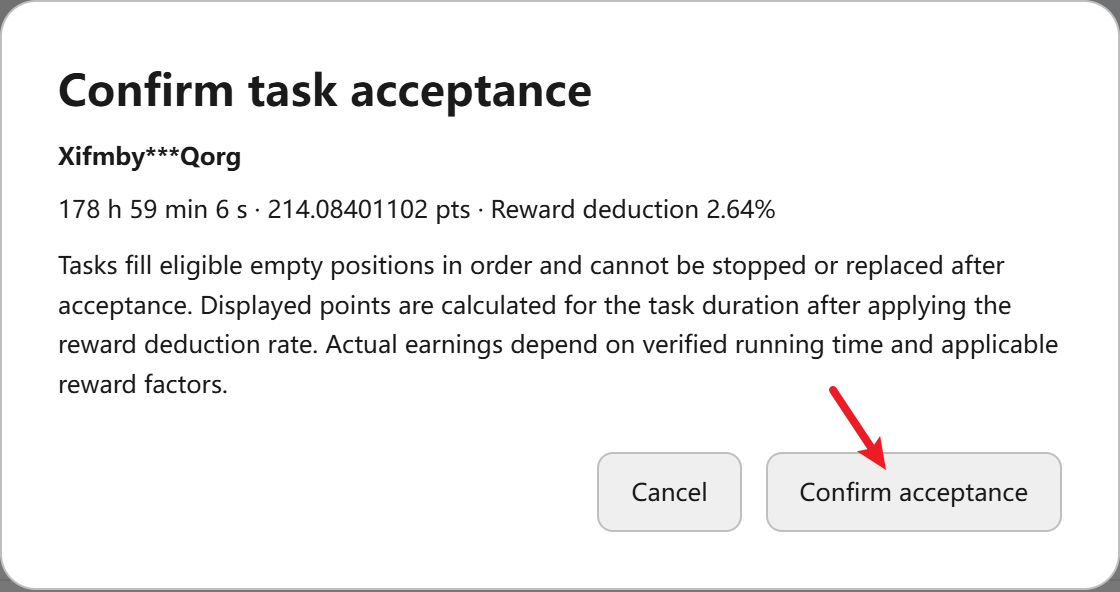
07STEP 5C Review the Confirmation Details
Before accepting a task, review its duration, points and Reward deduction. The illustrated 2.64% deduction reflects the task-level operating environment, including conditions such as power stability and network continuity. Manual Mode uses the full 100% compute factor, while Automatic Mode uses 70% and can pick up subsequent eligible tasks automatically. Confirm the displayed task terms before acceptance, which commits the position until the task expires.
View larger Confirm task acceptance and read its terms
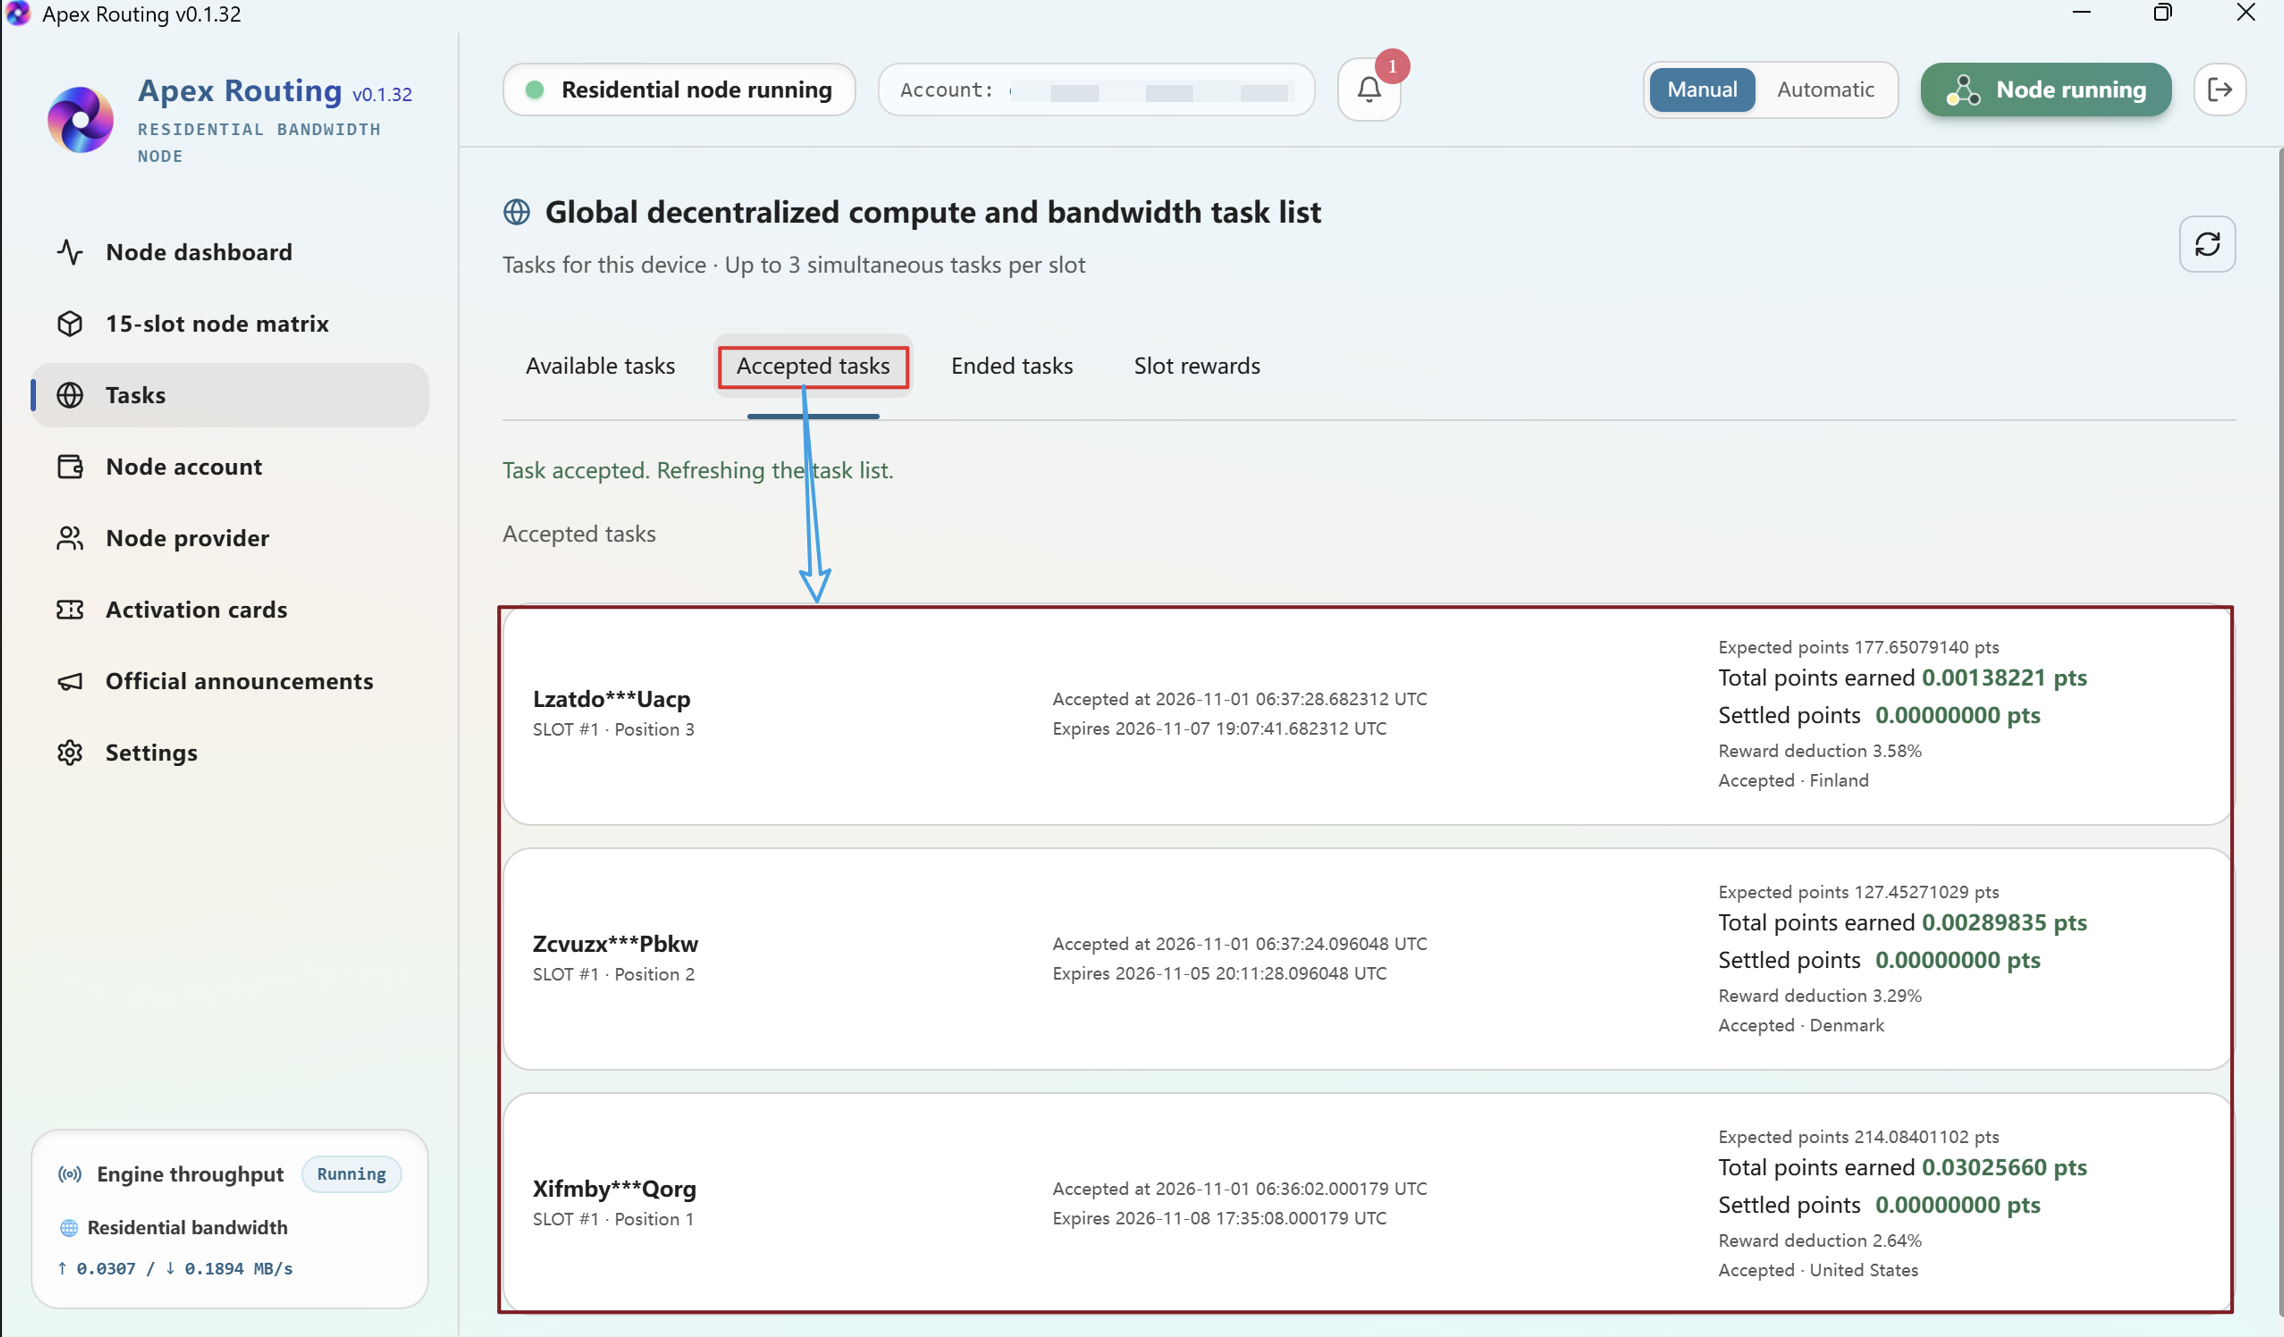
08STEP 5D Check the Accepted Tasks List
Open Accepted tasks to see the tasks assigned to the slot, their positions, expiration times, displayed reward deductions, and points earned or settled. The screenshot shows accepted tasks assigned across three positions.
View larger Accepted task details and position assignments
When a task reaches its time limit, open Tasks → Ended tasks to review ended tasks. In Manual mode, return to Available tasks and accept another task for the empty position. In Automatic mode, the application can select another eligible task when one is available.
TASK HANDLING Automatic Mode
09Enable Automatic Task Handling
Choose Automatic in the top control bar to have the application automatically accept eligible tasks into available slot positions. No manual acceptance steps are necessary in this mode. When a task reaches its time limit, the application can select another available eligible task without requiring you to return to the task hall.
View larger Automatic mode selected while the node is running
AUTOMATIC MODE — 70% COMPUTE ALLOCATION
Under the stated operating rule, Automatic uses 70% of the compute allocation. Relative to a comparable full-capacity Manual task, this represents a 30% reduction in compute-based earning capacity. Its advantage is ongoing automatic task selection, subject to task availability.
IMPORTANT Manual vs Automatic — Know the Difference
Both modes use the same activated slot and require the computer and Apex Routing application to remain running. The practical trade-off is compute allocation versus hands-free task renewal.
MANUAL
100% COMPUTE
• You choose tasks in the task hall.
• No extra 30% automatic-mode compute reduction.
• When a task expires, you must accept the next one yourself.
• If you do not return, its task position remains empty.
AUTOMATIC
70% COMPUTE
• The application selects tasks in the background.
• 30% lower compute-based earning capacity than full-capacity Manual mode.
• When a task expires, the app can select the next eligible task automatically.
• Task positions can still be empty when no eligible tasks are available.
IMPORTANT — OPERATING CONDITIONS & REWARD LOSS
The 2.64% Reward deduction shown in the example is an indicator of potential task reward loss under the current operating conditions. Unstable network connectivity, power interruptions, or other disruptions may affect task execution and the points ultimately settled. This figure is an example, not a fixed deduction rate or a Manual-mode service charge. It is also separate from Automatic mode's 30% reduction in compute allocation. For more consistent operation, maintain stable power, reliable internet, and an awake computer with Apex Routing running.
REQUIRED Keep Your Node Running Continuously
Whether you select Manual or Automatic, task execution depends on the following conditions:
Have an activated slot with an eligible position for tasks.
Keep your computer connected to reliable electrical power.
Maintain a stable internet connection.
Keep Apex Routing running, including in the background when the main window is not in view.
Do not shut down the computer, use sleep or hibernation, or close Apex Routing while tasks are active.
For a simple, uninterrupted setup, keep the display active and adjust Windows power settings so automatic screen-off, sleep, or hibernation do not interrupt the node.
KEEP THE COMPUTER ON AND AWAKE
To avoid interruptions, keep your computer awake and Apex Routing running with a stable connection. A display turning off is not necessarily the same as Windows sleeping; nevertheless, keeping the screen active and disabling sleep timers is the clearest setup for continuous operation.
In Manual mode, remember to check the task hall as tasks reach their expiry times. In Automatic mode, the application can continue selecting eligible replacement tasks without manual acceptance, provided the service has tasks available.
You're All Set!
You have now completed the 365-day node-slot rental activation and task-handling guide. Thank you for choosing Apex Routing and for taking the time to learn how your node operates.
— The Apex Routing Team
Momentum / GUIDE 05
Wallet, points & USDT
Claim points, manage withdrawals and use activation cards.
Welcome to Apex Routing! This guide walks you through claiming slot points, converting points to USDT, linking your BSC receiving address, requesting USDT withdrawals, transferring points and using activation codes for 365-day node-slot rentals. Each operation is paired with the relevant application screen for easy reference.
NODE SLOT RENTAL | 365-DAY ACCESS Each 100 USDT activation-code payment grants a single node slot’s 365-day rental entitlement after successful activation. Renew the rental term after expiry to keep the slot available.
WHAT YOU WILL LEARN
01 Collecting slot points and converting points to USDT · Images 1–6
02 Linking your BSC (BEP-20) receiving address · Images 7–11
03 Requesting a USDT withdrawal to your linked BSC address · Image 12
04 Sending points to trusted recipients · Images 13–15
07 Unlocking your card wallet and activating a rented slot · Images 21–27
BEFORE YOU BEGIN
Sign in on the intended device and check its available points, USDT balance and primary-device status. The activation-card wallet stores rental activation codes, while your linked BSC receiving address is used for USDT withdrawals. Use the current values and status displayed by your app throughout the workflow.
SECTION 01
01Claim Slot Points & Convert to USDT
Images 1–6 | Move claimable points into your device balance, then review and confirm a points-to-USDT conversion.
Open Slot Rewards
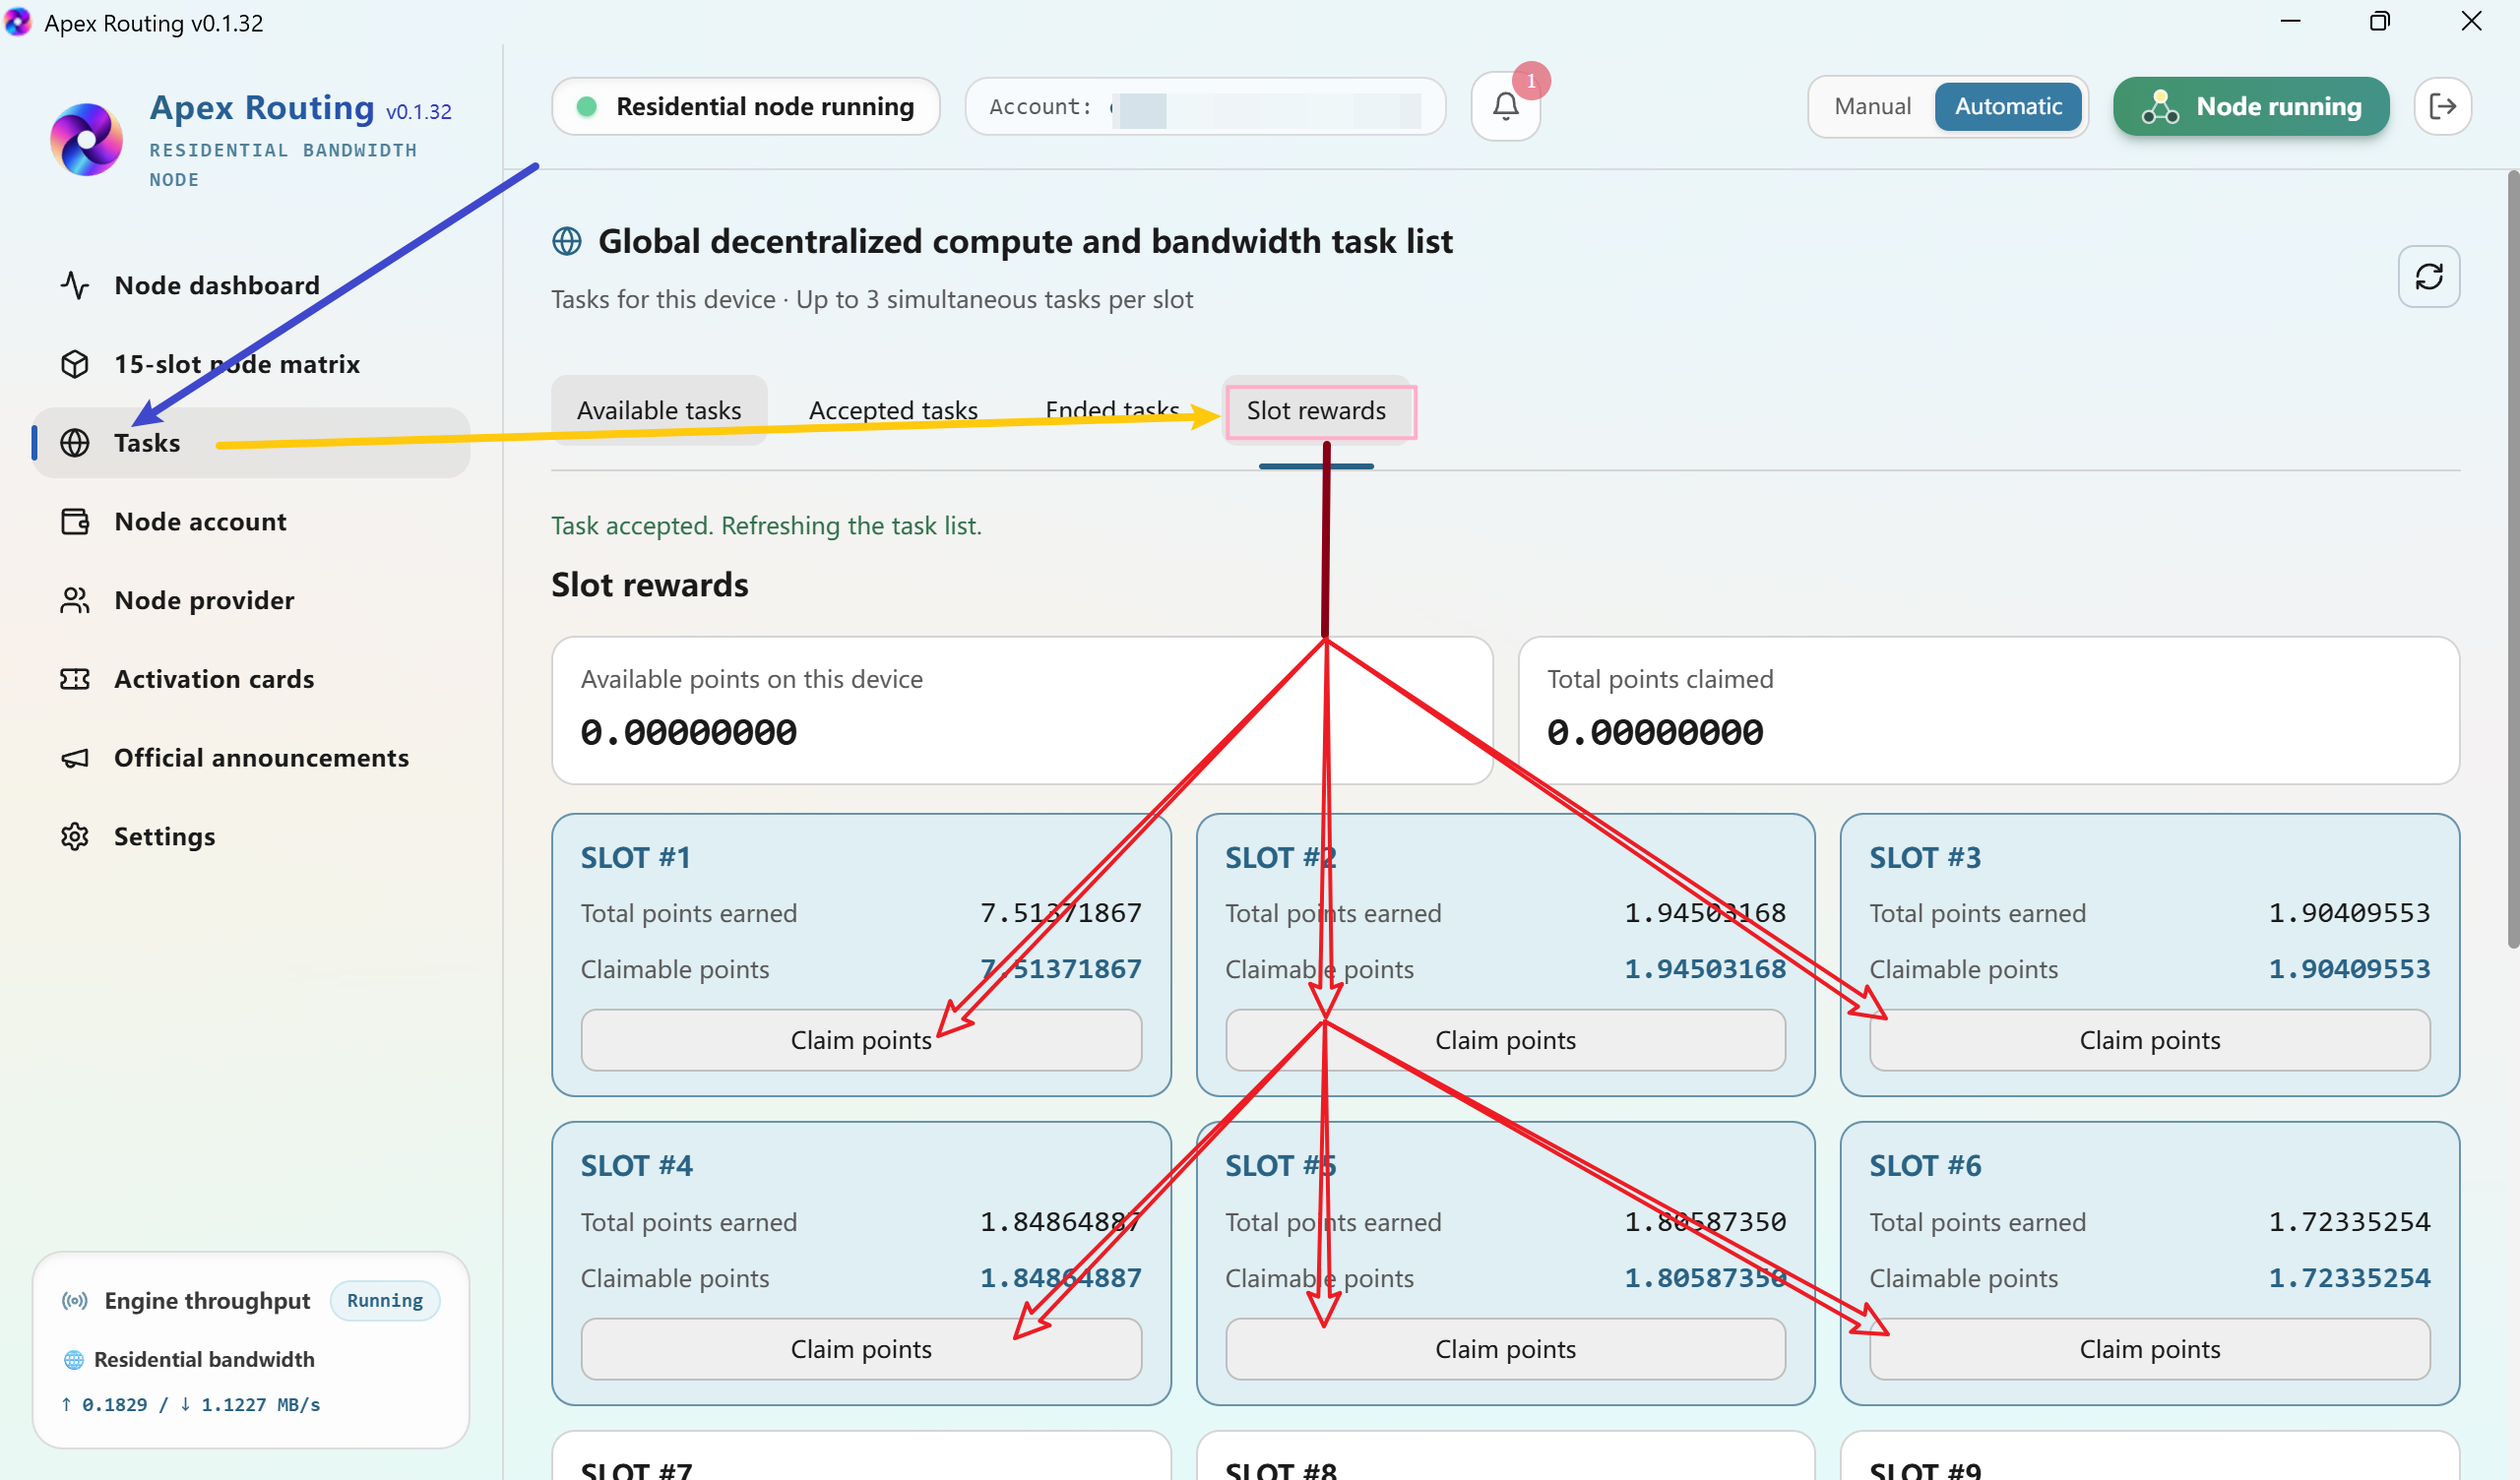
Select Tasks in the left navigation, then open Slot rewards. Each slot presents Total points earned, Claimable points and a Claim points button. Choose a slot with points available, claim its rewards and continue through the remaining slots as needed. Every slot maintains its own reward record.
View larger IMAGE 01 | Slot rewards tab and claim controls for individual slots
Confirm the Point Claim
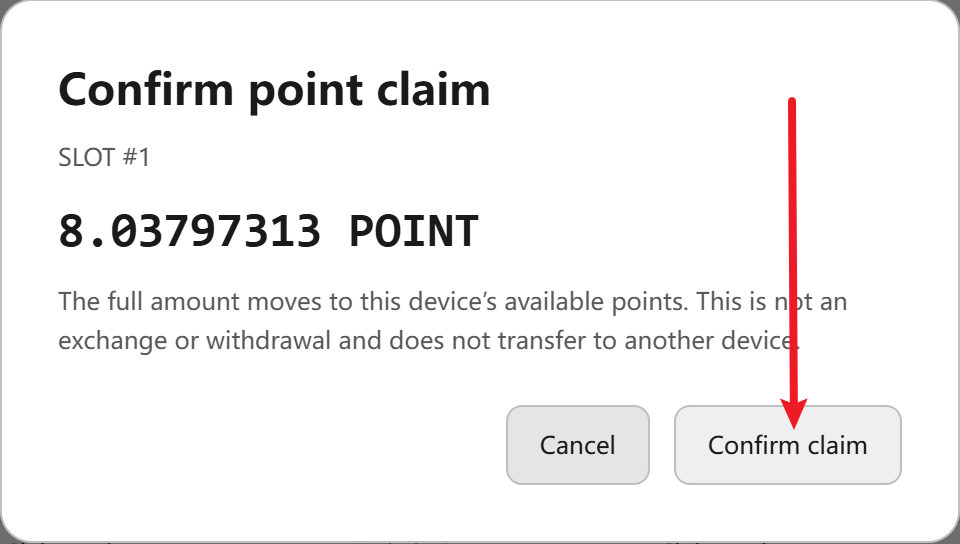
Review the slot number and claimable amount in Confirm point claim. Select Confirm claim to move the selected points into this device’s available balance, ready for the conversion workflow.
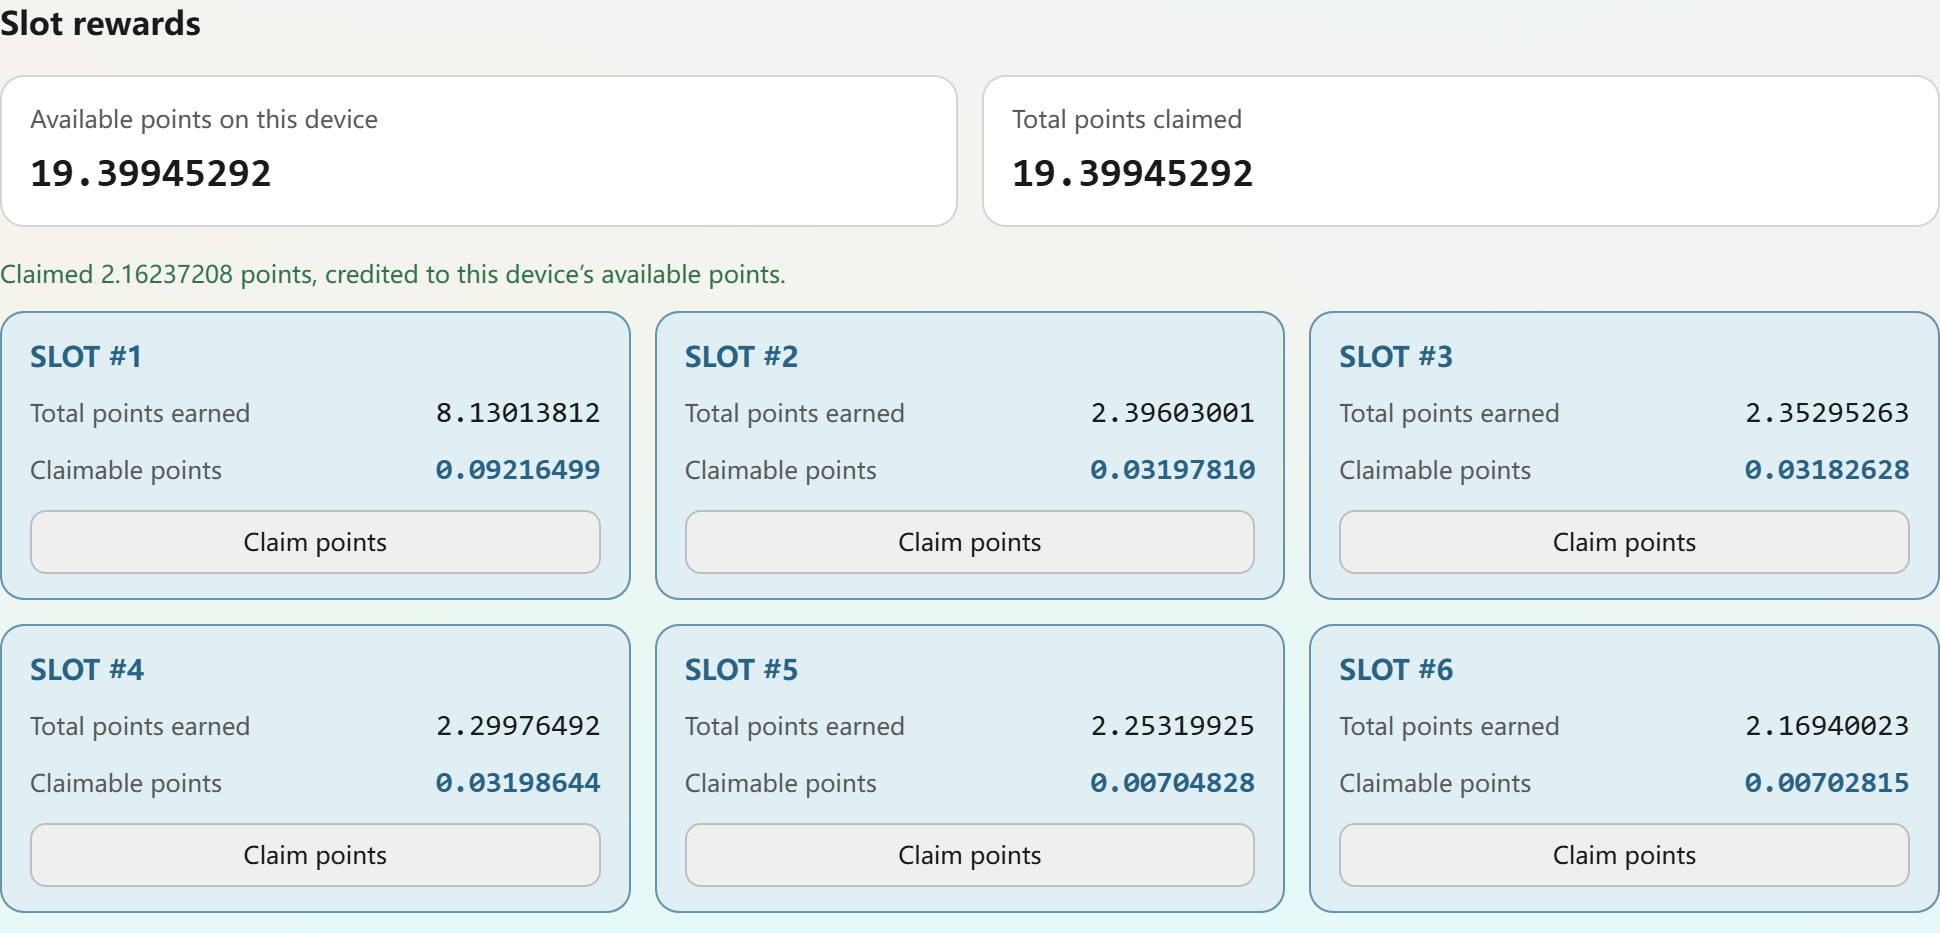
After the claim is processed, review the Available points on this device field and the claim confirmation message. The remaining claimable amount for the selected slot should update accordingly. If you have more slots with claimable points, repeat the claim process for each relevant slot.
View larger IMAGE 03 | Updated slot rewards and points credited to the device
Open the Node Account Conversion Panel
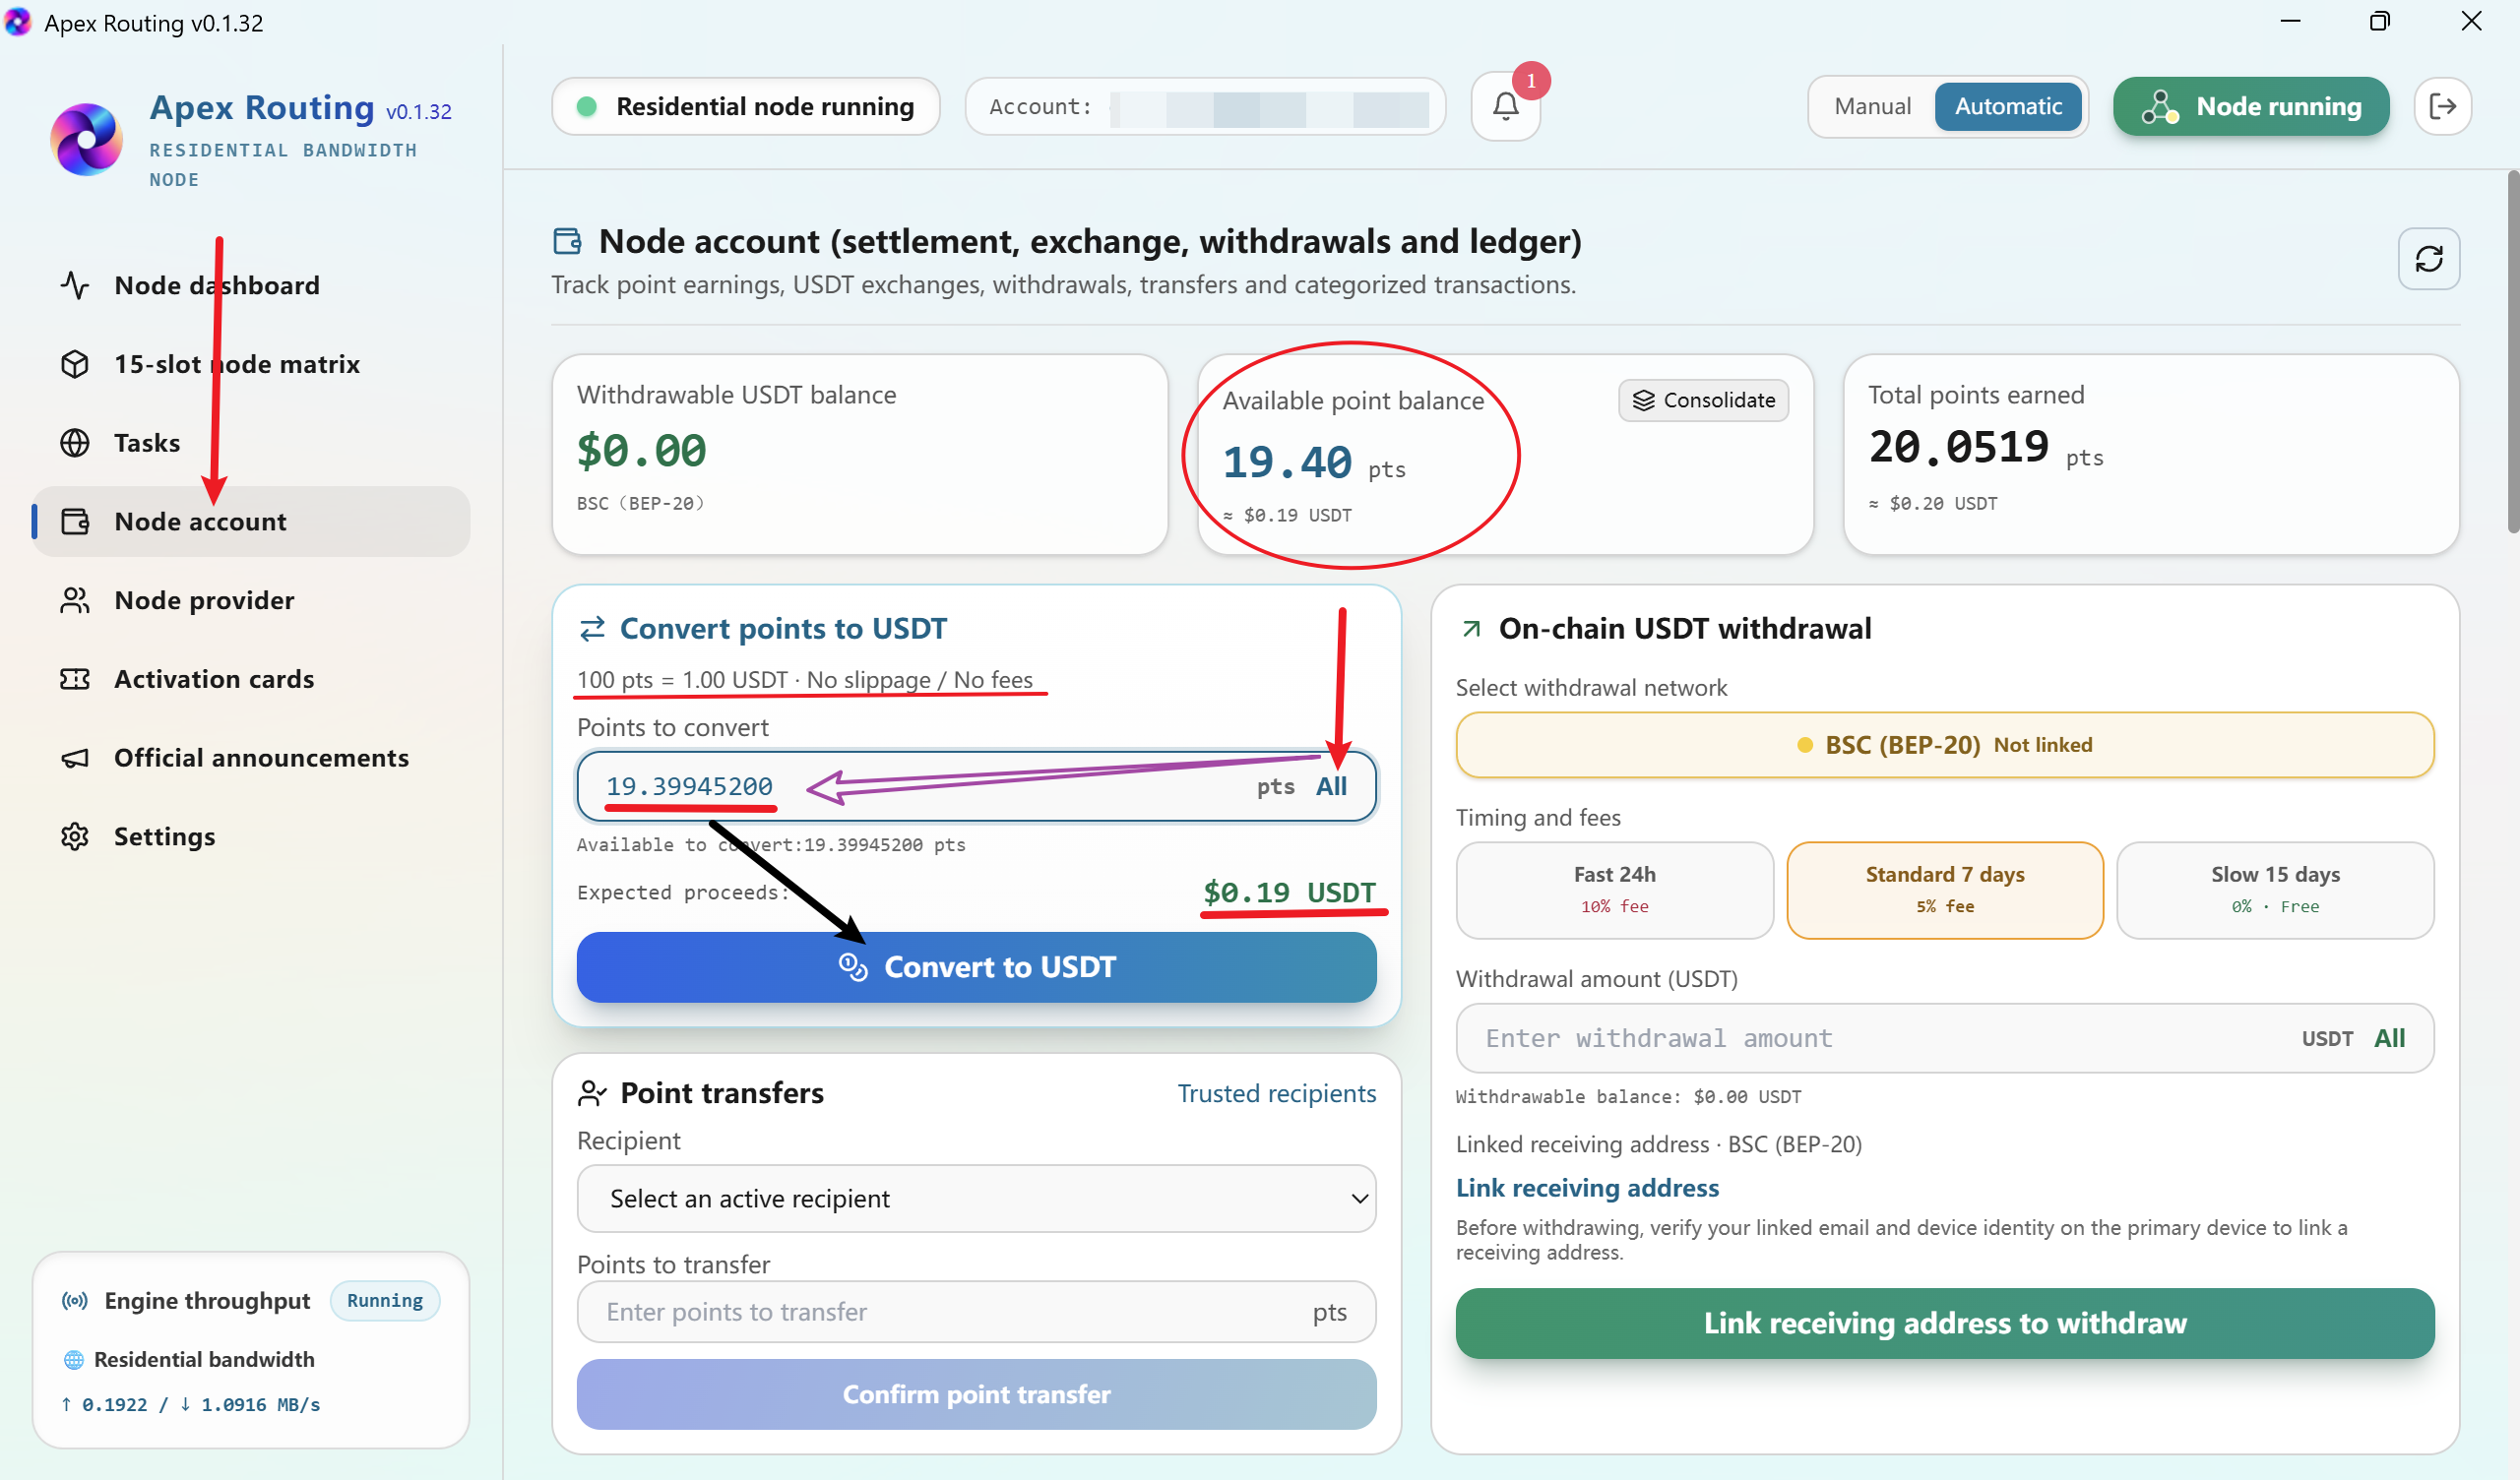
Select Node account. In Convert points to USDT, check your Available point balance, then enter the number of points you wish to convert or choose All when appropriate. The interface displays the conversion rate as 100 pts = 1.00 USDT and shows expected proceeds before confirmation. The example uses approximately 19.399452 points.
View larger IMAGE 04 | Points balance and Convert points to USDT panel
Review and Confirm Conversion
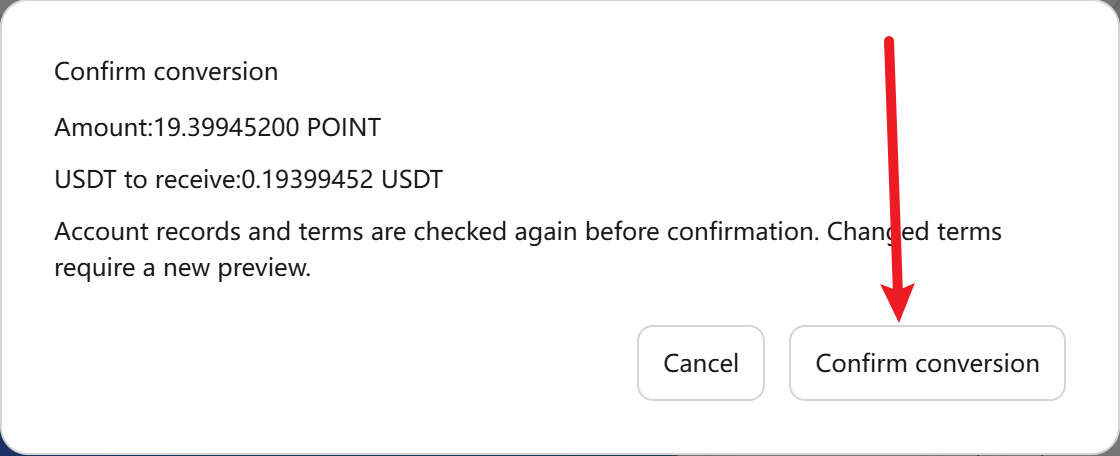
Review the point amount and the USDT amount in Confirm conversion, then select Confirm conversion. The application checks the current account figures at confirmation; follow the refreshed on-screen values for the final step.
View larger IMAGE 05 | Conversion preview and final confirmation
Check Your USDT Balance
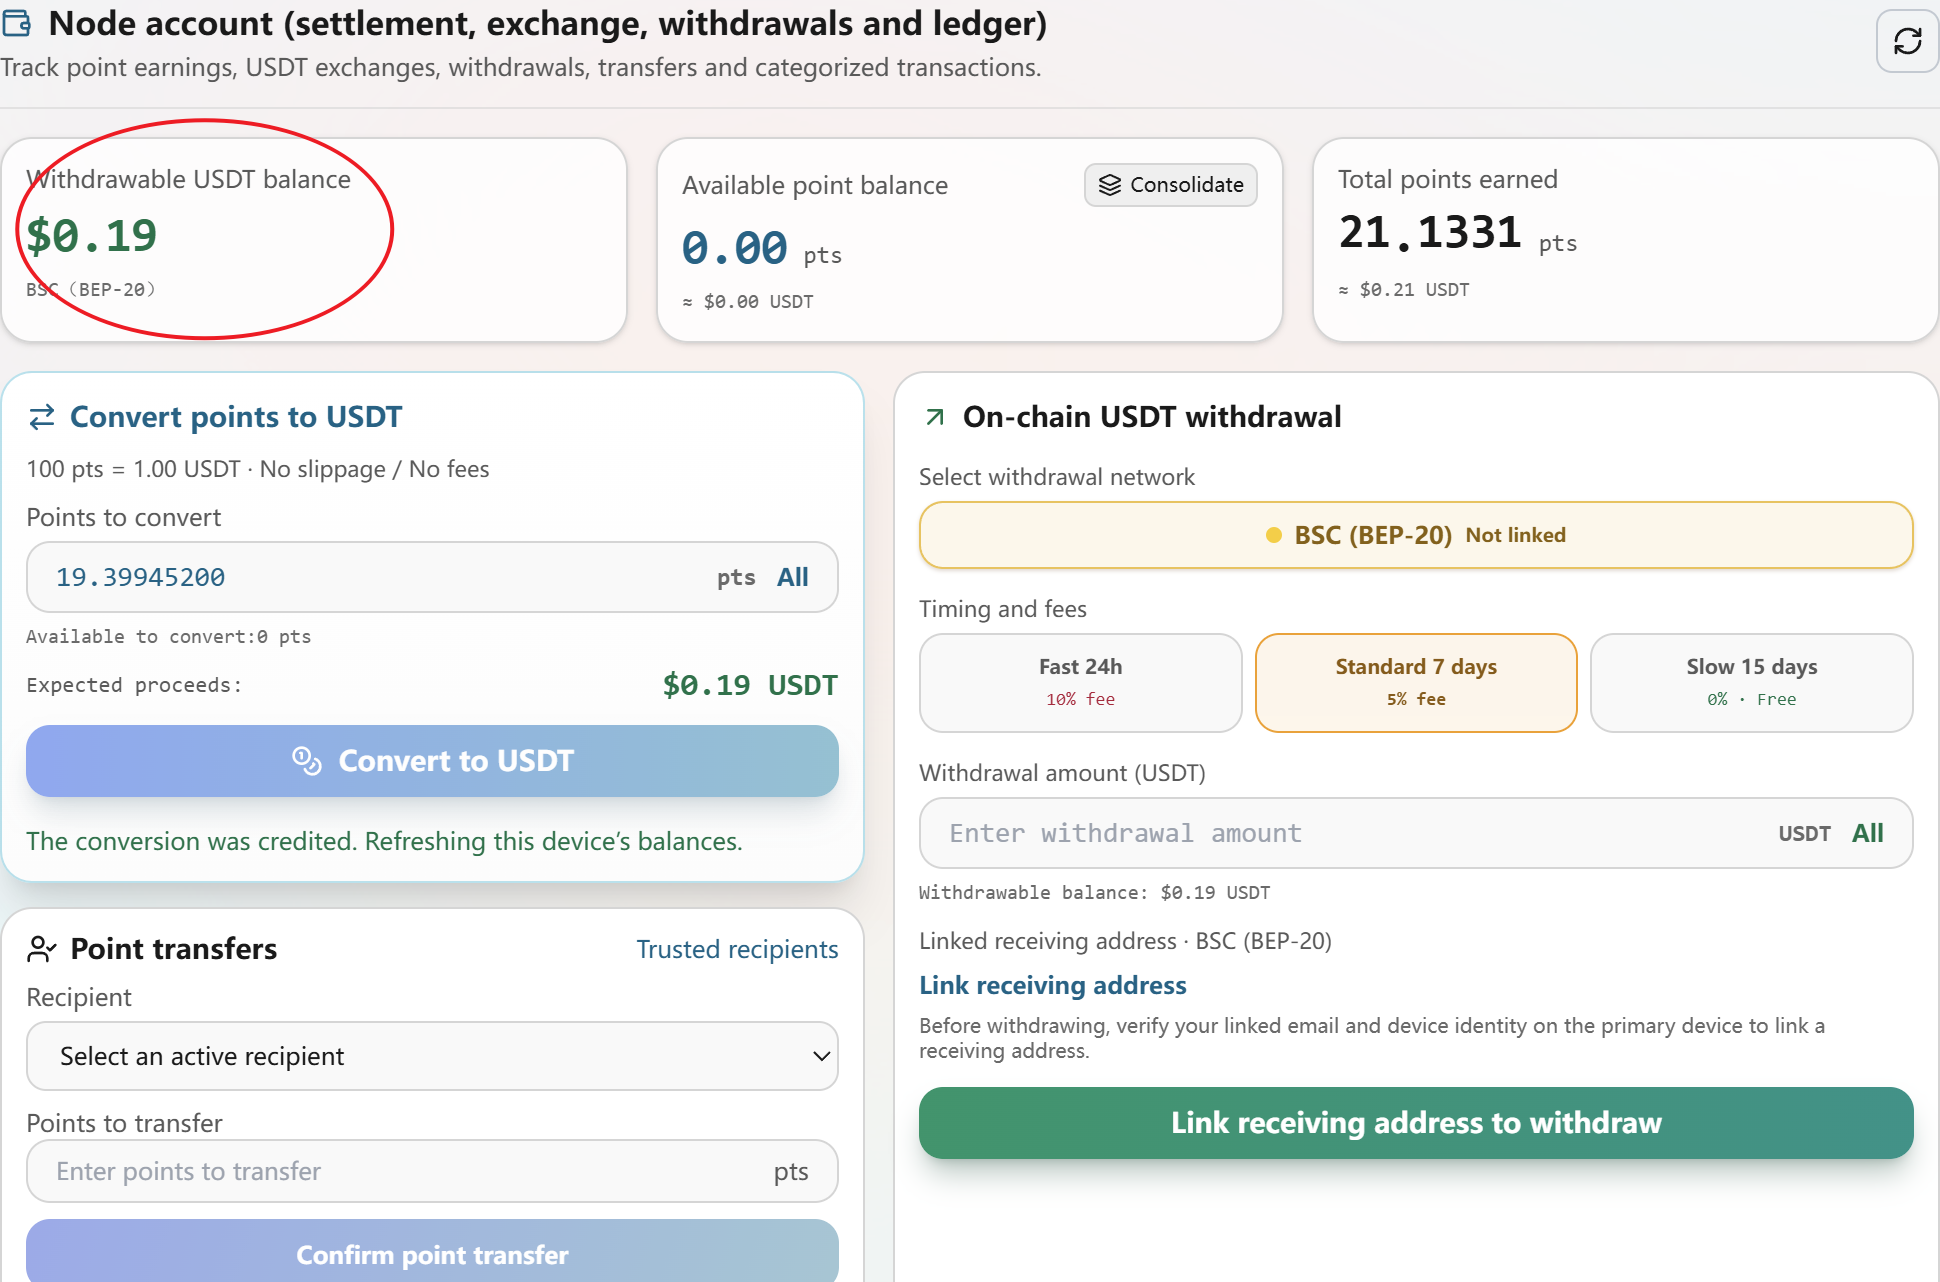
Return to Node account to review Withdrawable USDT balance and the updated point balance. The conversion panel displays 100 pts = 1.00 USDT, with no slippage or conversion fee. The withdrawal panel provides its own timing and fee options. Overview cards may show rounded totals.
View larger IMAGE 06 | USDT and point balances after conversion
POINT CONVERSION VERSUS WITHDRAWAL
Points conversion updates the USDT balance within Apex Routing. To move USDT to your external wallet, activate a BSC receiving address and continue in the On-chain USDT withdrawal panel.
SECTION 02
02Link a BSC (BEP-20) Receiving Address
Images 7–11 | Set up the on-chain address used for USDT withdrawals. This is a verification workflow with an on-screen waiting period.
Begin Receiving-Address Linking
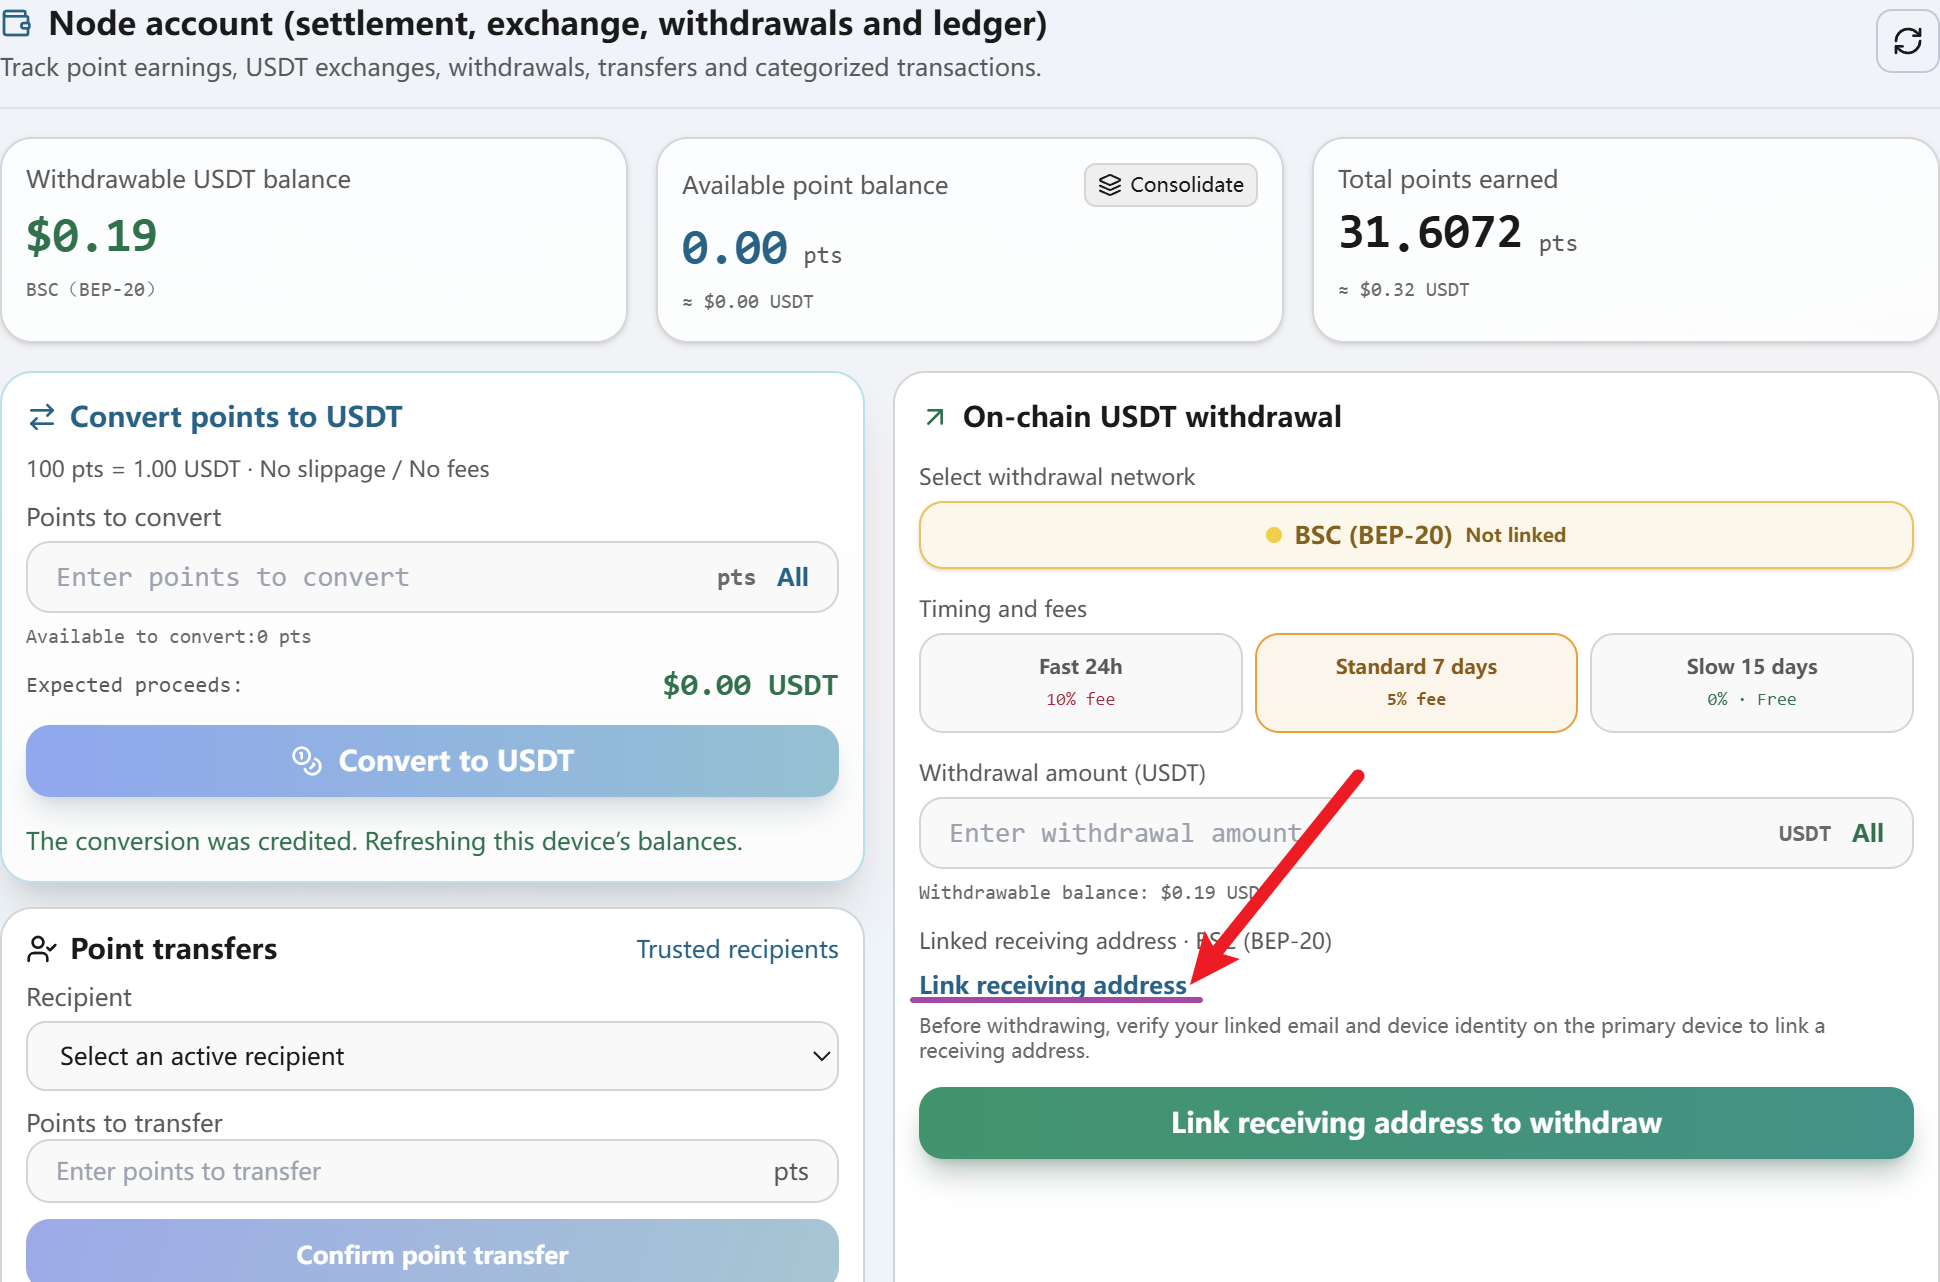
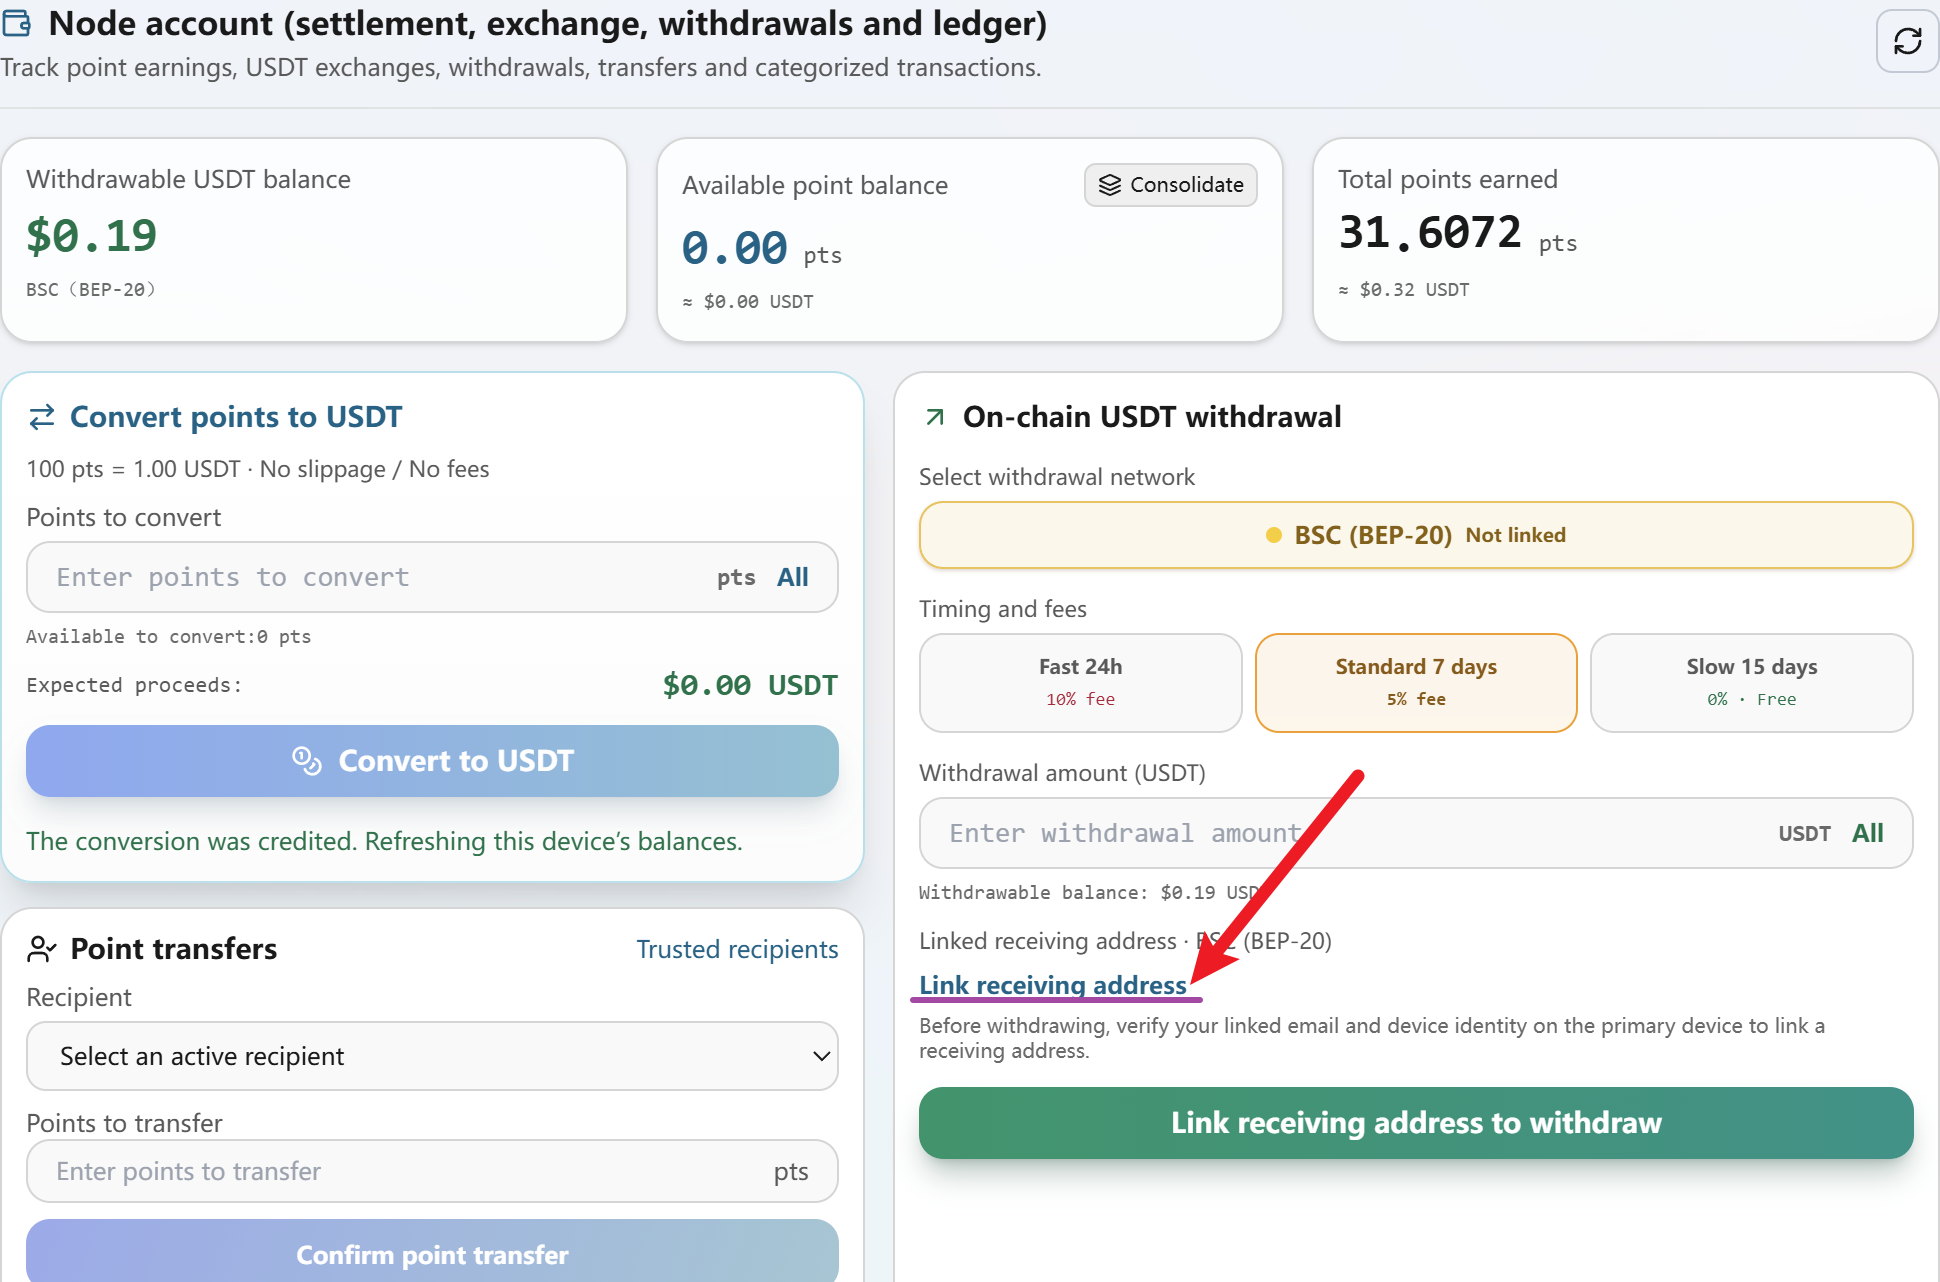
In Node account, locate On-chain USDT withdrawal and select Link receiving address (or the corresponding control). The withdrawal panel displays the BSC (BEP-20) network and three processing choices: Fast 24h (10% fee), Standard 7 days (5% fee) and Slow 15 days (0% fee). You will select the preferred option when submitting a withdrawal request.
View larger IMAGE 07 | Receiving-address link entry and withdrawal options
Enter the Address on Your Primary Device
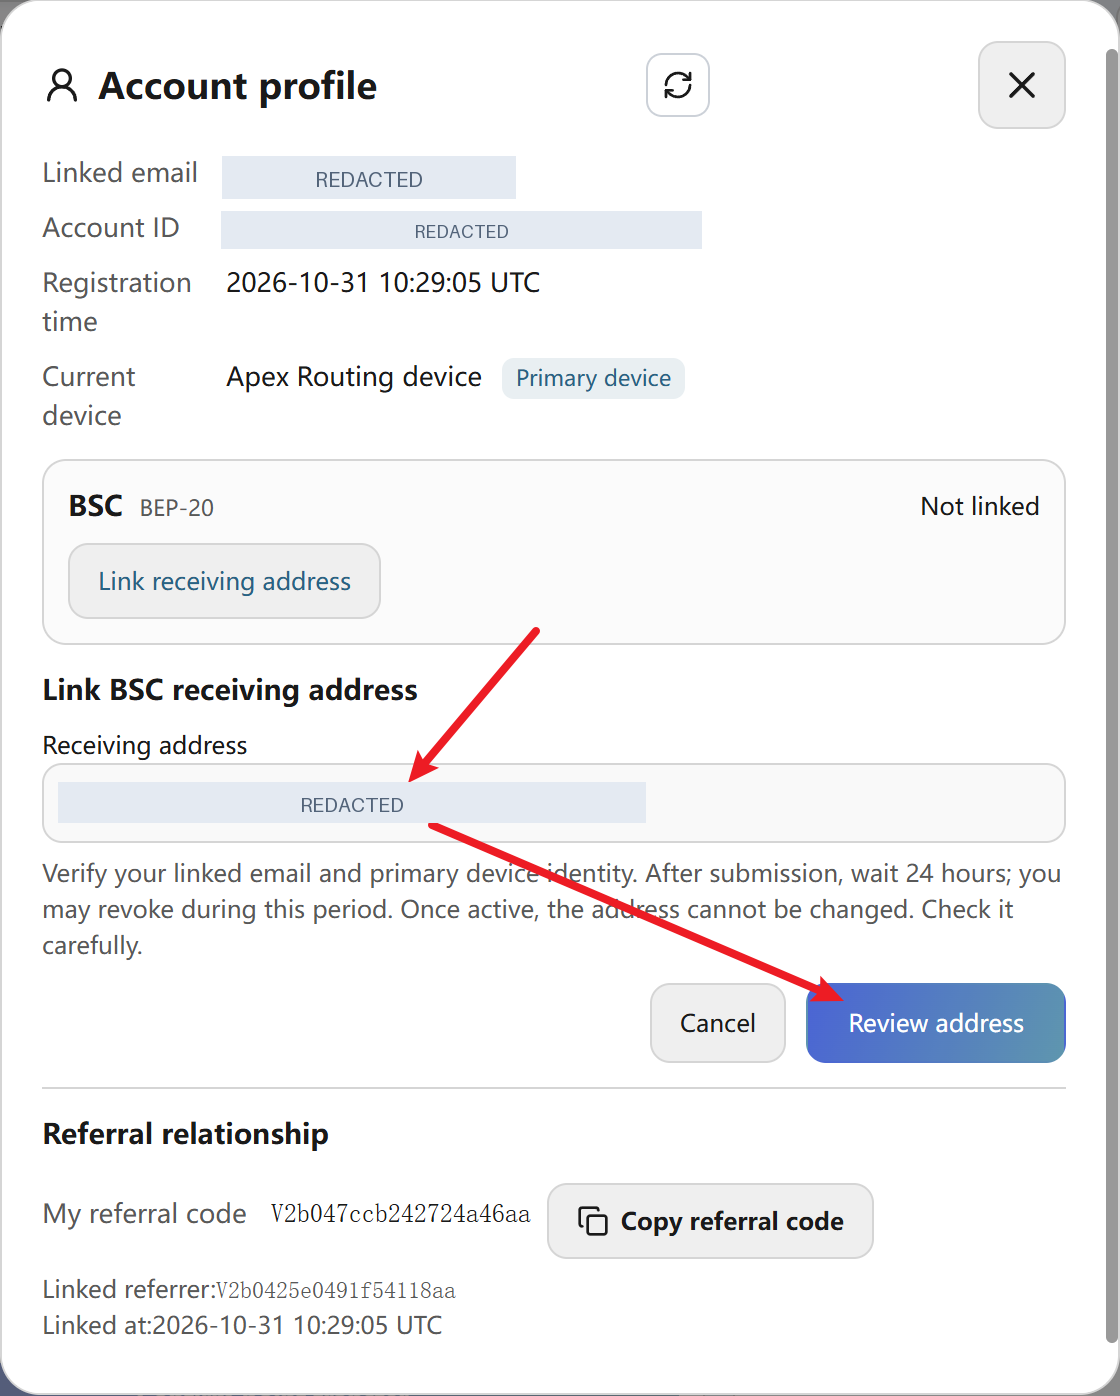
The Account profile window identifies the current device. Under Link BSC receiving address, paste the address where you want to receive BEP-20 USDT, then select Review address. Confirm that it is an address you control and that it supports the BSC (BEP-20) network. The screen states that linking requires verification of your linked email and primary device identity.
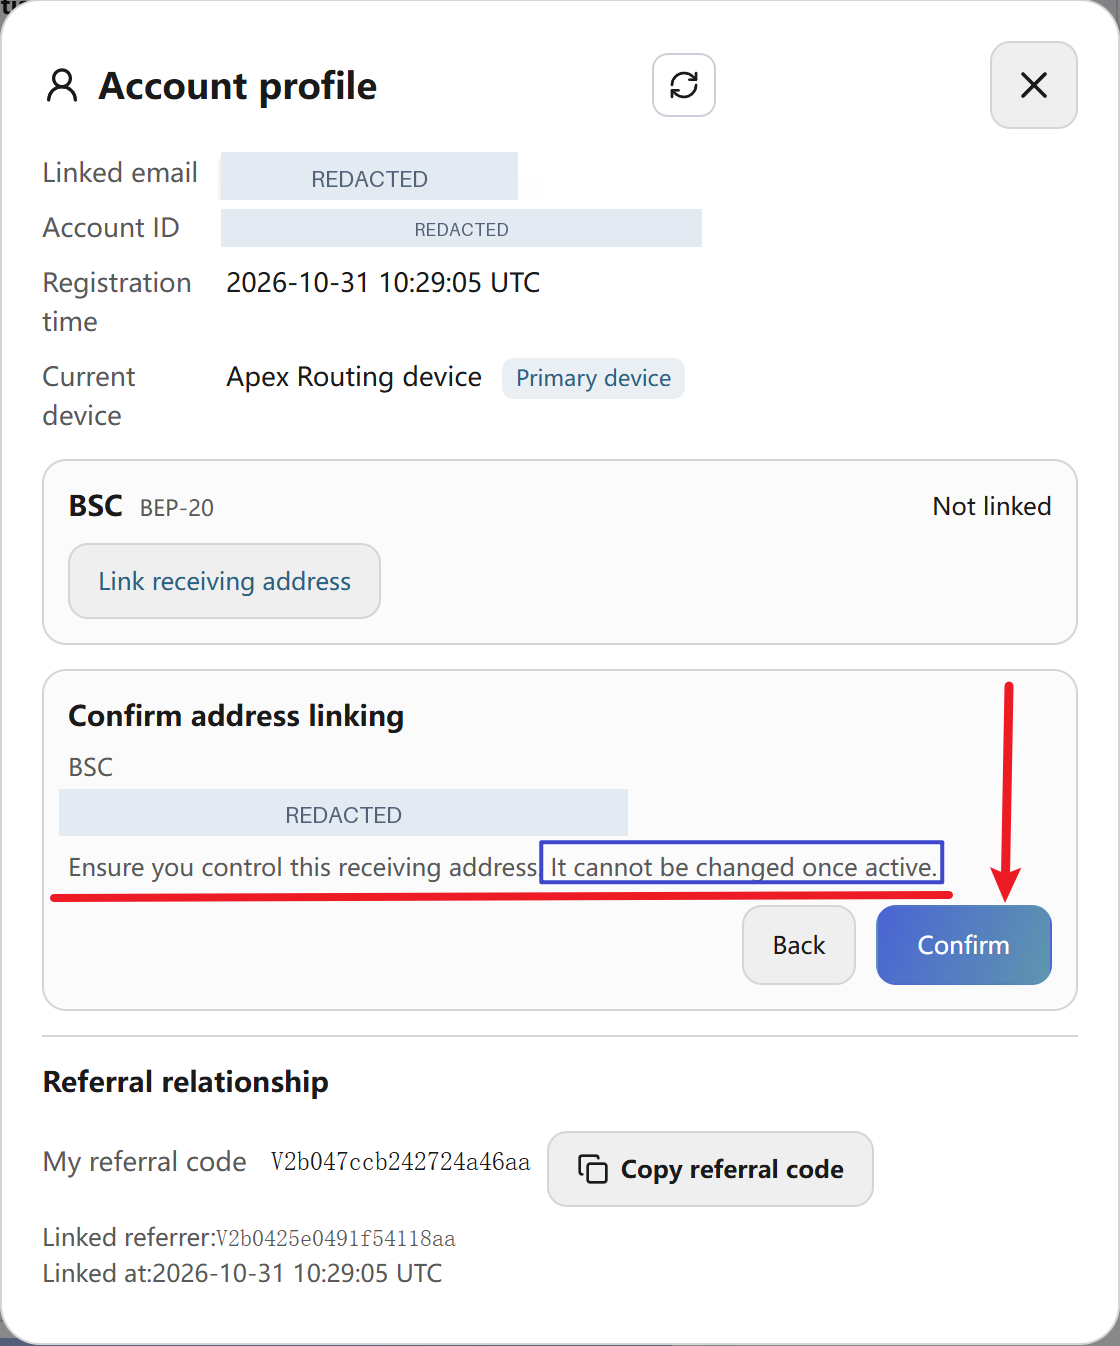
Compare the complete receiving address shown in Confirm address linking with the address in your wallet. Select Confirm only after verifying every character. The application warns that the linked address cannot be changed once it becomes active, so treat this as a permanent security-sensitive choice.
View larger IMAGE 09 | Final confirmation and warning that the active address cannot be changedSensitive details hidden
Request the Email Verification Code
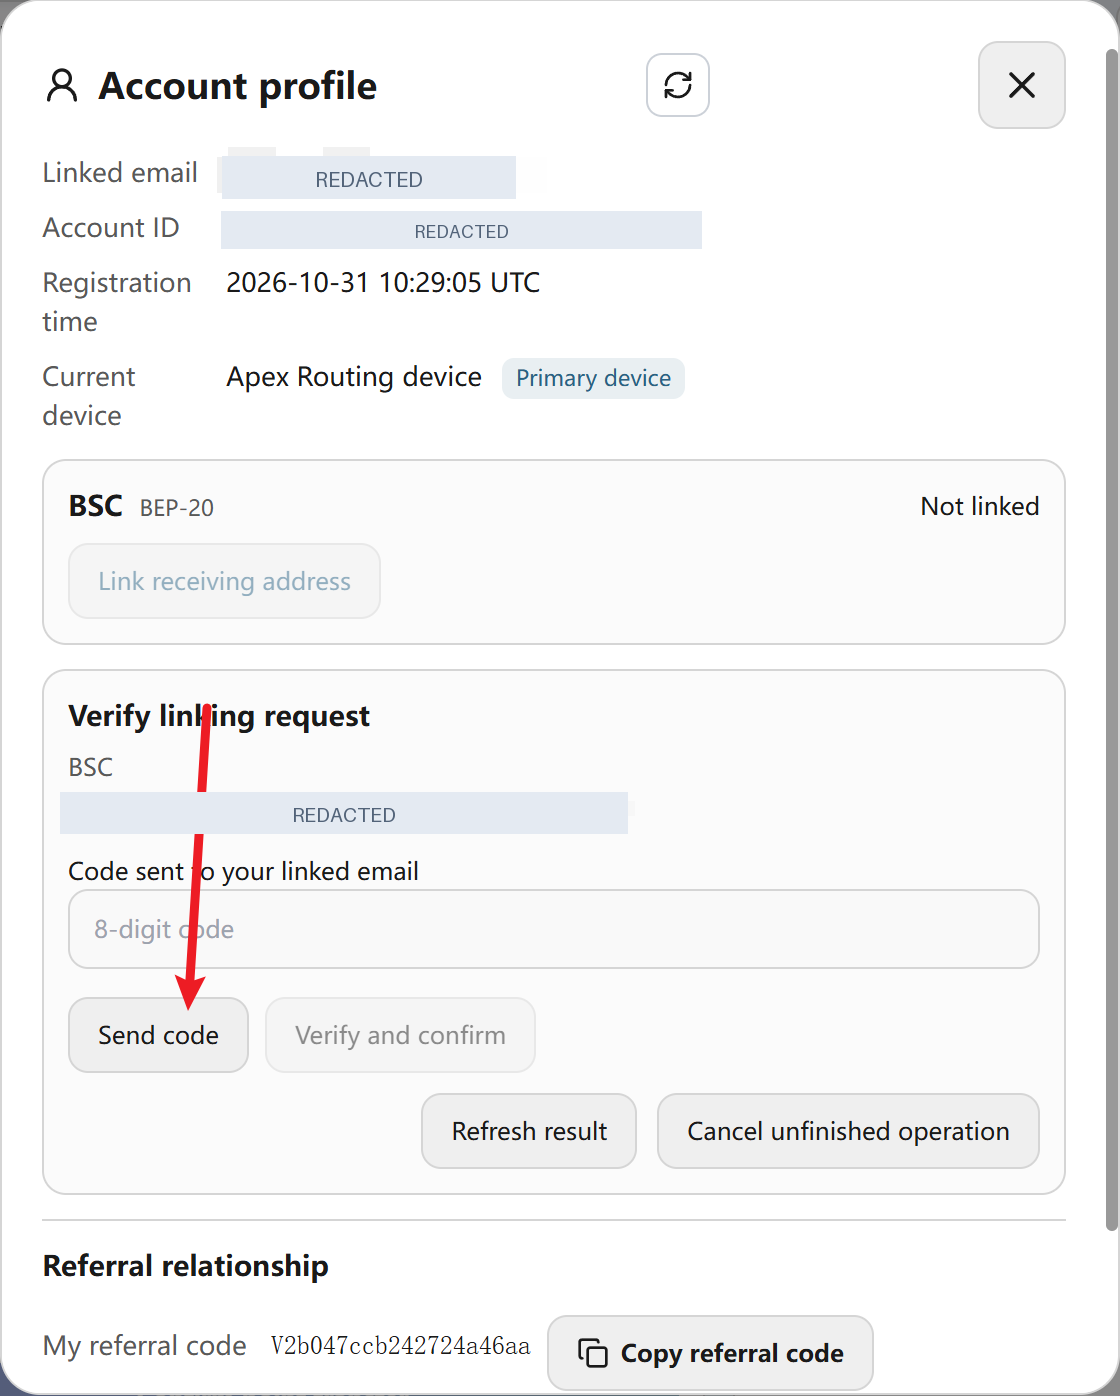
In Verify linking request, select Send code. Retrieve the verification email sent to your linked address, then enter its current code in the field shown. Keep the verification window open while completing this step.
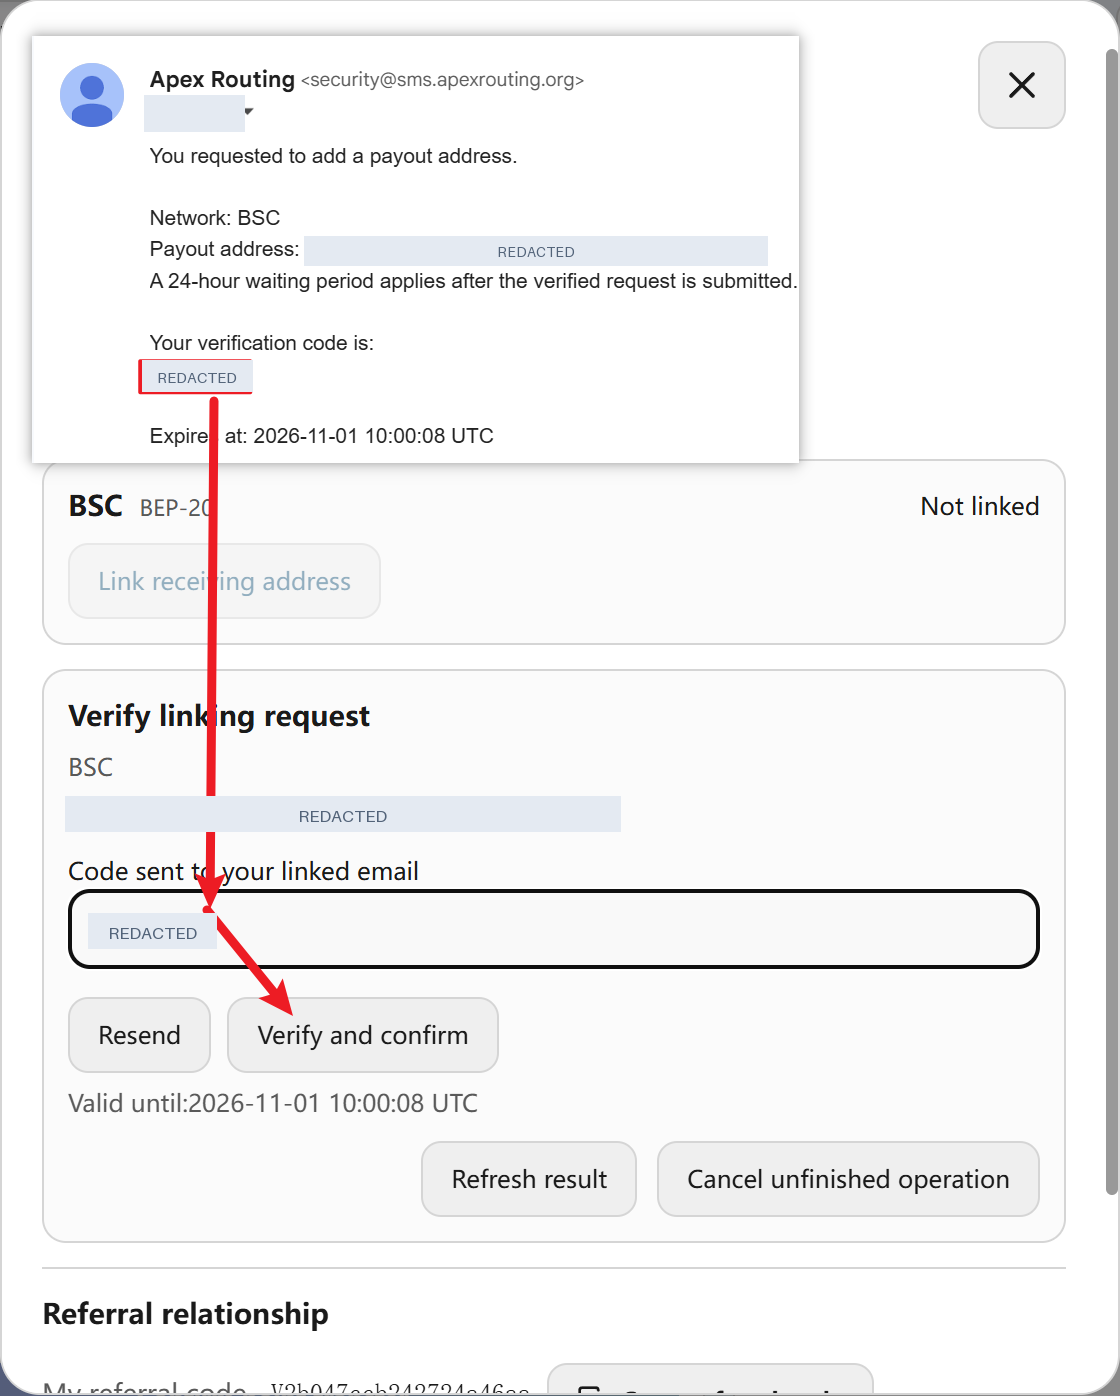
Enter the email verification code and select Verify and confirm. The app then applies the displayed 24-hour linking period, during which you can revoke the request. Use Refresh result or View address linking progress to track the status, and proceed to withdrawals once the receiving address displays Linked. The linked address is fixed after activation.
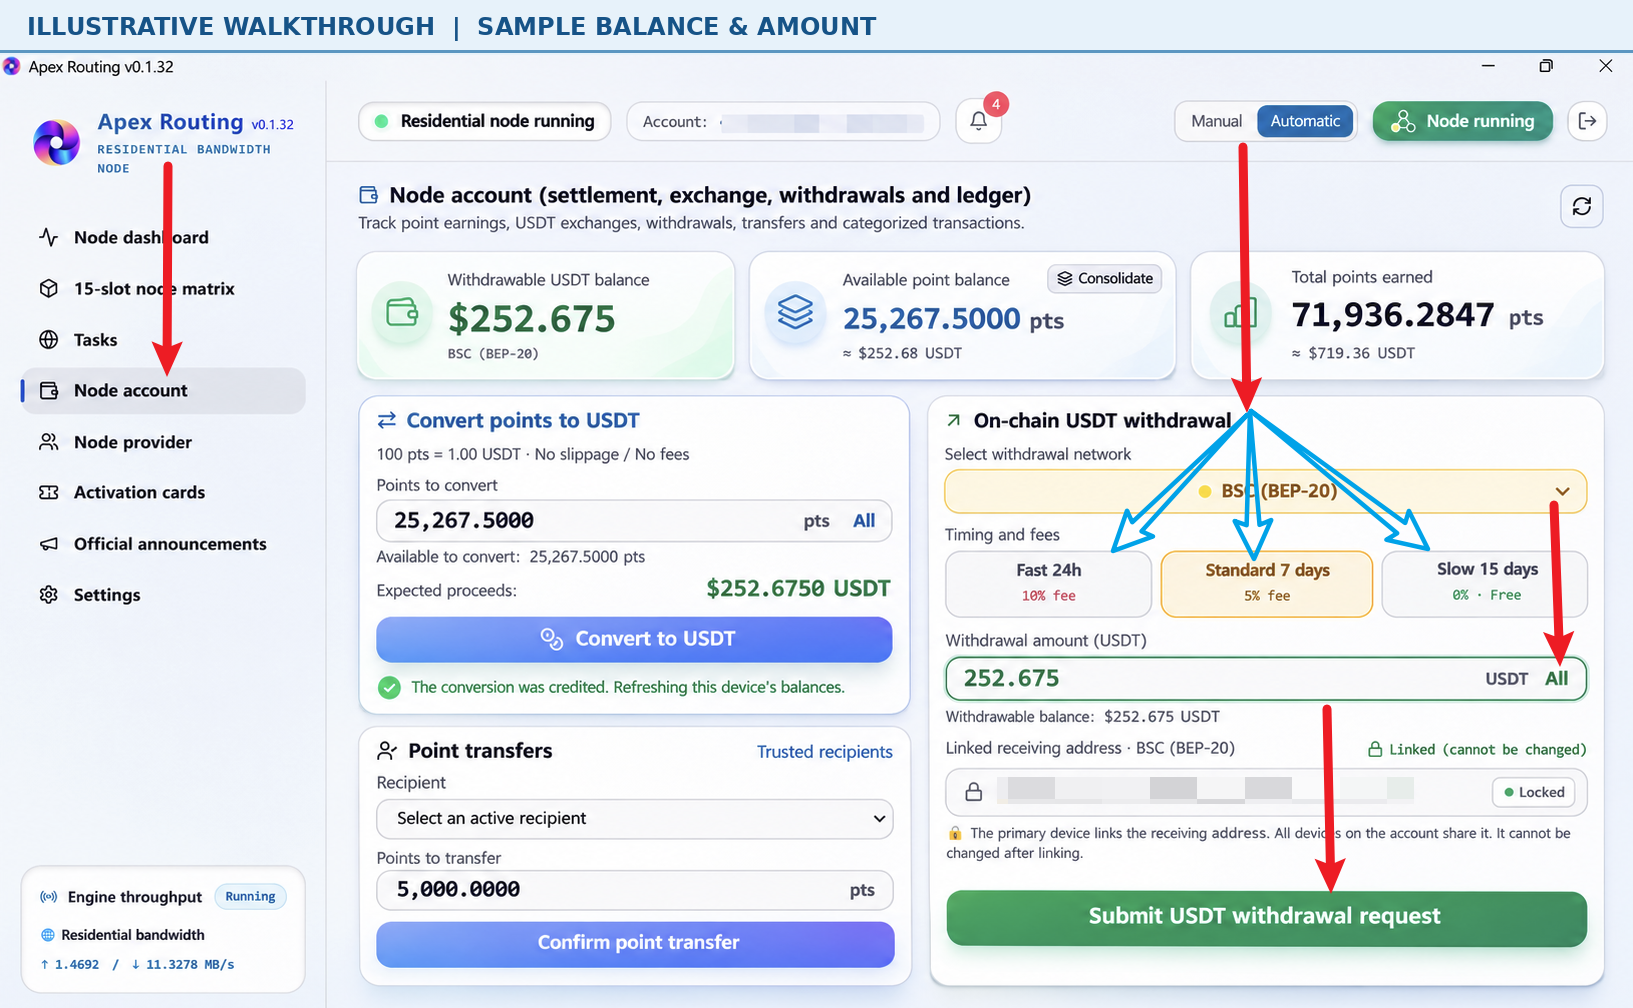
Image 12 | Use your linked BSC receiving address to choose a withdrawal route, enter the USDT amount and submit the request.
Select the Withdrawal Option and Submit
Once your BSC (BEP-20) receiving address displays Linked, open Node account and review Withdrawable USDT balance. In On-chain USDT withdrawal, choose Fast 24h (10% fee), Standard 7 days (5% fee), or Slow 15 days (0% fee). Enter an amount in Withdrawal amount (USDT), or select All. Review the selected route, amount and linked receiving address, then select Submit USDT withdrawal request and follow the confirmation shown by the app. Image 12 uses a sample balance of 252.675 USDT to show the controls.
View larger IMAGE 12 | BSC withdrawal routes, example amount and submission control
WITHDRAWAL STATUS AND PROCESSING
Choose Fast 24h (10% fee), Standard 7 days (5% fee), or Slow 15 days (0% fee). Check your available USDT balance, linked BSC address and amount, then select Submit USDT withdrawal request. Follow processing progress and transaction history in the app. Image 12 uses a sample amount to demonstrate the controls.
SECTION 04
04Transfer Points to Another User
Images 13–15 | Add a trusted recipient, select the account and enter the point amount to send.
Find Point Transfers
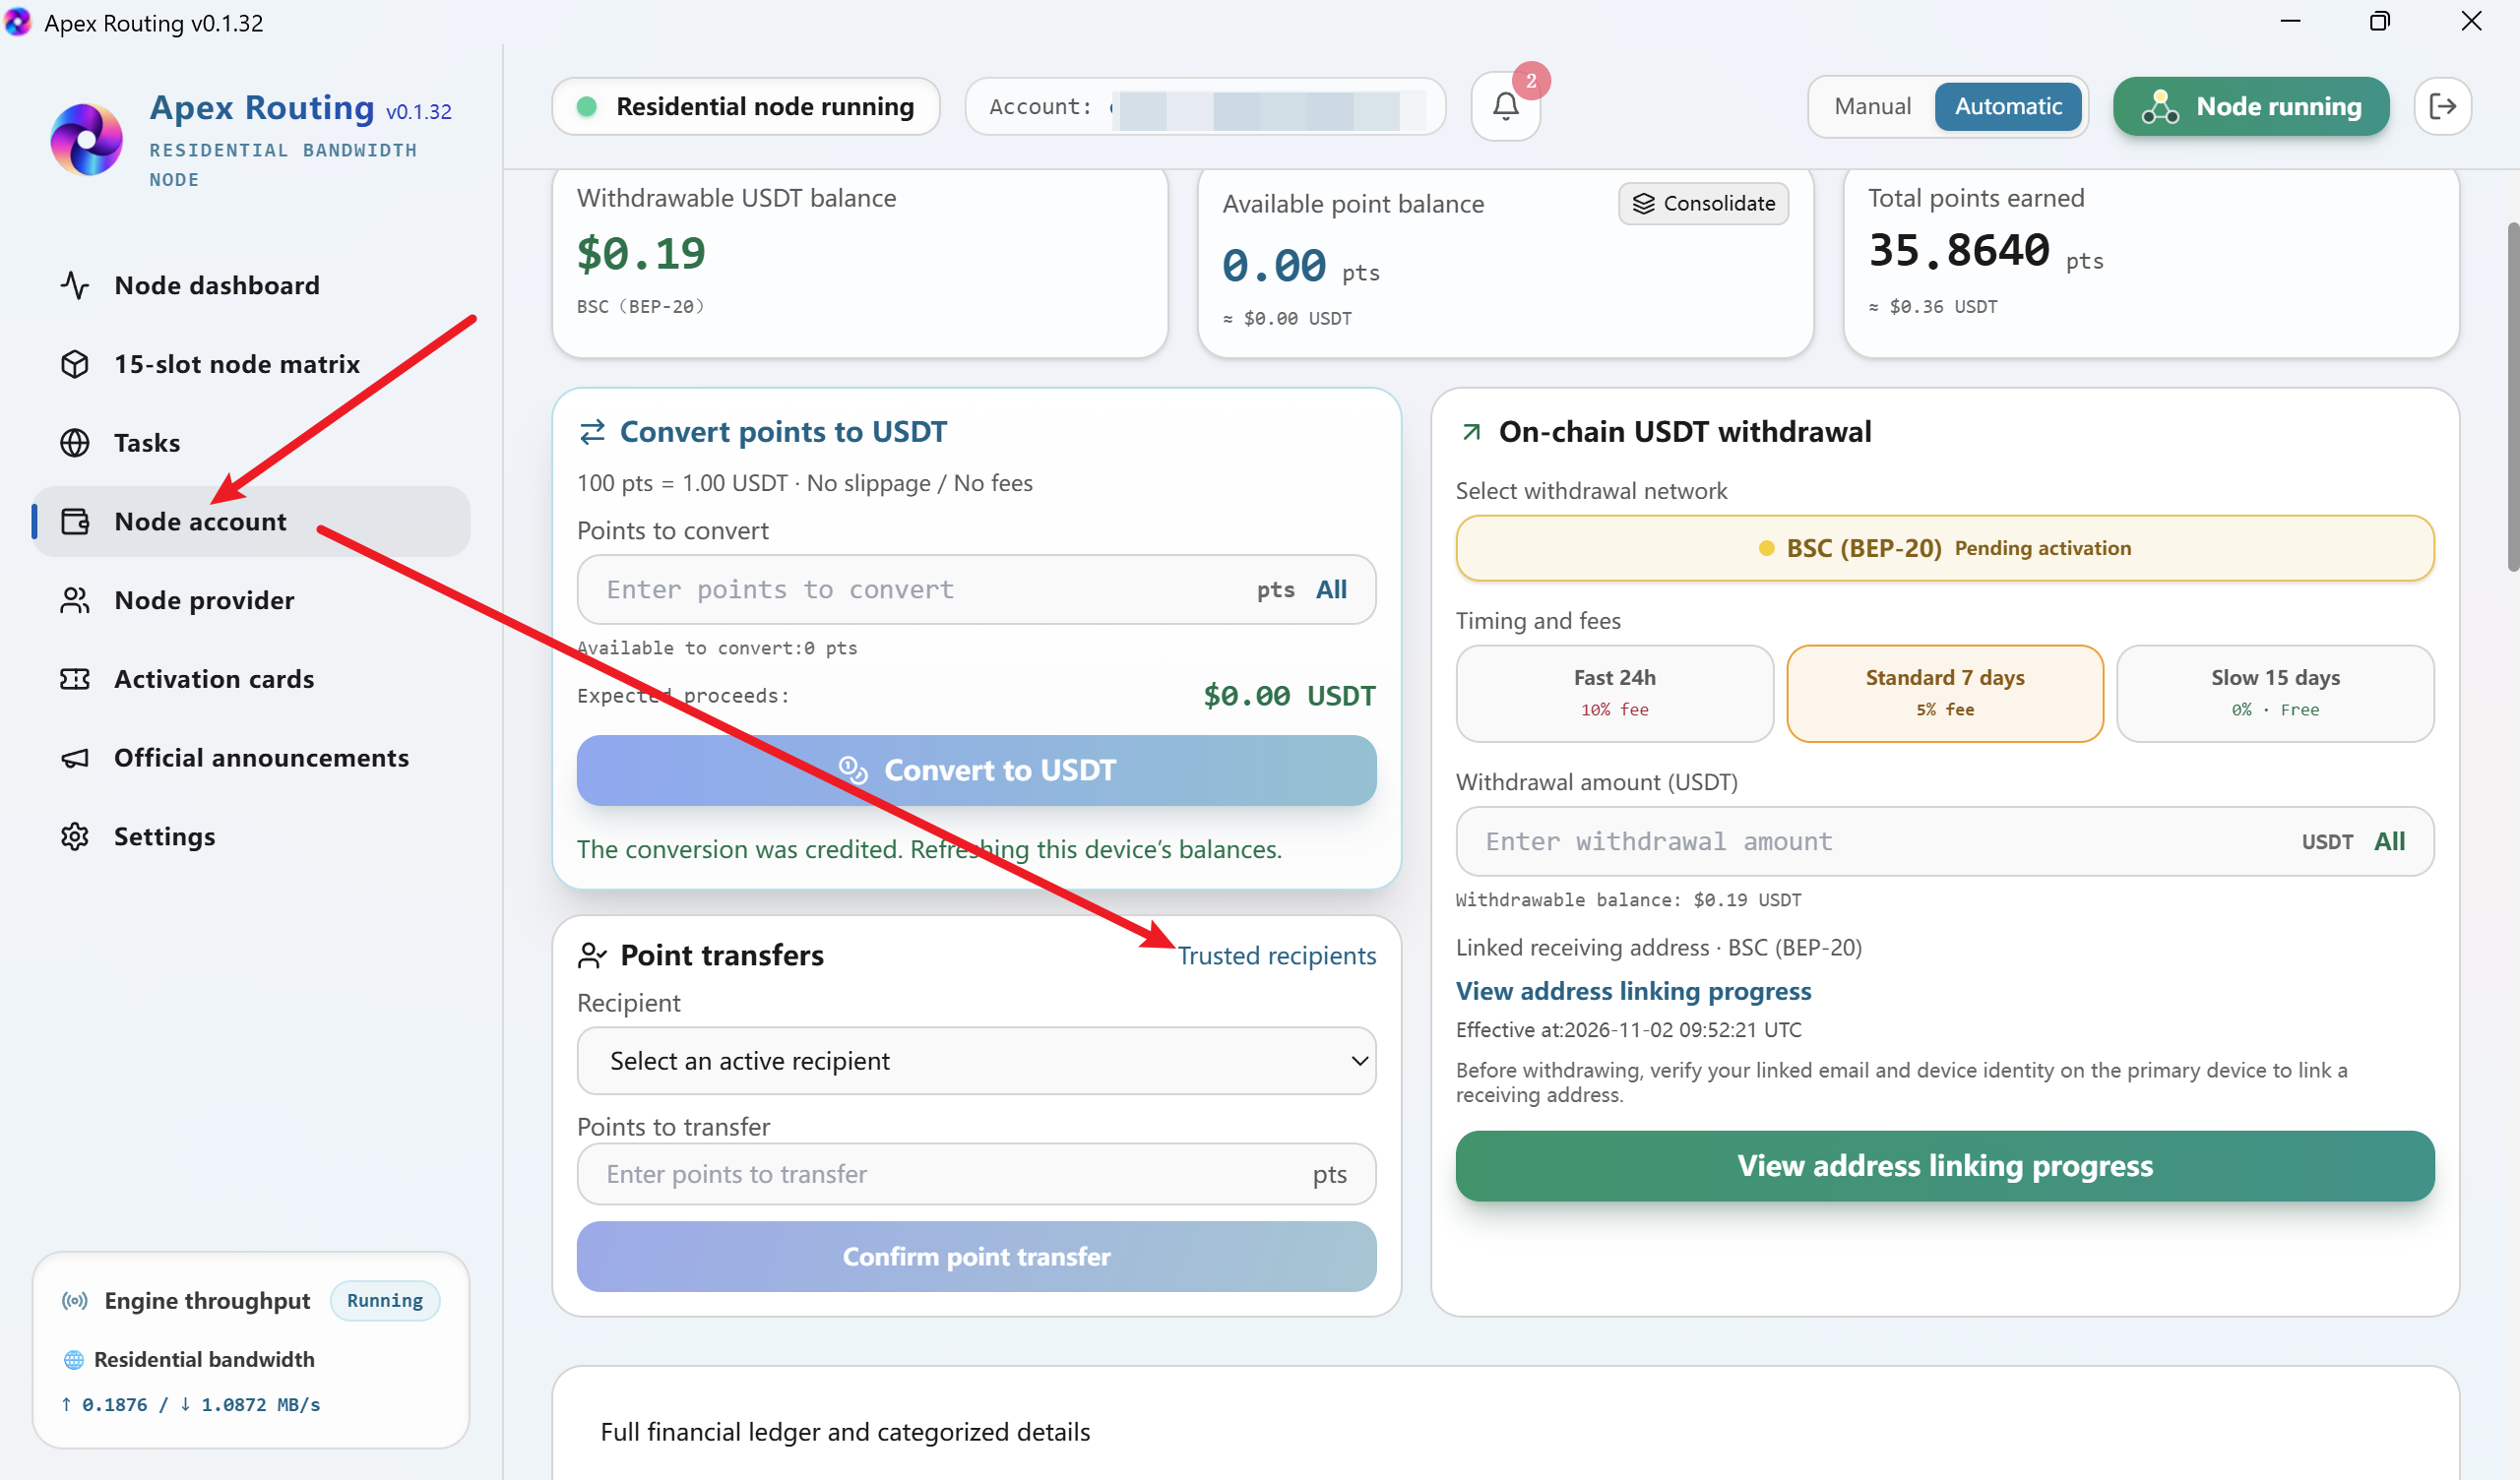
In Node account, locate Point transfers and choose Trusted recipients to manage the accounts you are allowed to select as recipients. The screenshot also shows a recipient dropdown and the points input field in the main transfer panel.
View larger IMAGE 13 | Point transfers and Trusted recipients entry
Add a Trusted Recipient
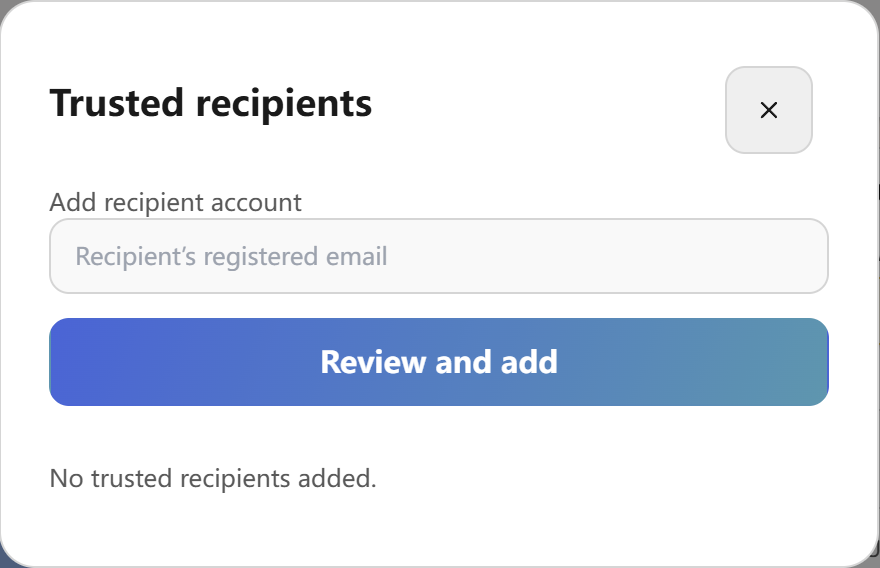
In Trusted recipients, enter the recipient’s registered Apex Routing email address and select Review and add. Verify the intended recipient, then complete the confirmation shown by the app. The accompanying screen illustrates the recipient list before an account is added.
View larger IMAGE 14 | Add recipient by registered email
Enter the Amount and Confirm the Transfer
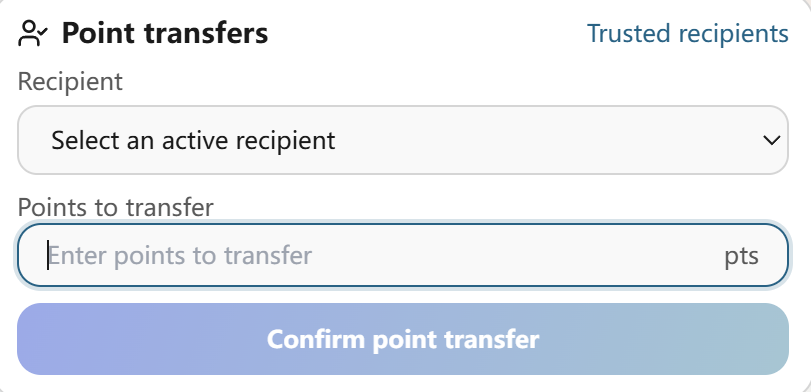
Return to Point transfers, select an active recipient and enter the amount in Points to transfer. Select Confirm point transfer when the app enables it, review the details and submit. The operation transfers available points between eligible accounts; use the confirmation and ledger to follow its status.
View larger IMAGE 15 | Select an active recipient and enter a point amount
CHECK BEFORE SENDING
Select the intended trusted recipient, confirm the current available points and review the on-screen transfer details. After submission, check the transaction record for the resulting status.
SECTION 05
05Obtain a Slot Rental Activation Code with Points
Images 16–17 | Use available points on the primary device to obtain an activation code for one 365-day slot rental.
Open Activation Cards and Choose Points Payment
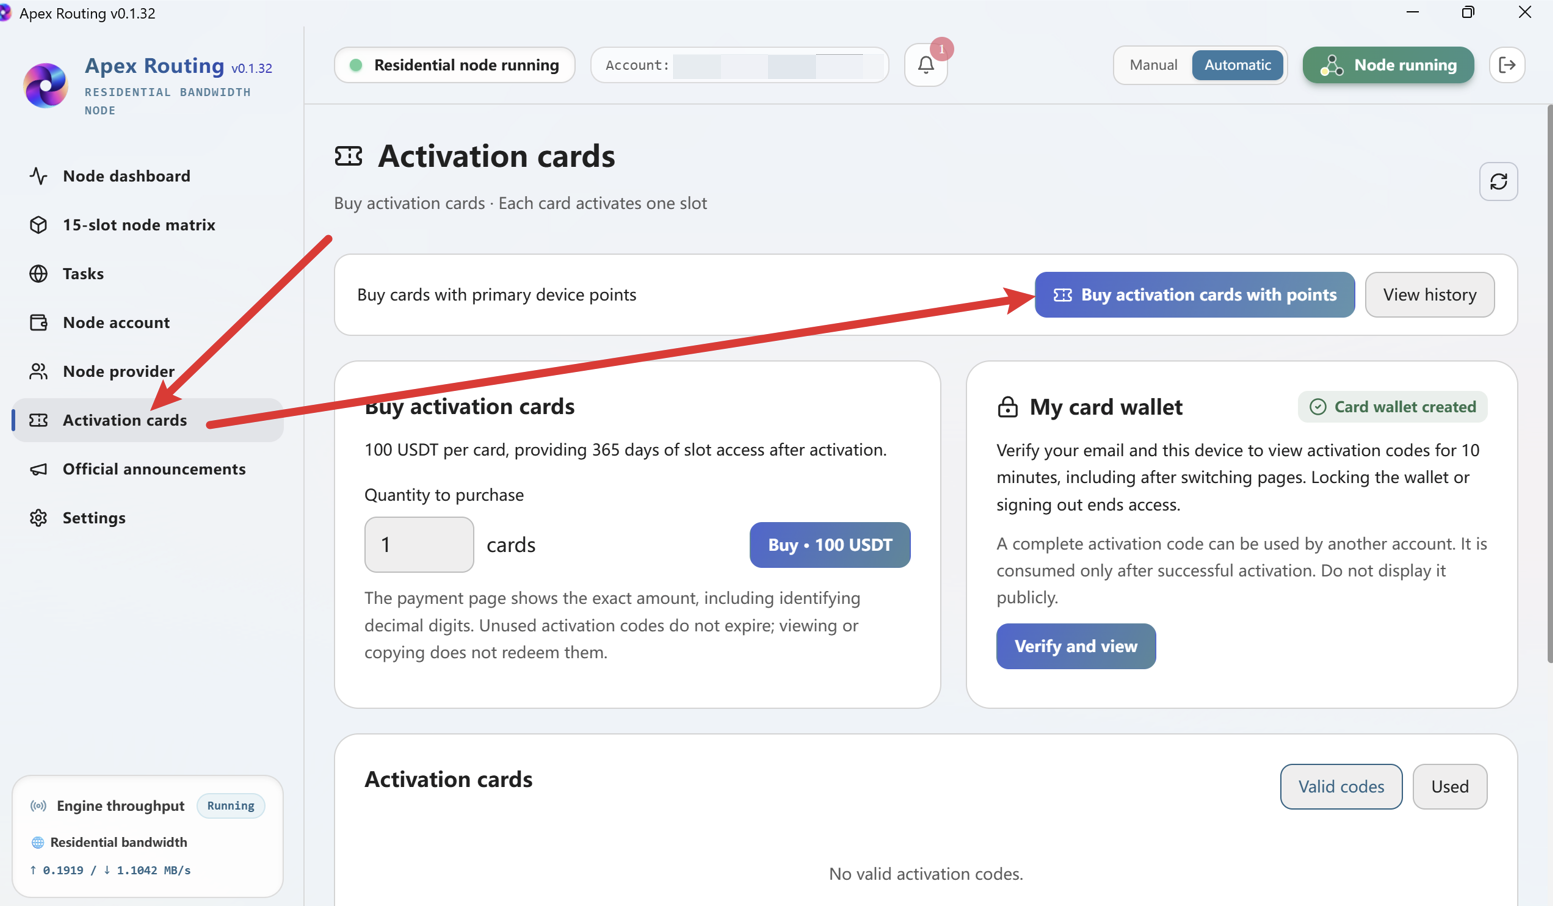
Open Activation cards from the left navigation and select the on-screen Buy activation cards with points control. The activation code obtained through this action provides a 365-day node-slot rental entitlement upon successful activation. The page also includes a separate USDT payment option and My card wallet; choose the payment method that matches your plan.
View larger IMAGE 16 | On-screen “Buy activation cards with points” control for rental codes
Review the 10,000-Point Rental Code Amount
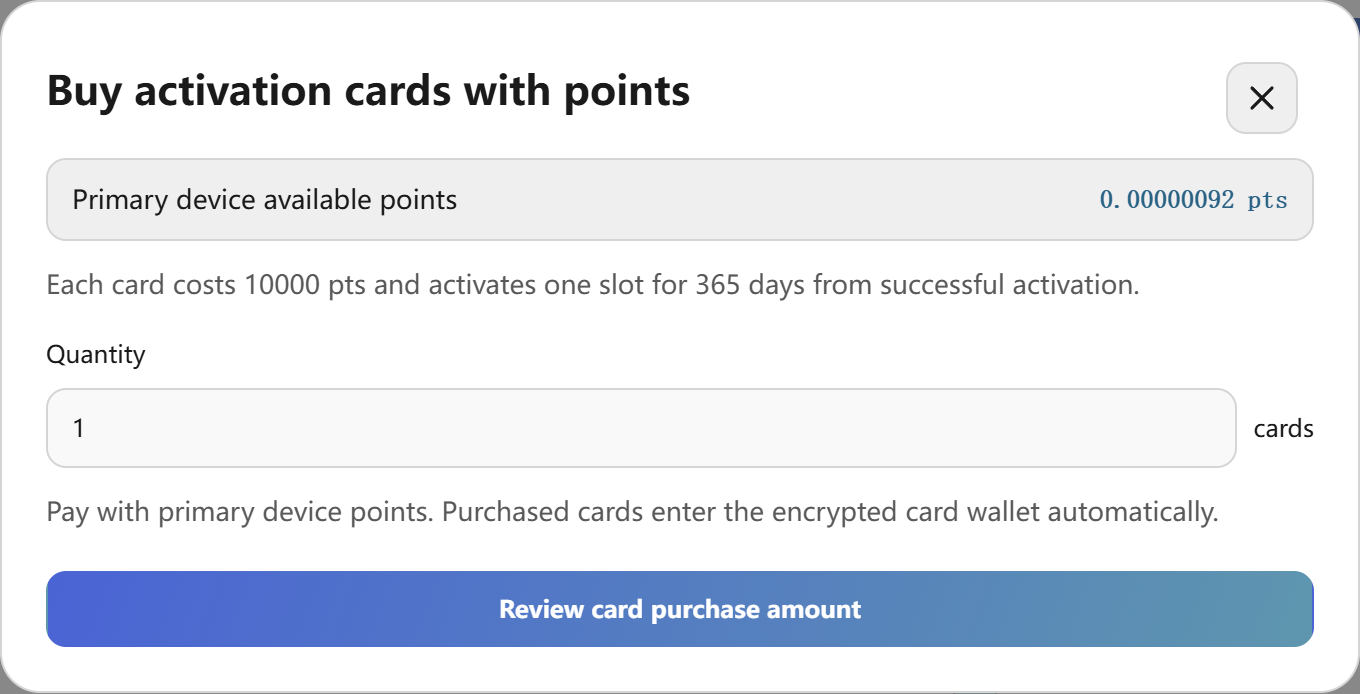
The points-payment dialog quotes 10,000 pts per activation code. Each valid code begins one slot’s 365-day rental term when activated. Enter the desired quantity and select Review card purchase amount. The points payment is drawn from the primary-device balance, and the code is held in the encrypted card wallet. The example screen shows the points requirement and the available balance for this step.
View larger IMAGE 17 | 10,000 pts per rental activation code and points-payment review
POINTS CAN SUPPORT ADDITIONAL SLOTS
At the displayed 100 pts = 1 USDT conversion ratio, 10,000 pts corresponds to 100 USDT in account value. The activation-card screen quotes 10,000 pts for an activation code that starts a 365-day slot rental upon successful redemption. Obtain the code first, then activate the intended slot.
SECTION 06
06Obtain Slot Rental Activation Codes with USDT
Images 18–20 | Create a payment order for 365-day slot rental activation codes and follow the exact BSC instructions shown.
Select the Number of Rental Activation Codes
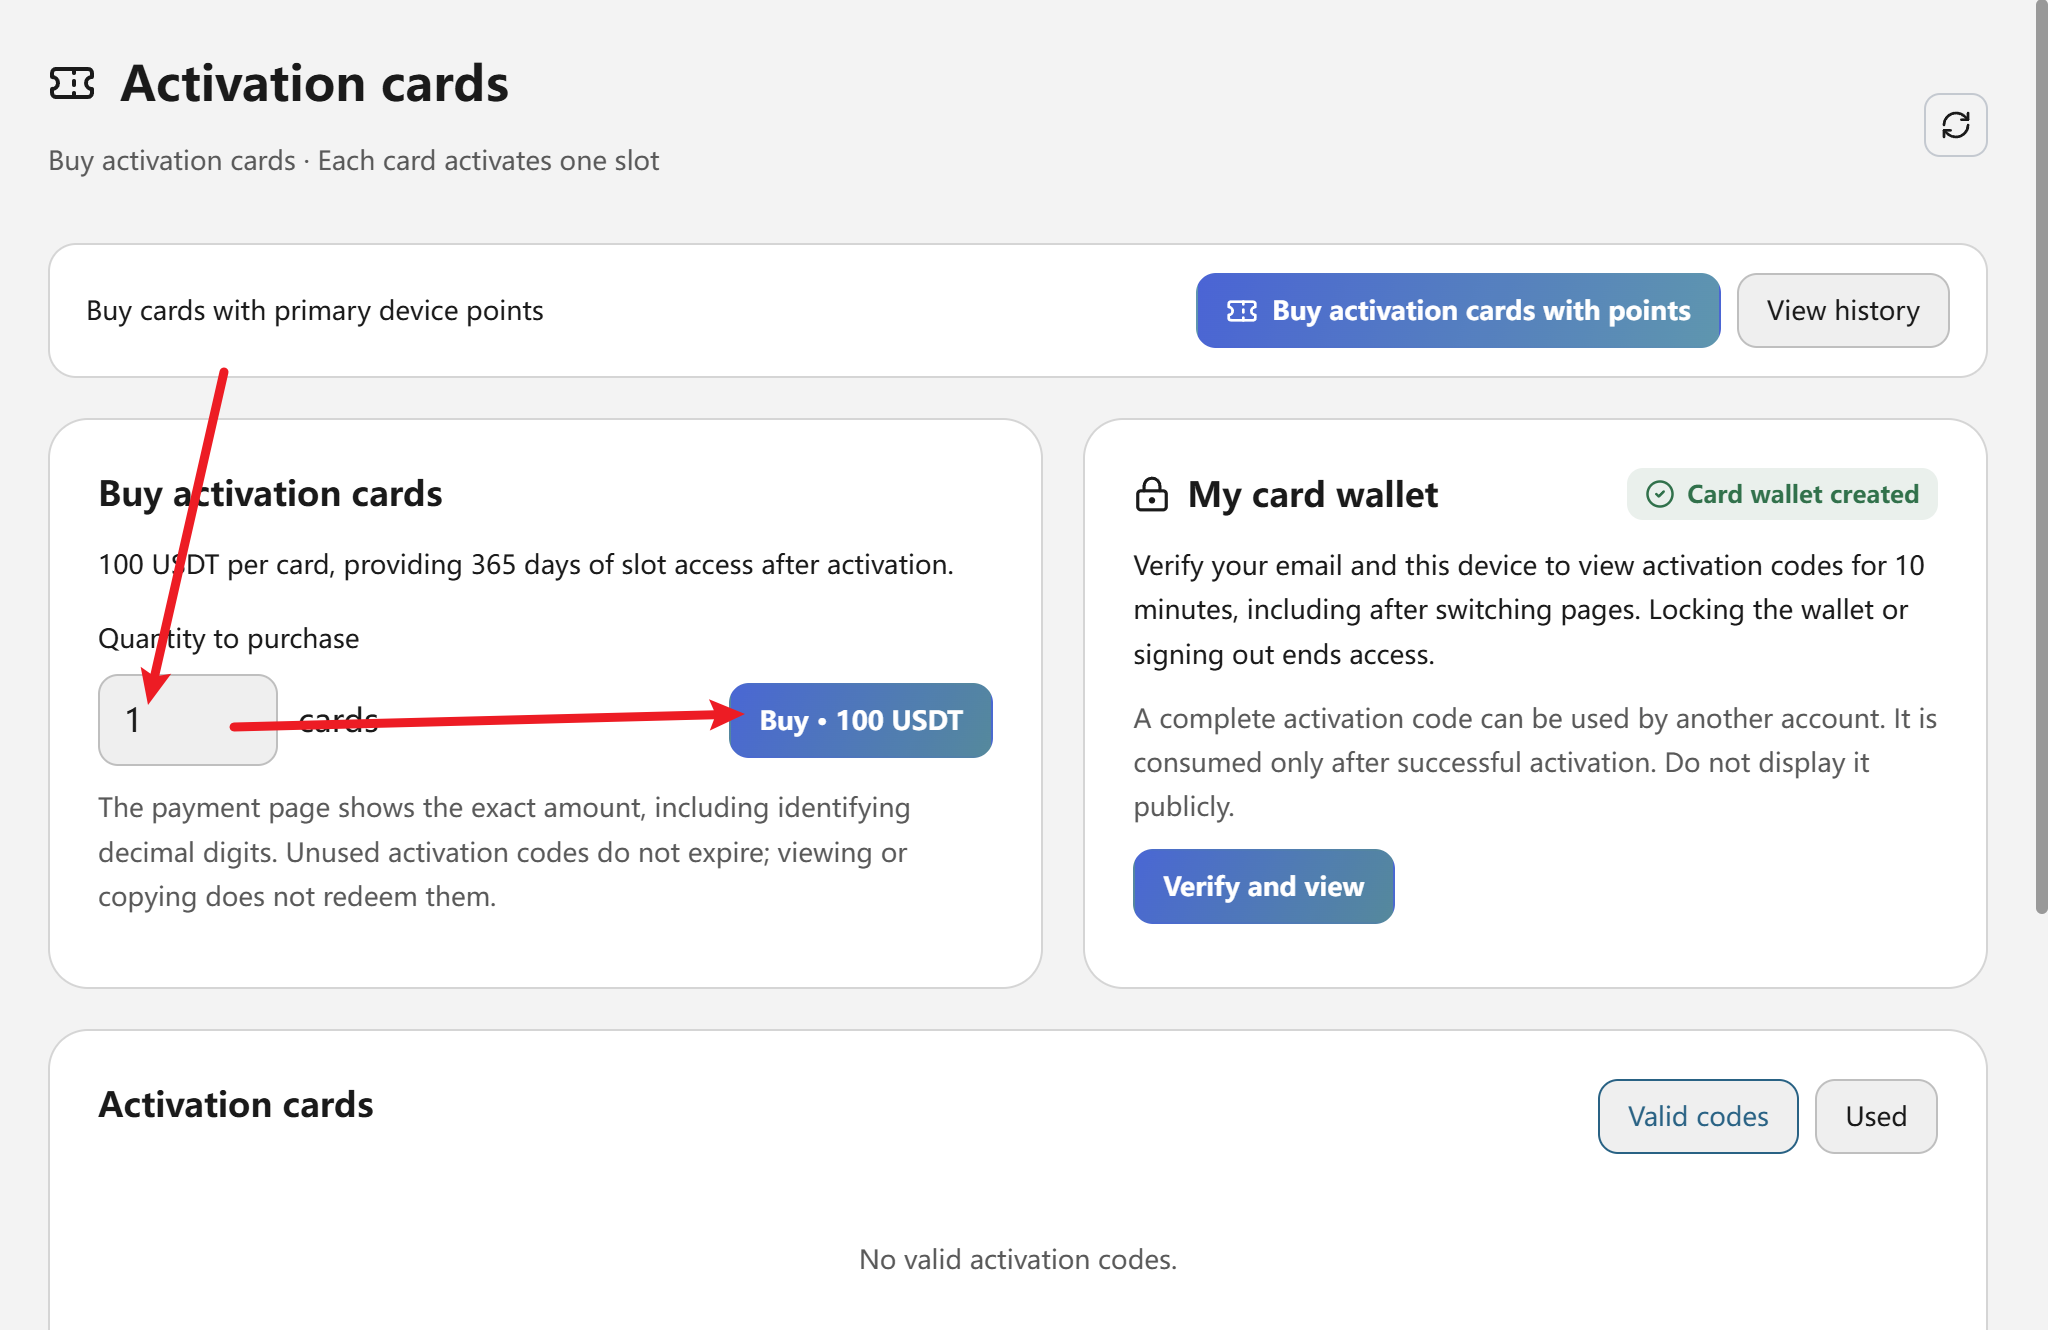
In Activation cards, find Buy activation cards. Each code has a base rental payment of 100 USDT and starts one slot’s 365-day term after activation. Choose the quantity and select the Buy button as labeled in the app. The payment page then supplies the precise order amount, including any identifying decimal digits.
View larger IMAGE 18 | On-screen USDT payment form and “Buy” button for rental codes
Review Terms and Create the Order
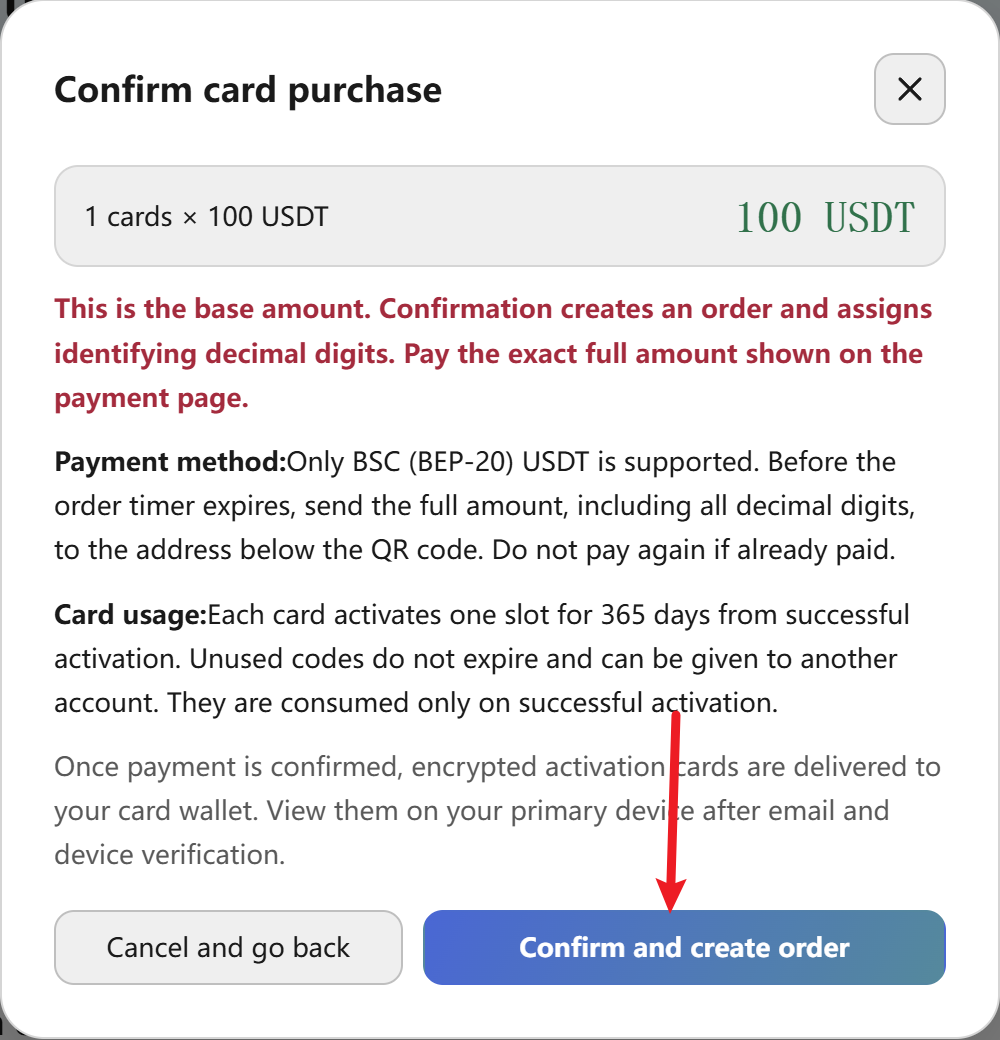
In Confirm card purchase, check the number of activation codes and the total base rental payment. Review the displayed card-use conditions: unused codes remain available until redeemed, can be provided to another eligible account, and are consumed on successful activation. The corresponding 365-day rental period begins when the code is activated. Select Confirm and create order.
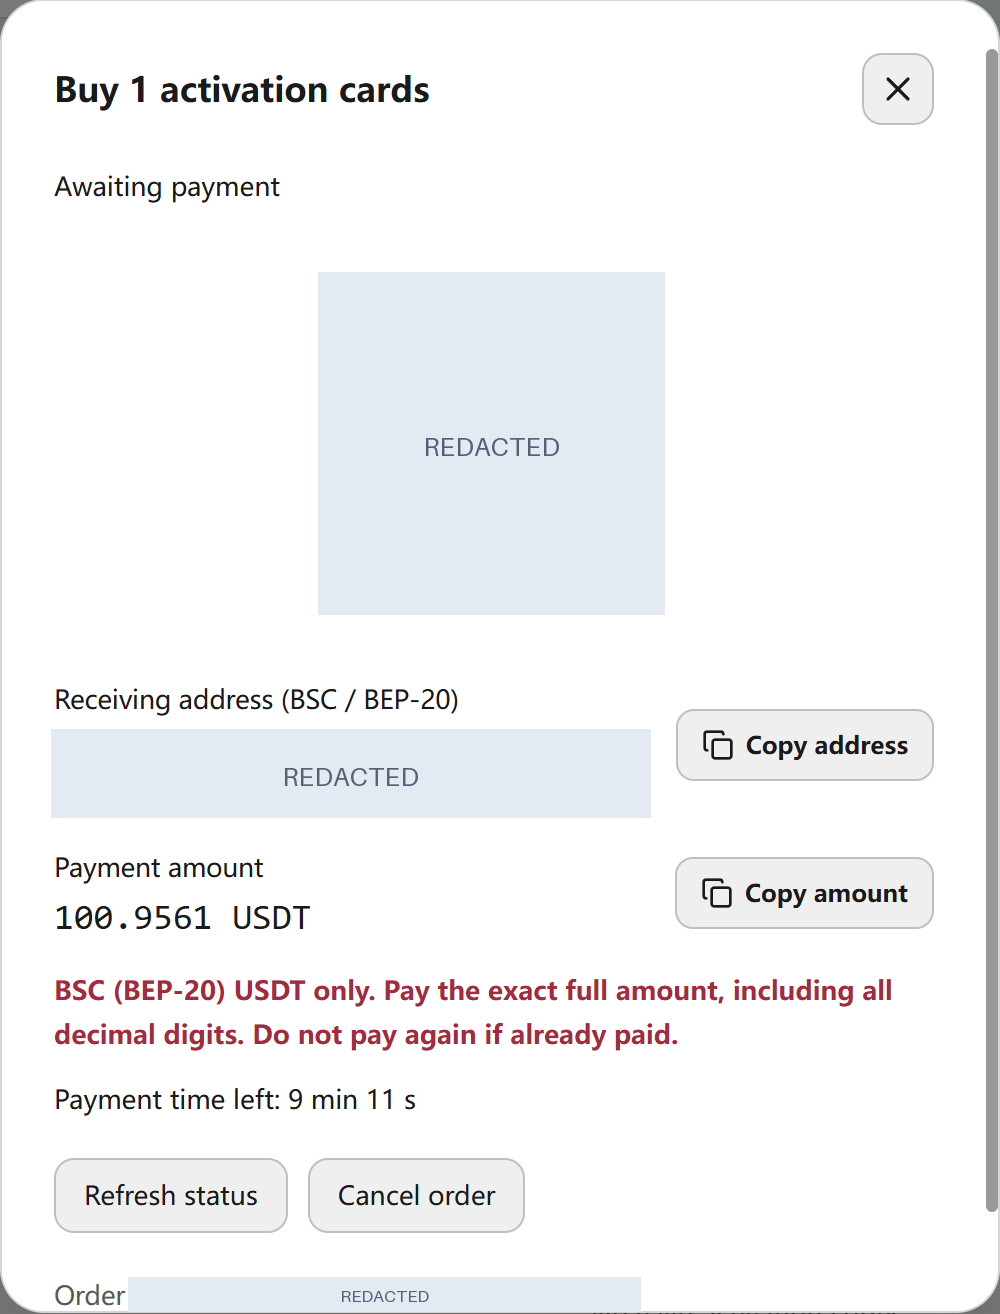
The payment page displays a BSC (BEP-20) receiving address, QR code, exact amount including identifying decimal digits, a time limit, and Refresh status. Copy the address and full amount exactly from your own order—do not use the example values in this screenshot. Send BEP-20 USDT before the timer ends. Keep the order available while checking status, and never send a second payment merely because the first confirmation is taking time.
The base fee is 100 USDT for each activation code covering one slot’s 365-day rental period. Use the exact USDT amount and BSC network shown on your active payment order, including identifying decimals. Keep the order and its transaction details available while waiting for status confirmation.
SECTION 07
07Verify Your Card Wallet & Activate a Slot
Images 21–27 | Unlock the encrypted card wallet with email verification, locate eligible activation codes and apply one to a locked slot.
Open My Card Wallet
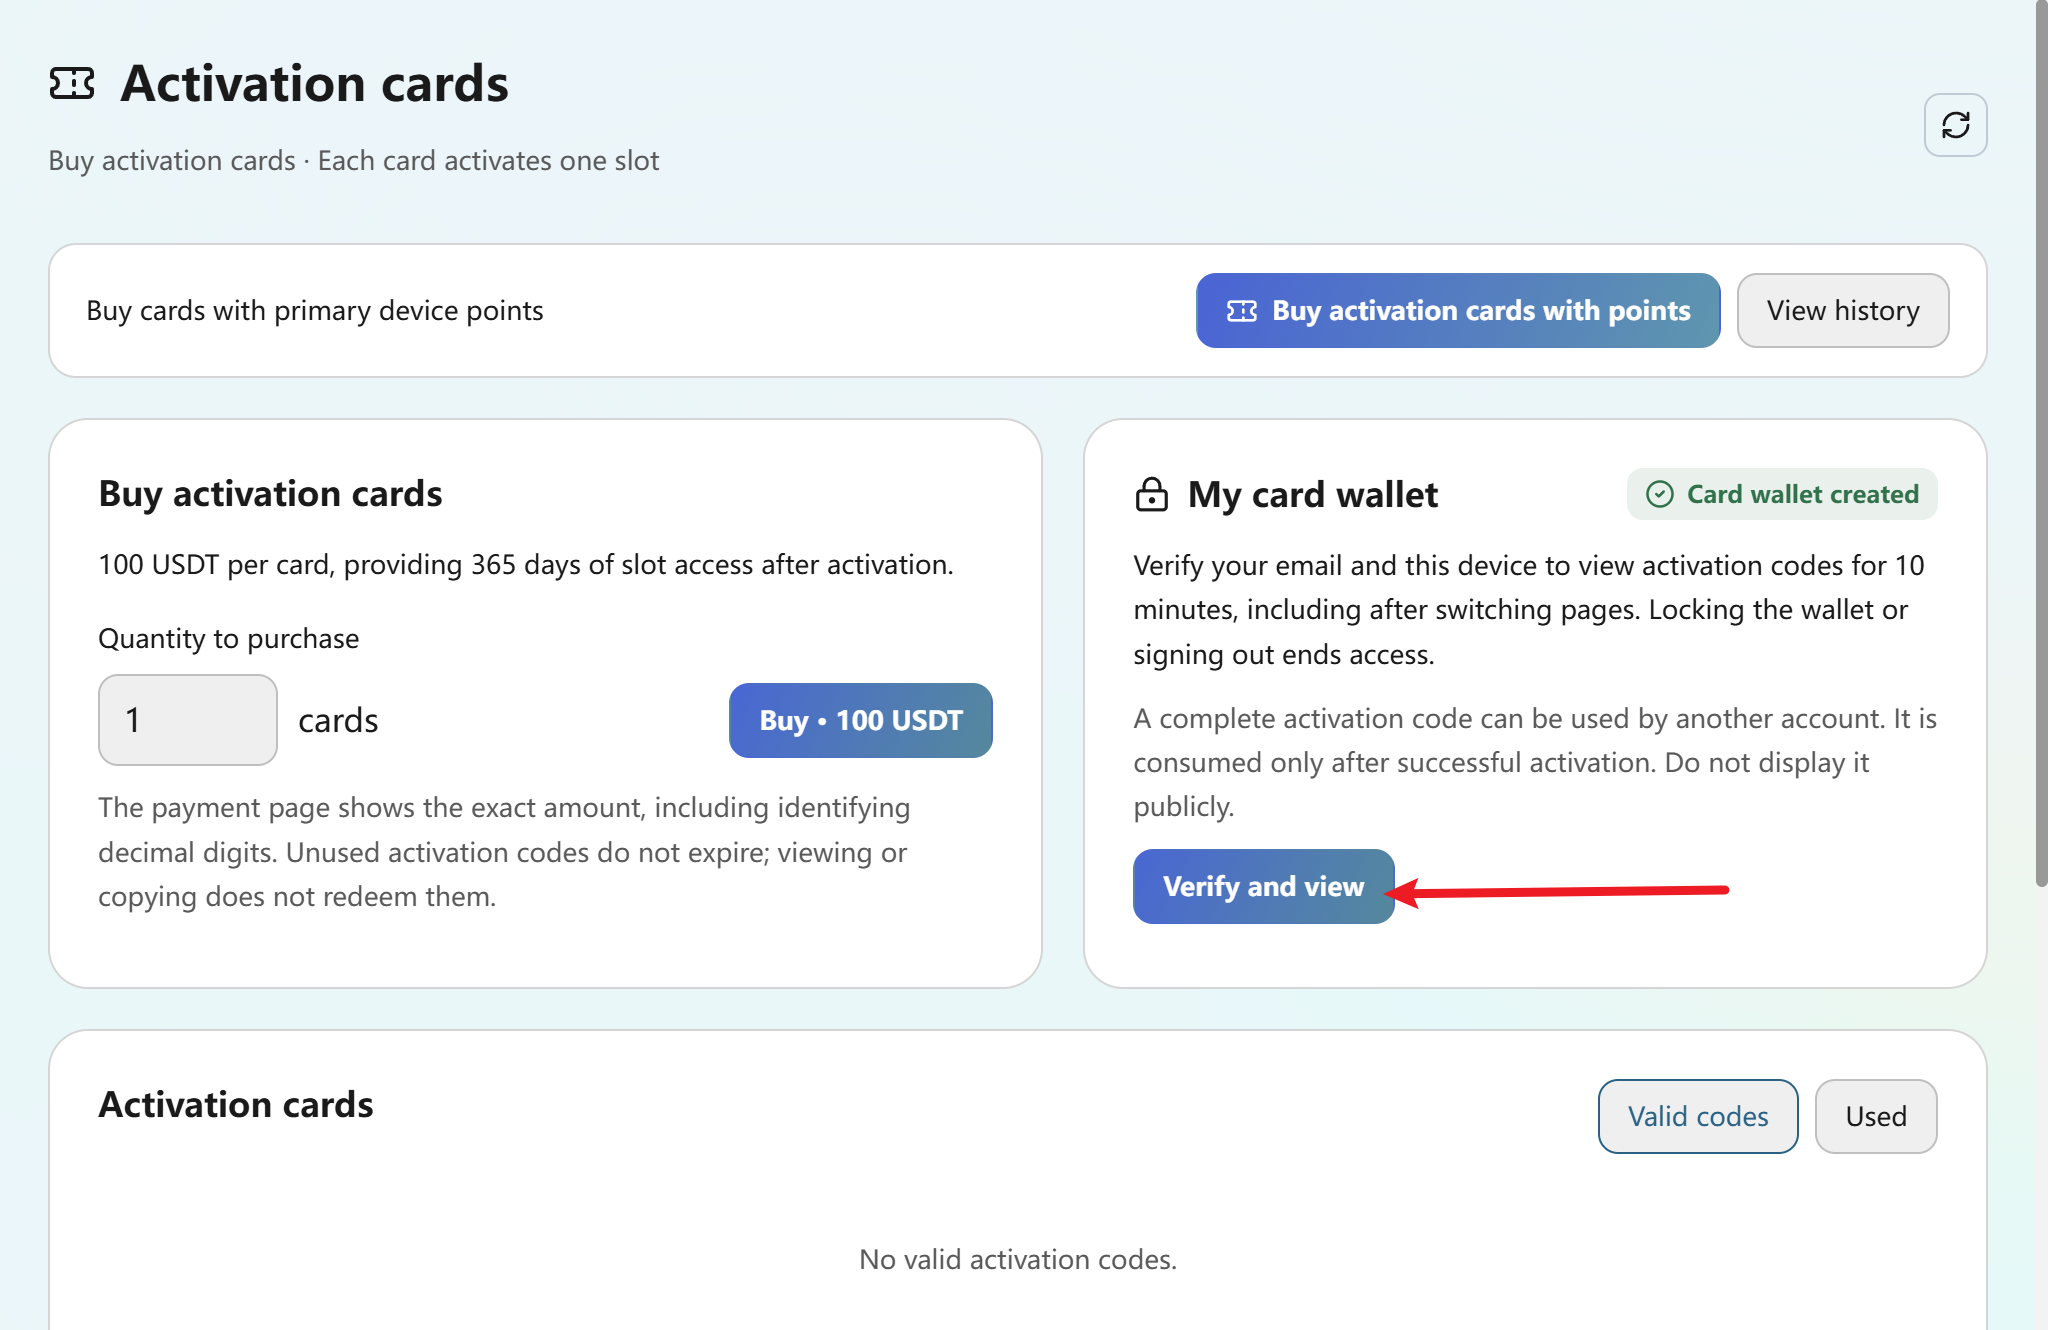
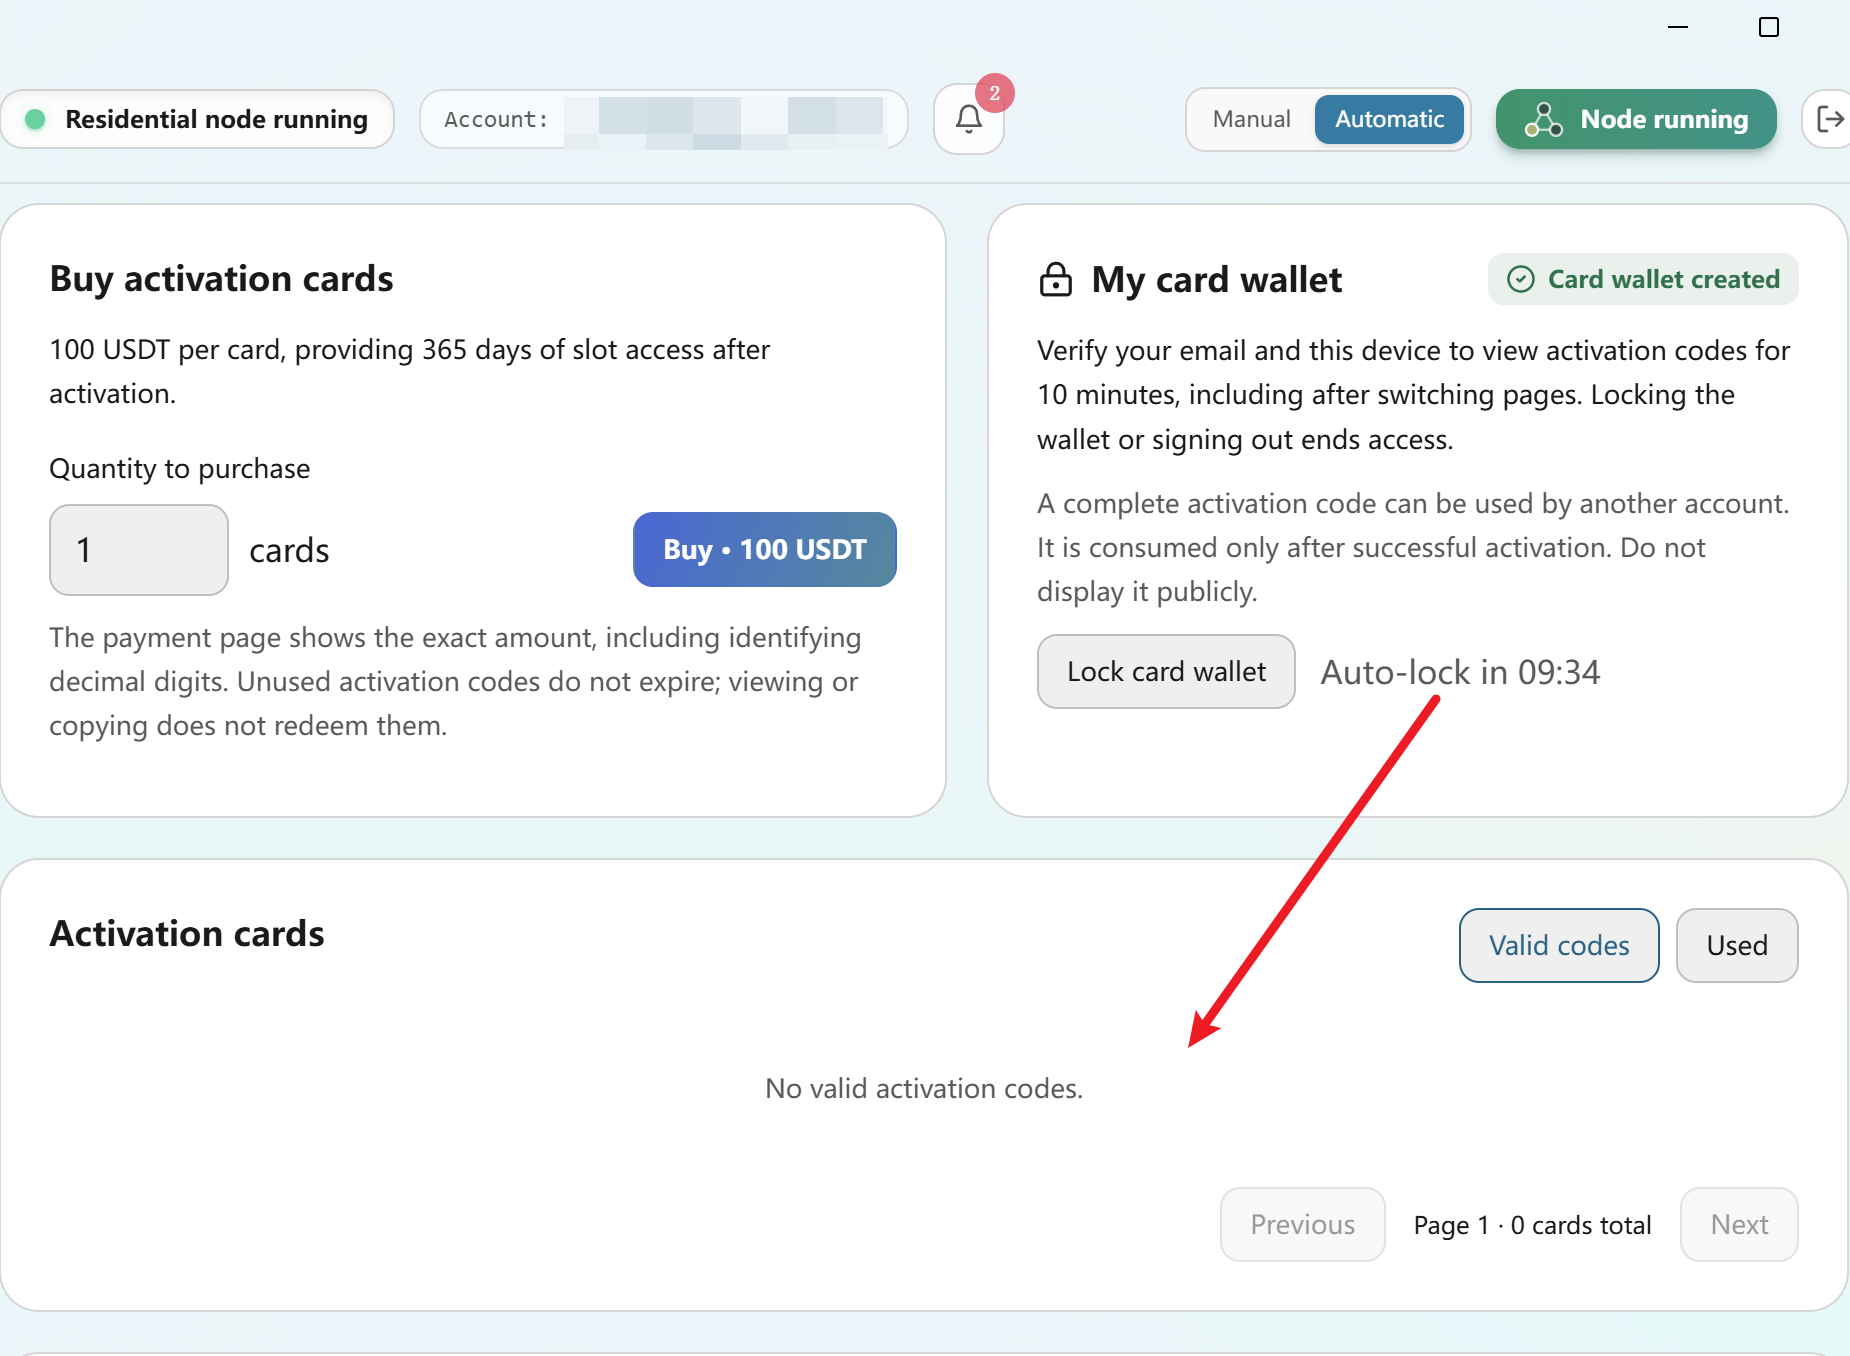
On Activation cards, select Verify and view under My card wallet. The screenshot shows Card wallet created, which means the example device already has an encrypted card wallet. If your own screen instead prompts you to create one, use the available Create card wallet action and follow its on-screen setup before trying to view codes.
View larger IMAGE 21 | My card wallet and Verify and view
Request a Card-Wallet Verification Code
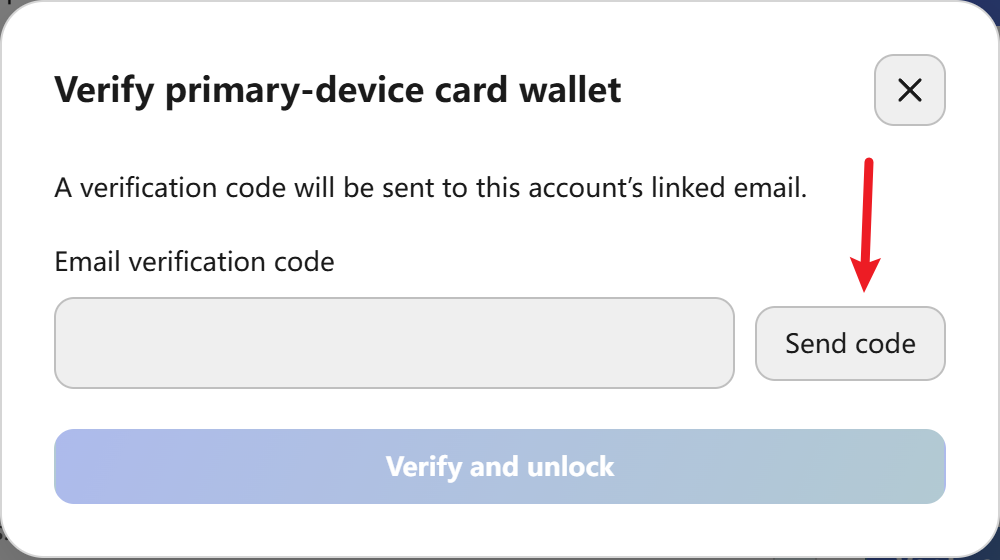
The Verify primary-device card wallet dialog explains that an email verification code will be sent to the linked email address. Select Send code. This verification is for access to the stored activation cards; it is separate from linking a USDT payout address.
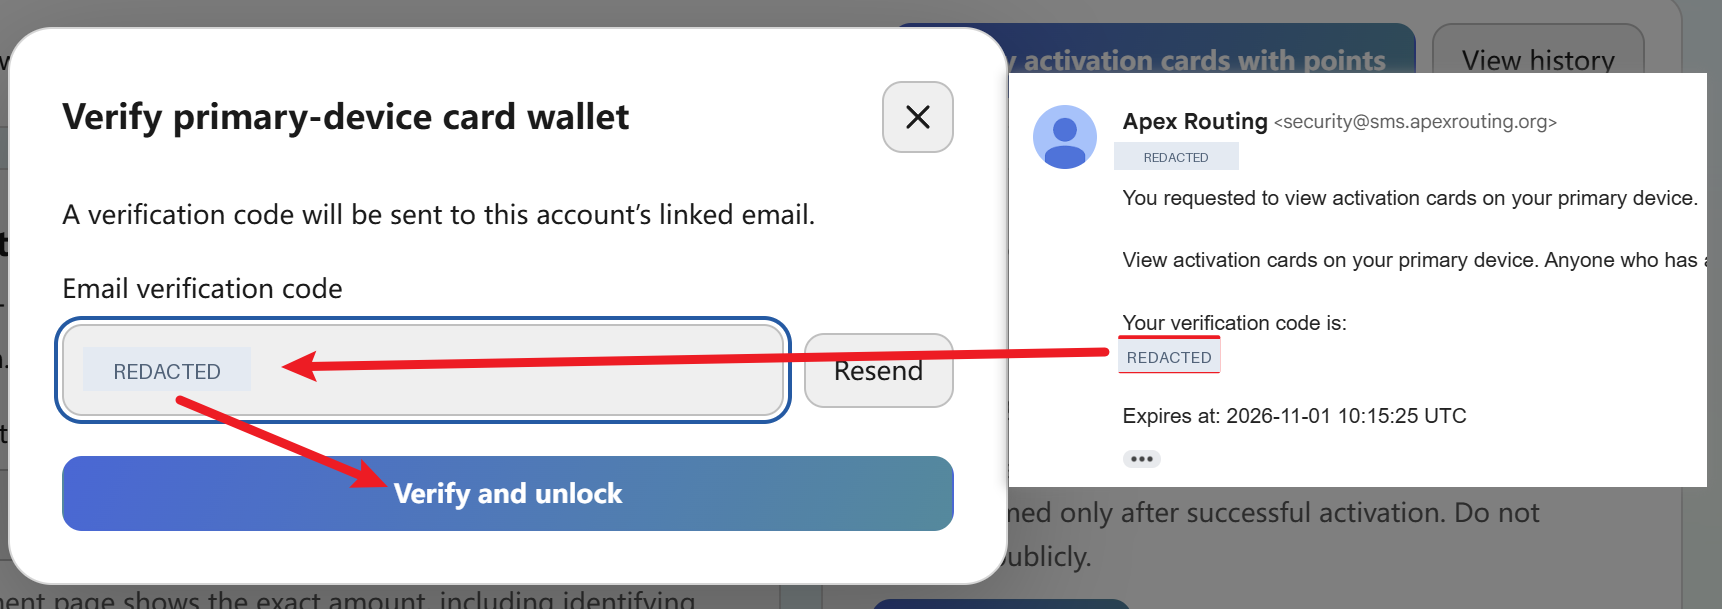
Open the linked email, retrieve the current verification code and enter it in the app. Select Verify and unlock to open the activation-code wallet for this viewing session.
View larger IMAGE 23 | Enter verification code and select Verify and unlockSensitive details hidden
Find Your Activation Codes
After email verification, the wallet temporarily displays the activation-code records. Access remains open for 10 minutes. Open Valid codes for unused entries or Used for redeemed codes. Copy the complete eligible code and keep it secure. The example shows the wallet interface with an empty Valid codes list.
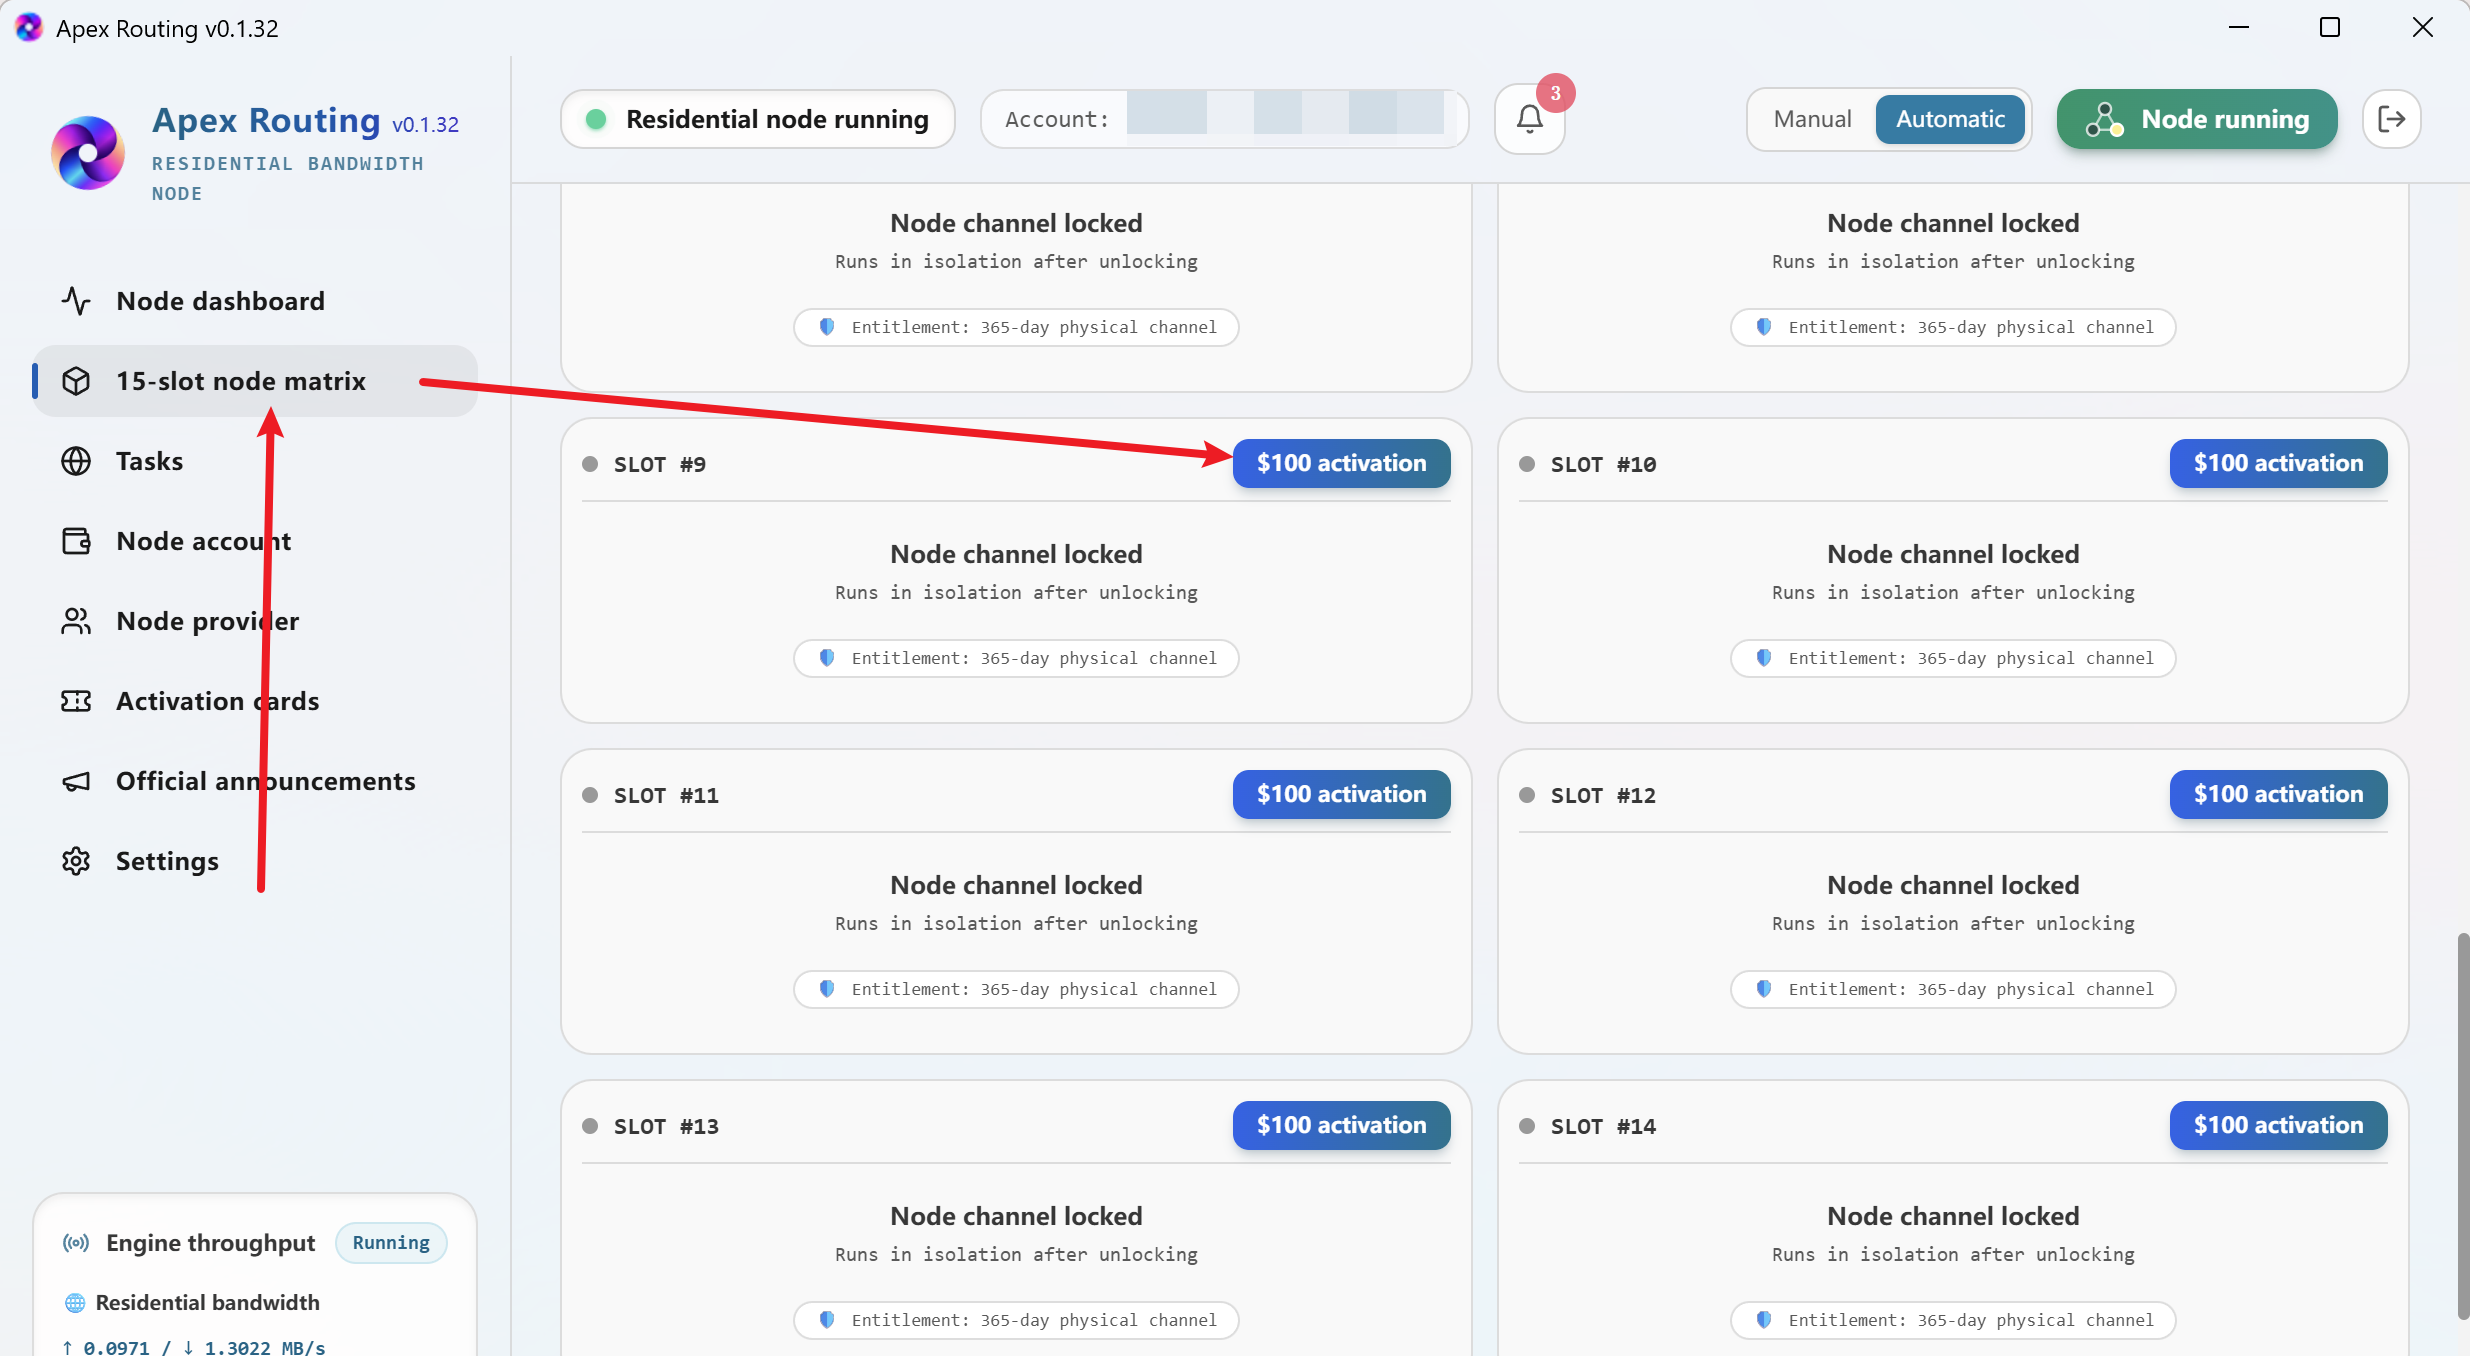
Open 15-slot node matrix and find the locked slot you want to rent and activate. Select its activation button. Each valid activation code starts one slot’s 365-day rental term when successfully redeemed.
View larger IMAGE 25 | Open the node matrix and choose a locked slot
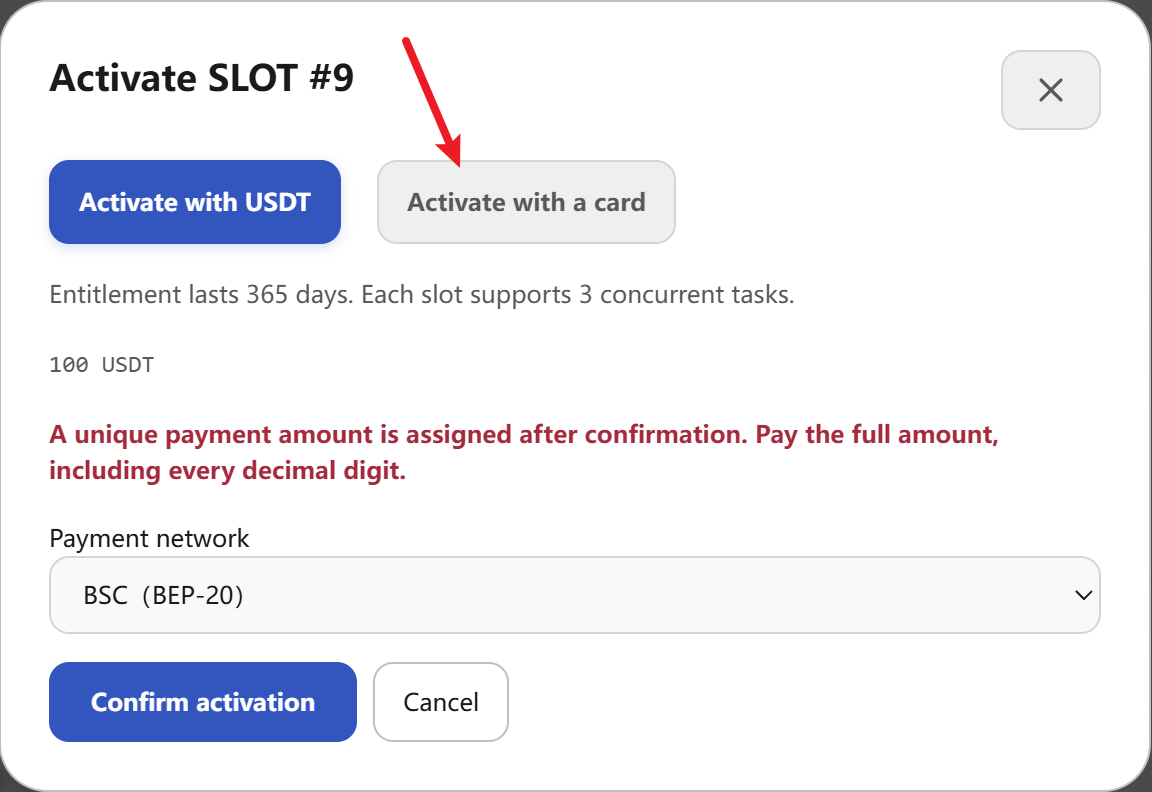
Choose Activation with a Card
In the Activate SLOT dialog, switch from Activate with USDT to Activate with a card. Confirm the slot number before continuing. Obtaining a rental activation code and starting the corresponding slot rental period are separate steps.
View larger IMAGE 26 | Select Activate with a card
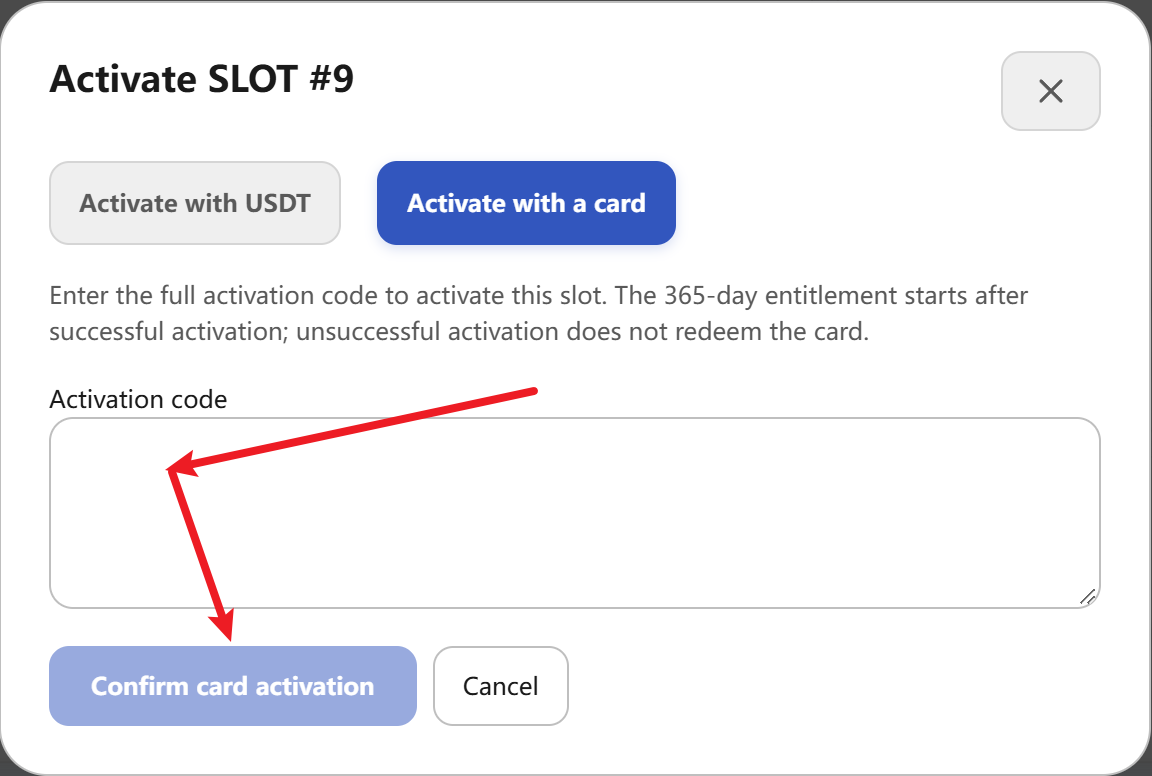
Paste the Full Code and Confirm
Paste the complete code from your card wallet into Activation code and select Confirm card activation. Once the activation succeeds, the slot begins its 365-day rental term and appears as active in the node matrix. Check the slot details to confirm the activated status and remaining rental period.
View larger IMAGE 27 | Enter a complete activation code and confirm card activation
KEEP ACTIVATION CODES SECURE
A complete unused activation code can be redeemed by an eligible account. Store it securely and share it only with the intended recipient. The card is consumed upon successful activation.
08You're All Set!
You have now reviewed how Apex Routing points are claimed, converted and transferred; how a receiving address is linked and a USDT withdrawal request is submitted; and how activation codes are obtained, securely viewed and used to begin 365-day node-slot rental periods.
Thank you for choosing Apex Routing. We appreciate your trust and are pleased to help you make the most of the account-management features available in the application.
— The Apex Routing Team
Momentum / GUIDE 06
Understanding your node economics
Follow the assumptions and arithmetic of a one-device example.
You have learned how to start 365-day node-slot rental terms, manage tasks and use your points. This final chapter brings those pieces together in a clear 360-day calculation: first understand one fully configured computer, then see its annual figures.
THE MANUAL FULL-LOAD MODEL
15 active slots × 100% Manual compute × 24-hour task coverage × 360 calculation days
CALCULATION INPUTS | One slot rents for 100 USDT over 365 calendar days. This worksheet uses an illustrative 30% monthly parameter, 100% Manual compute, 12 × 30 = 360 modeled calculation days, and the client conversion ratio of 100 pts = 1 USDT. The following tables apply these inputs consistently for a 15-slot computer.
NODE SLOT RENTAL | 365-DAY ACCESS Each 100 USDT activation payment provides one node slot with 365 days of rental access after successful activation. Renew the rental term after expiry to continue using that slot.
01Start with a complete 15-slot device
One computer supports up to 15 active slots, each with its own task positions. Full-load Manual Mode assigns 100% of the model’s compute factor to the task. Maintaining this scenario requires available tasks and prompt manual acceptance when each task ends.
View larger SOURCE IMAGE 04 | Node-slot matrix and available task positions
02The calculation: from daily points to an annual total
Start with the value of one slot. The entire device is simply this daily rate multiplied by 15. There is no need for a complicated calculation to see the annual picture.
DAILY FULL-LOAD MANUAL VALUE
100 × 30% × 100% ÷ 30 = 1.00 USDT per slot per day
ONE FULLY ACTIVATED COMPUTER
15 slots × 1.00 USDT = 15 USDT per day = 1,500 pts
Time frame
Plain arithmetic
Calculated point value
One day
15 × 1
15 USDT | 1,500 pts
30-day month
15 × 30
450 USDT | 45,000 pts
360-day year
450 × 12
5,400 USDT | 540,000 pts
MANUAL FULL-LOAD ANNUAL POINT-CONVERSION VALUE
5,400 USDT
15 slots · 360 calculation days · 540,000 pts
The one-minute explanation
A fully populated 15-slot computer produces a calculated 450 USDT equivalent per 30-day month in this full-load model. Repeat that 12 times and the annual point-conversion total becomes 5,400 USDT equivalent.
Where Automatic Mode fits
Manual Mode uses the full 100% compute factor and requires the next task to be accepted manually. Automatic Mode uses a 70% factor but can accept the next available task automatically. The main figures in this guide use the higher 100% Manual full-load calculation, not the automatic-mode figure.
03One computer: annual figures and the three withdrawal choices
The first-year rental and hardware calculation is straightforward: rent 15 slots for 365 days at 100 USDT per slot (1,500 USDT total), then include approximately 100 USD to purchase one usable computer. Slot rental is a term-based expense that must be renewed after expiry if you wish to continue; computer hardware is a one-time purchase cost in this worksheet.
Annual line
Amount
Points converted at displayed 100 pts / 1 USDT
5,400 USDT equivalent
15 slot rental fees × 100 USDT (365-day terms)
−1,500 USDT
One computer purchase, first year
−100 USD equivalent
Remainder before withdrawal fees
3,800 USDT equivalent
Three withdrawal routes, one annual model
Withdrawal method
Fee applied to 5,400
First-year remainder
Fast · 24 hours
10%
3,260 USDT
Standard · 7 days
5%
3,530 USDT
Slow · 15 days
0%
3,800 USDT
FIRST-YEAR REMAINDER · SLOW 0% ROUTE
3,800 USDT
5,400 − 1,500 in 365-day slot rental fees − 100 in first-year hardware
S = activated slots; M = compute factor (1.00 for Manual, 0.70 for Automatic); F = selected withdrawal fee; H = one-time hardware purchase cost in the first year; 100 × S = slot rental fees for the 365-day term. For our 15-slot Manual full-load model: S = 15, M = 1.00, H = 100. Example with the 0% route: 5,400 − 1,600 = 3,800.
For everyone else: remember these three figures
One 15-slot computer
Full-load Manual calculation
Each 30-day month
450 USDT equivalent
Twelve 30-day months
5,400 USDT equivalent
First-year remainder · Slow 0%
3,800 USDT equivalent
The same computer in a later entitlement term
If the computer remains usable after the first year, the original hardware purchase does not need to be counted again. The 15 slot rentals have a 365-day term and require a new rental period to continue after expiry. Under the same calculation inputs, the later-term remainder with the 0% withdrawal route is 5,400 − 1,500 = 3,900 USDT equivalent.
FROM ONE DEVICE TO A LARGER VIEW
One device makes the model clear. The next chapter shows how authorized remote access makes more devices easier to reach and manage.
Thank you for choosing Apex Routing. — The Apex Routing Team
WORKSHEET BASIS | The figures follow a 30% monthly modeling parameter, continuous Manual-mode task allocation, 360 calculation days, and the listed slot rental, hardware and withdrawal costs. The worksheet shows the arithmetic of this specific scenario, with operational expenses tracked separately as appropriate.
A single device is easy to follow when you know its tasks, points and operating costs. A second device introduces a new question: how do you check on it without standing beside it? This guide shows how to connect to a separate Windows computer with RustDesk, a third-party remote desktop application, and view the Apex Routing app on that machine.
WHAT YOU WILL LEARN
01 Download RustDesk from its official website · Images 1–4
02 Install RustDesk on the computers involved · Image 5
03 Connect and authorize access using either approval or a one-time password · Images 6–7
04 Reconnect and organize remote-device entries · Images 8–9
05 View and manage Apex Routing remotely · Image 10
TWO DEVICES Main device: the computer you will use to initiate a remote connection. Remote device A: the computer you want to access, with Apex Routing running.
BEFORE YOU BEGIN Use computers you own or are permitted to manage. Both must be powered on, awake and online with RustDesk available. Connections can be authorized by accepting the request on remote device A, or by entering its current one-time password on the main computer if password authentication is enabled.
The screenshots show an example Windows workflow. Menu labels and release versions may vary. RustDesk is independently provided and is not a built-in Apex Routing feature.
01 / DOWNLOAD & INSTALL RUSTDESK
01Visit the RustDesk website
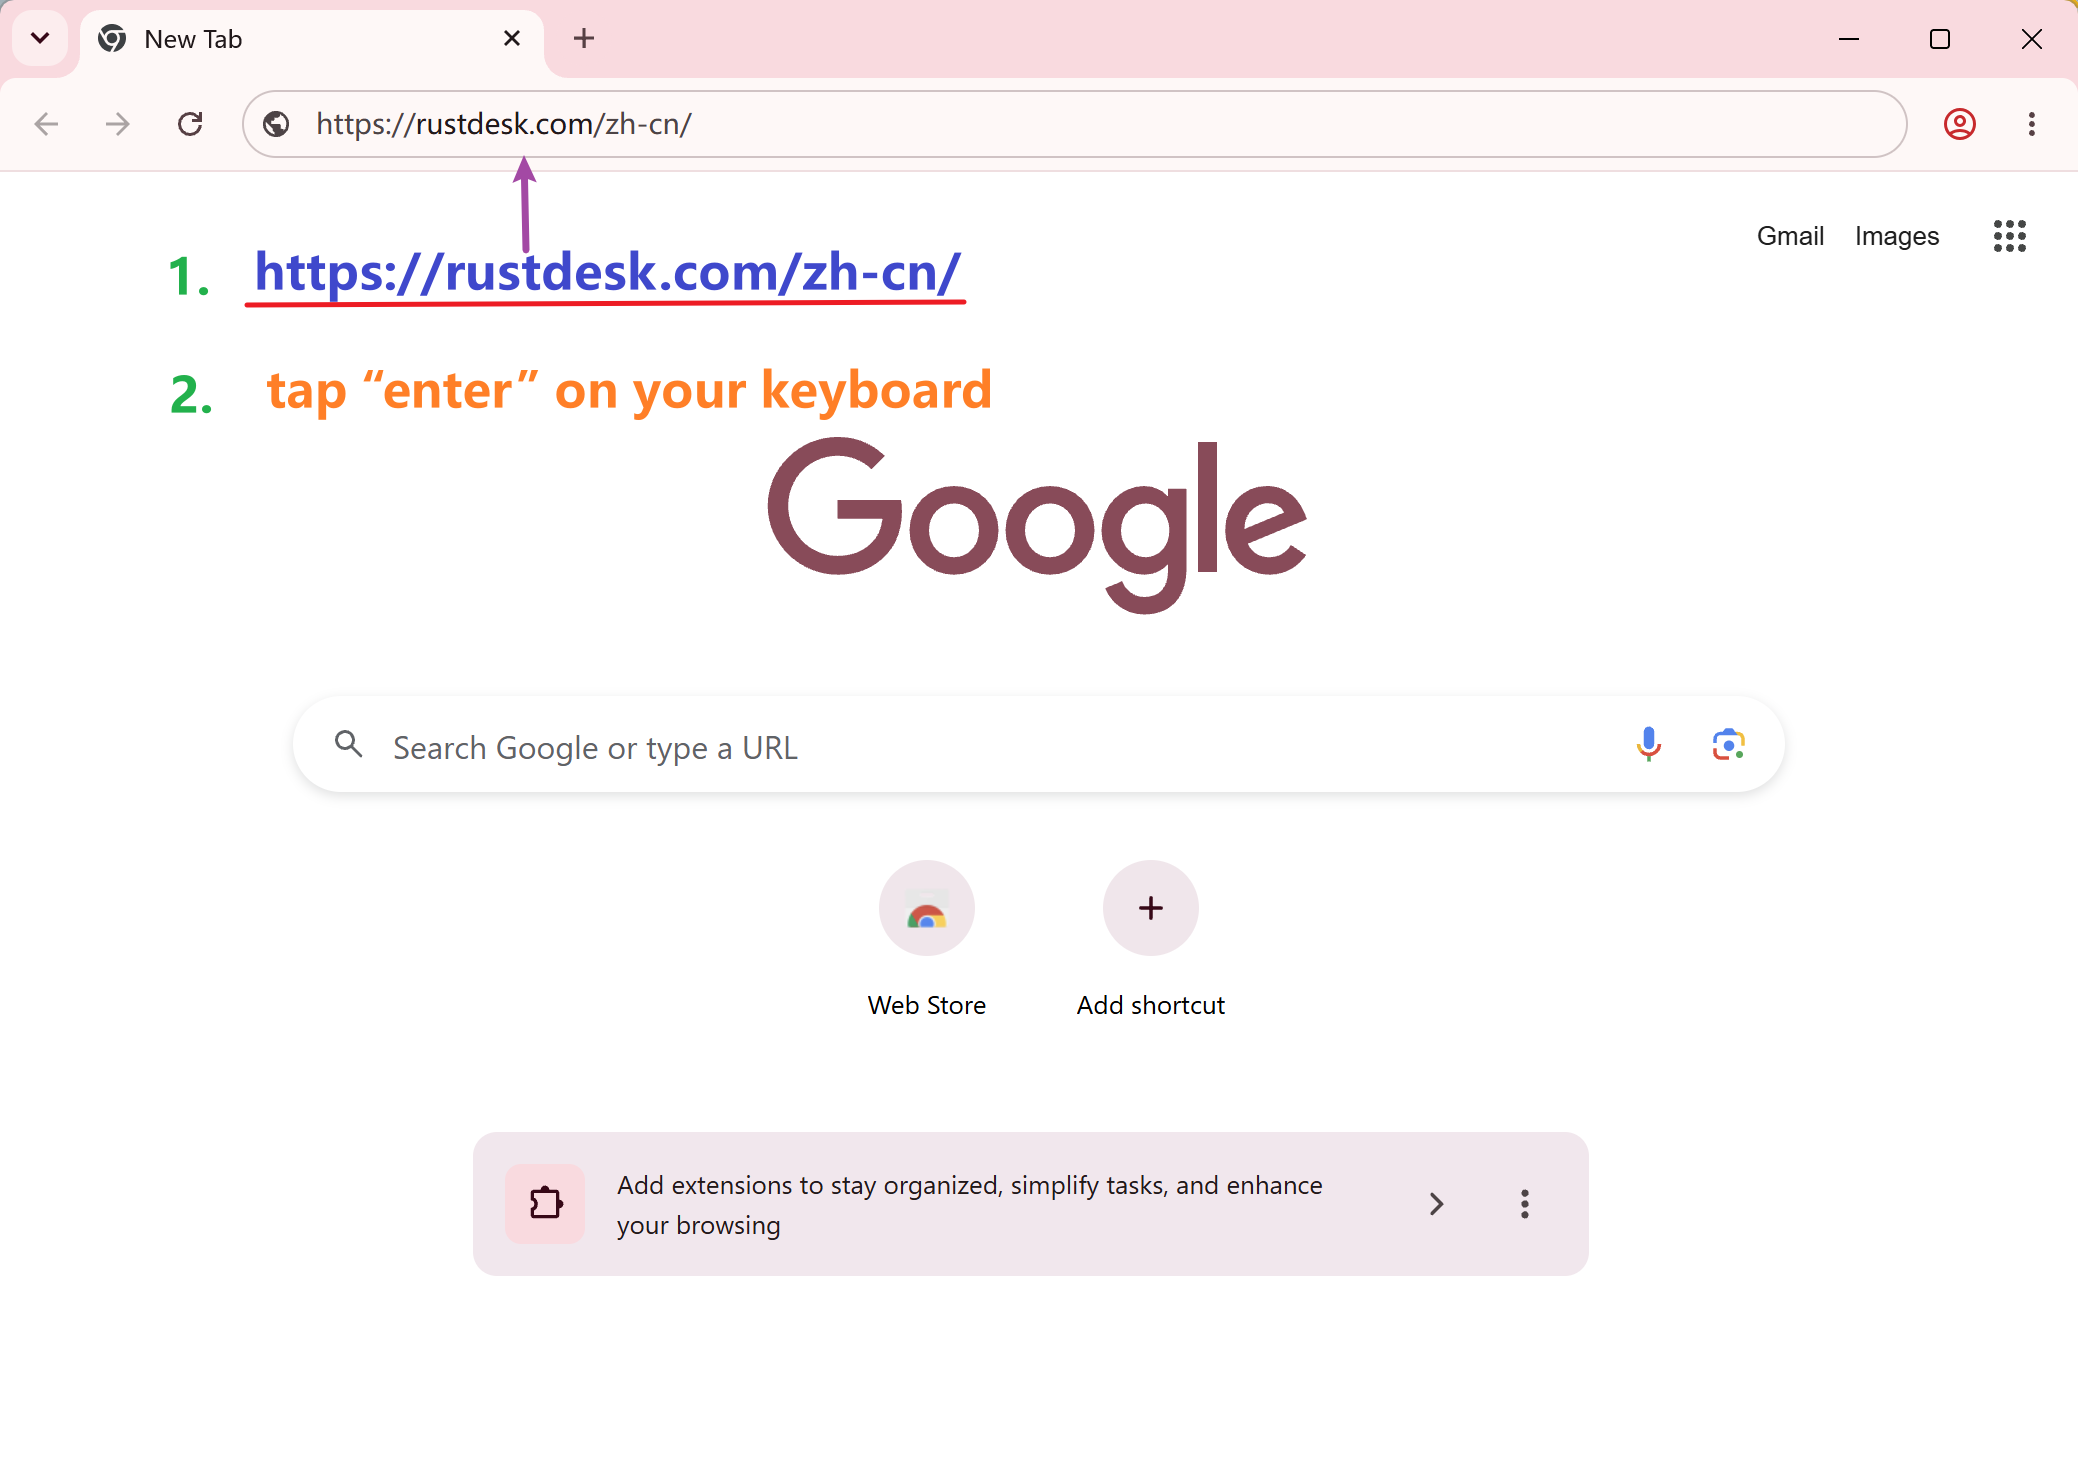
Open a browser on the computer you want to use for remote access. Enter https://rustdesk.com/ in the address bar and press Enter.
Use the official RustDesk website when obtaining the installer. The screenshot shows a localized version of the website; its page language may differ on your computer.
View larger IMAGE 01 | Enter the official RustDesk website address and load the page.
GOOD TO KNOW For this guide, install RustDesk on the main device and on each remote computer you plan to manage.
01 / DOWNLOAD & INSTALL RUSTDESK
02Open the download page
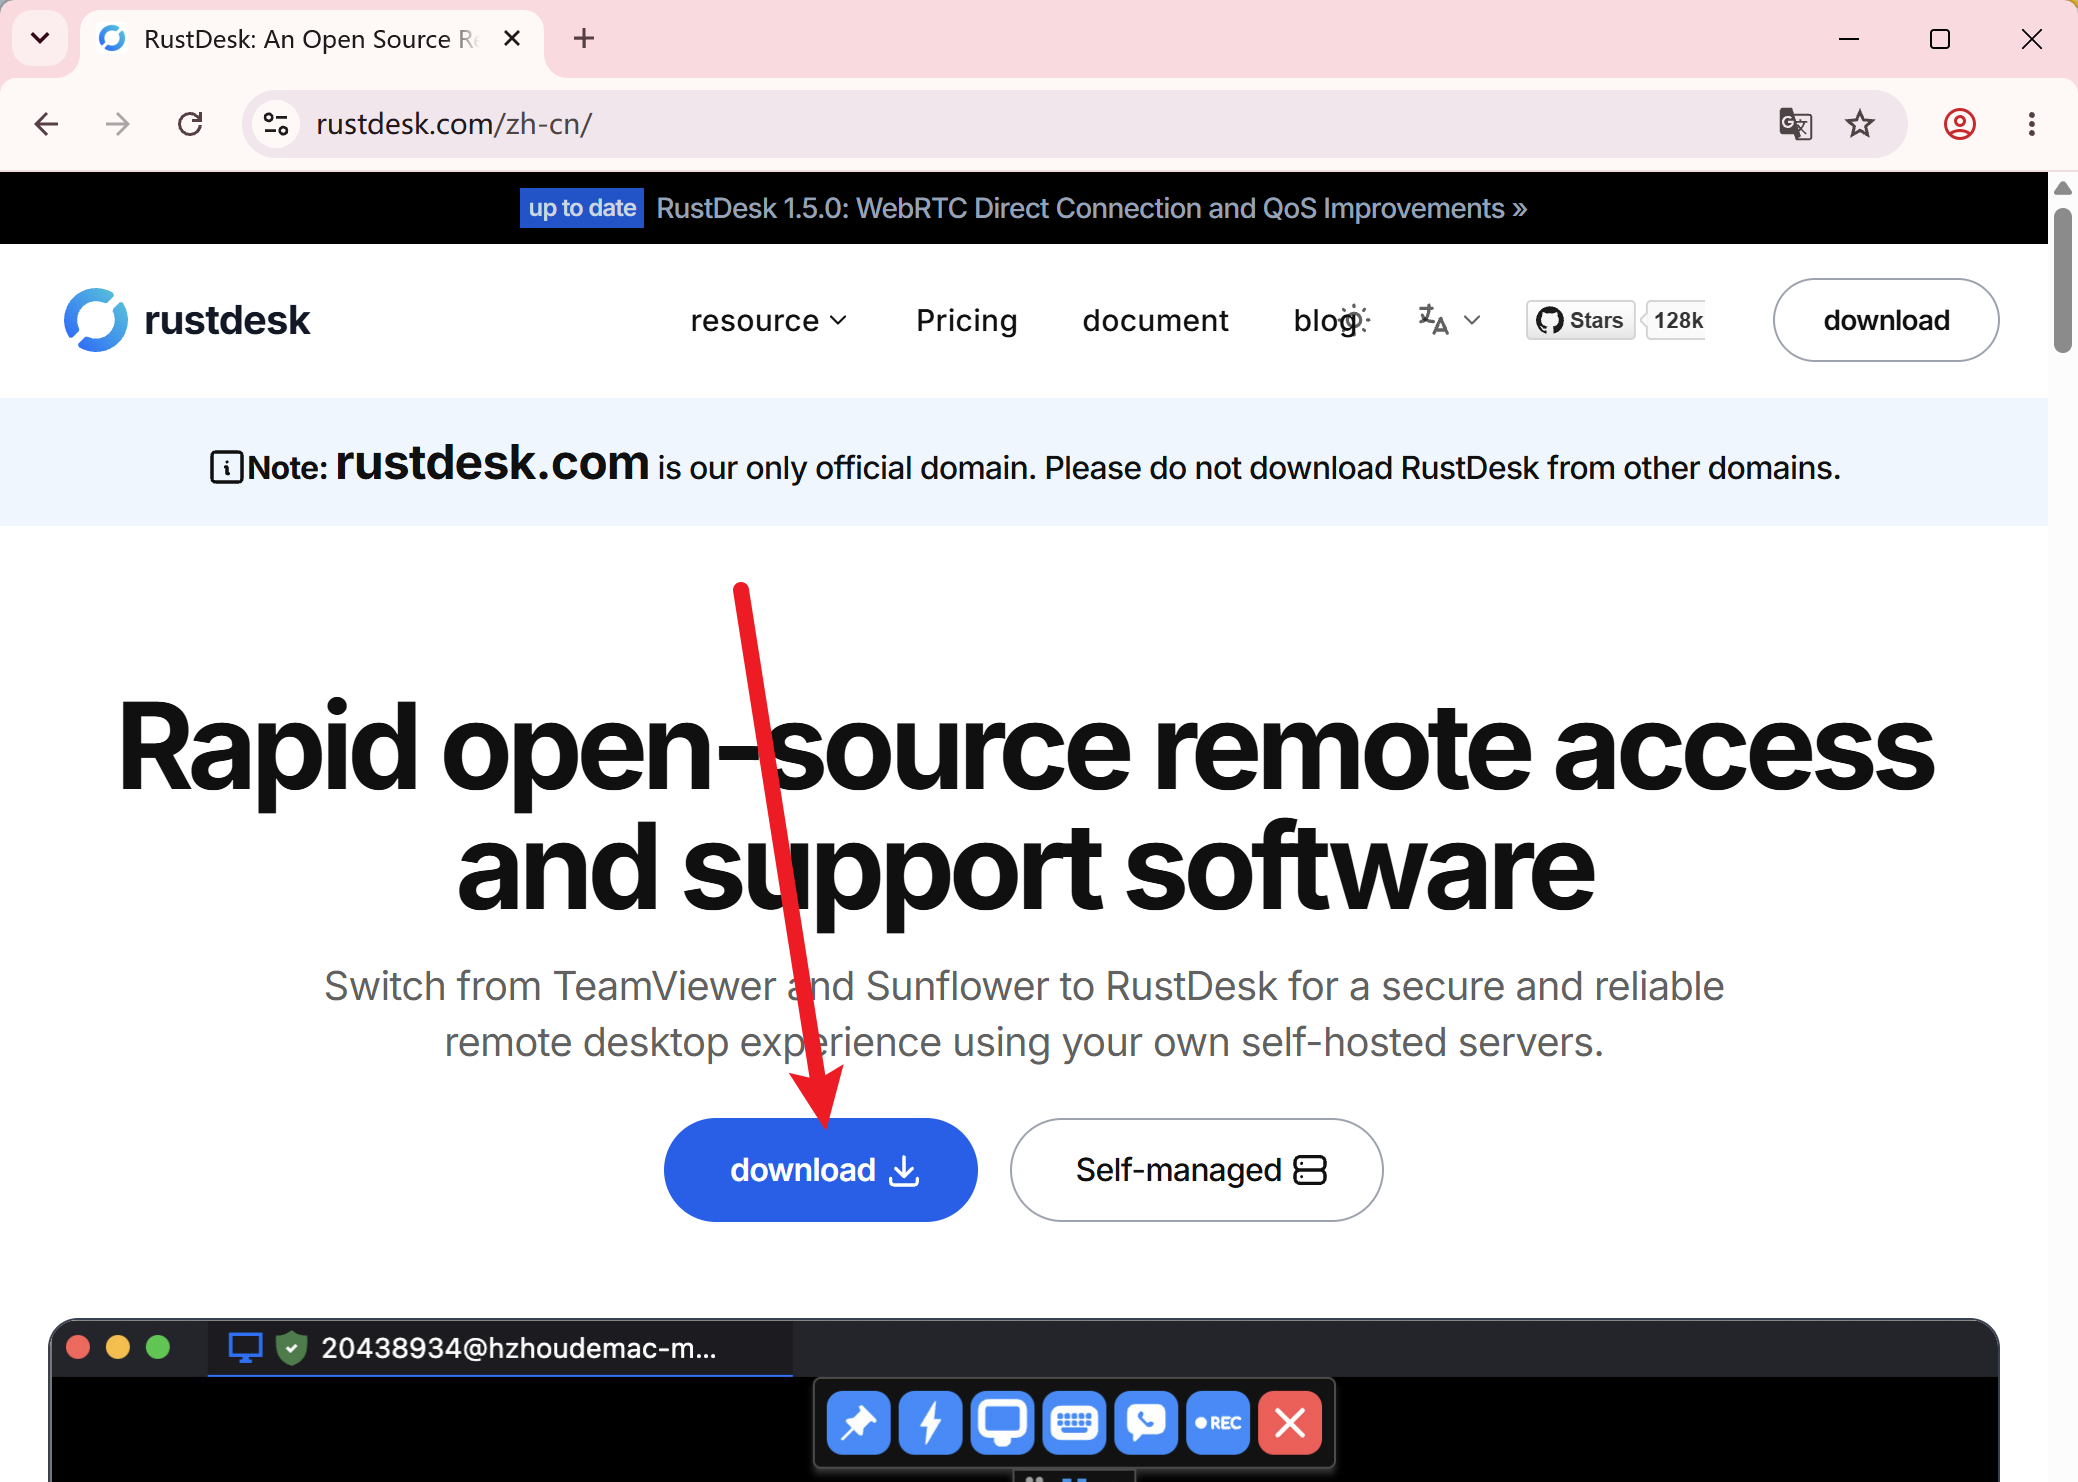
On the RustDesk homepage, select Download. The website will take you to its software download options.
Choose the Windows package that matches the computer you are installing on.
View larger IMAGE 02 | Select Download on the RustDesk website.
IMPORTANT Avoid unverified download mirrors or links received from unknown senders.
01 / DOWNLOAD & INSTALL RUSTDESK
03Choose the Windows installer
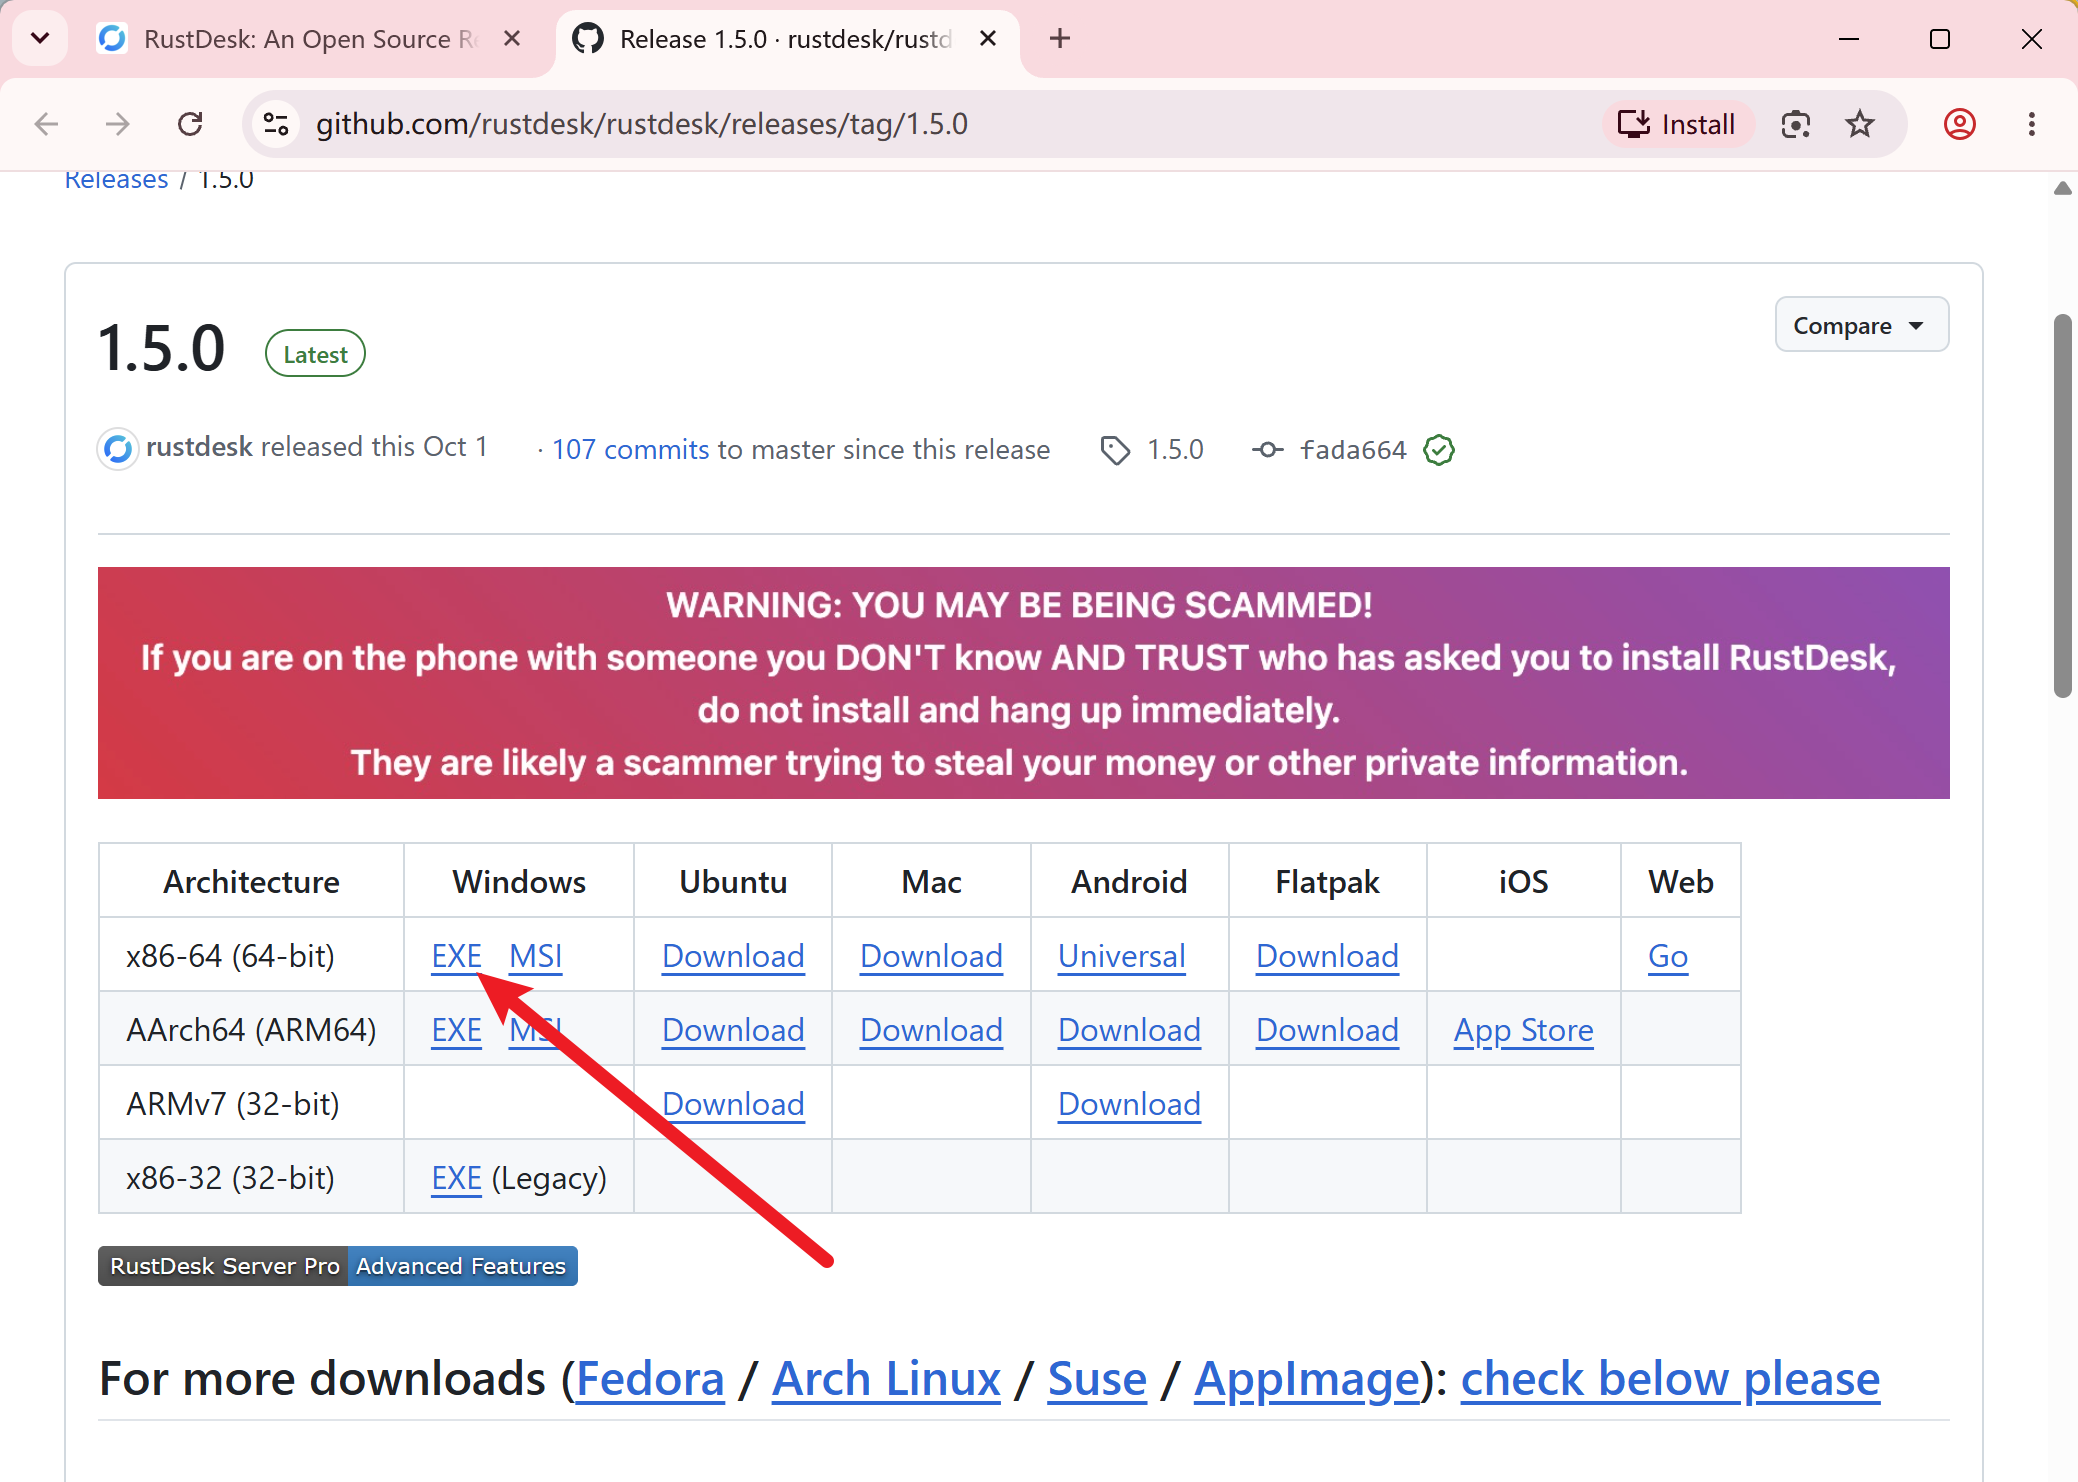
The download flow in the example opens the RustDesk GitHub release page. Find the Windows download options and choose the EXE file for your system architecture; the image points to the 64-bit Windows EXE option.
The screenshot shows release 1.5.0 as an example. You may see a newer release or a different layout when following these steps.
View larger IMAGE 03 | Select the appropriate Windows EXE from the release page.
GOOD TO KNOW For a typical Windows 10/11 PC with a 64-bit Intel or AMD processor, select the x86-64 (64-bit) Windows build.
01 / DOWNLOAD & INSTALL RUSTDESK
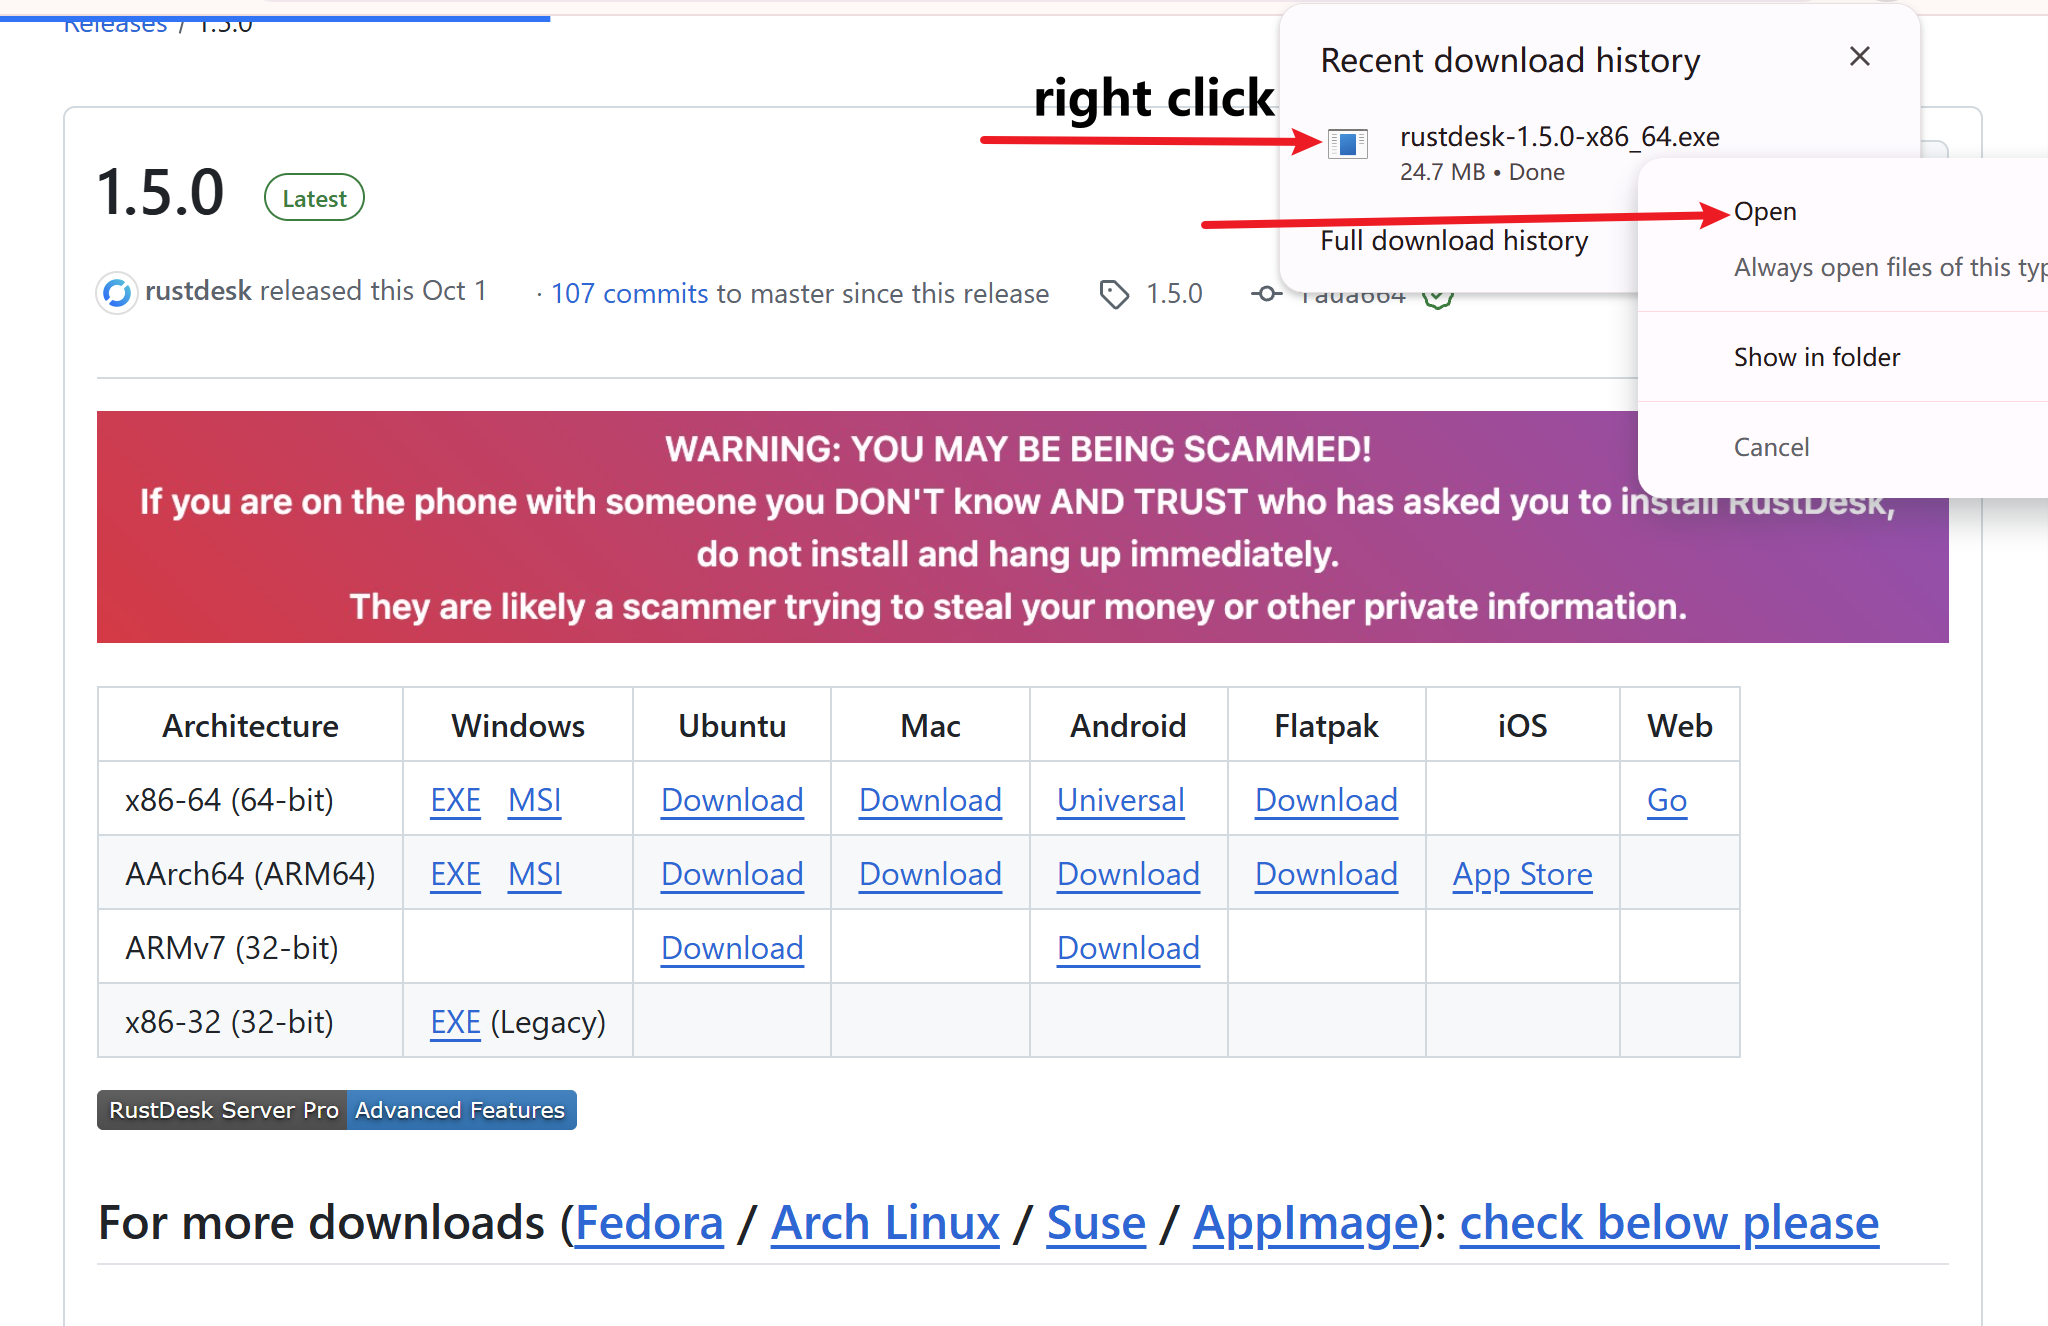
04Open the downloaded file
After the download completes, open your browser’s recent downloads list. Locate the RustDesk installer, then choose Open to start it.
If Windows asks whether you want to allow the installer to run, review the application information before approving.
View larger IMAGE 04 | Open the downloaded RustDesk installation file from your browser.
IMPORTANT Only continue if the installer came from the official RustDesk download source.
01 / DOWNLOAD & INSTALL RUSTDESK
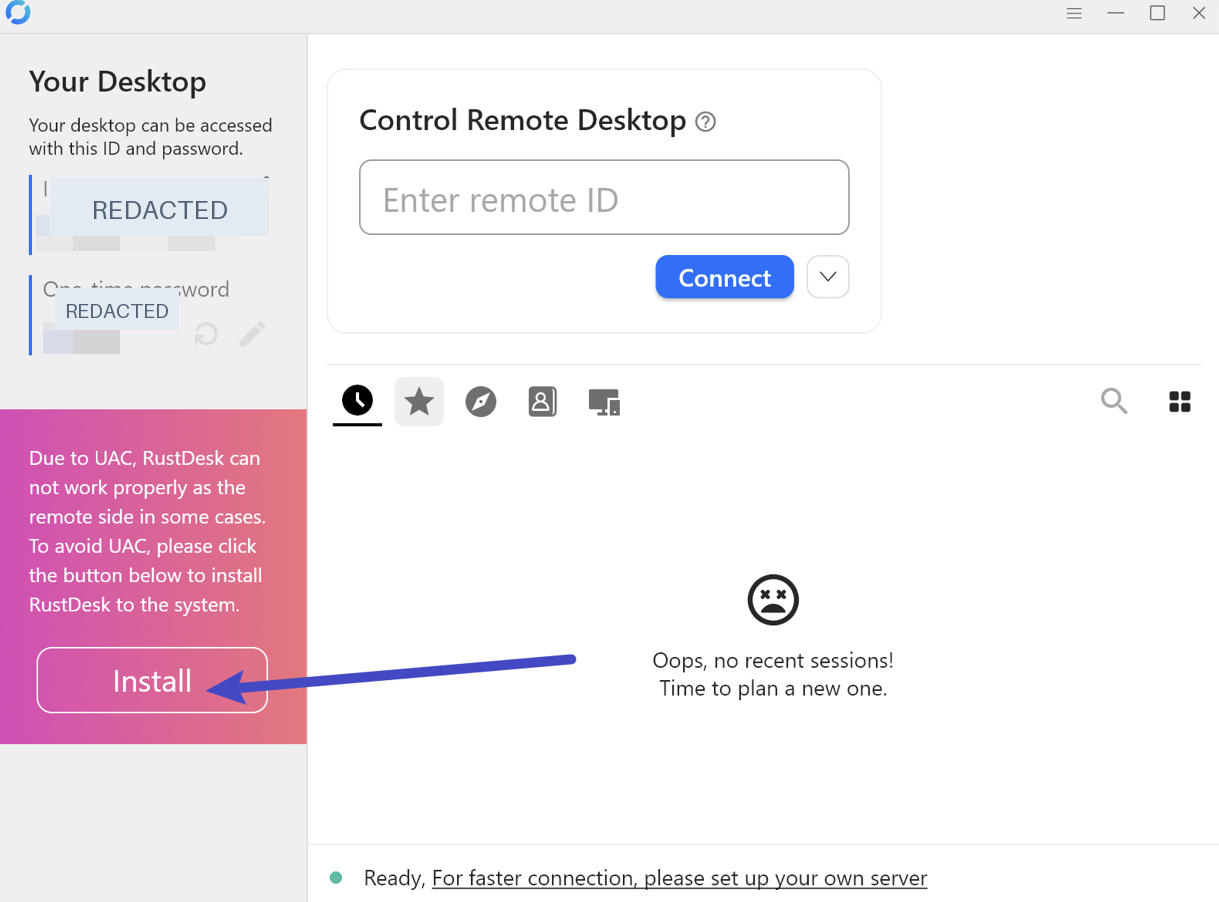
05Install RustDesk on both computers
Launch RustDesk. On the Windows client shown here, an Install button is available to set up RustDesk on the computer. Select it and follow the Windows installation prompts.
Repeat the download and installation steps on remote device A. After installation, open RustDesk on both devices and make sure each app is ready for a connection.
View larger IMAGE 05 | Use the Install option in the RustDesk Windows application.Sensitive details hidden
GOOD TO KNOW Two authorization methods are supported in RustDesk: approve the request on remote device A, or enter its current one-time password on the main computer when prompted, subject to the remote device security settings.
02 / CONNECT YOUR COMPUTERS
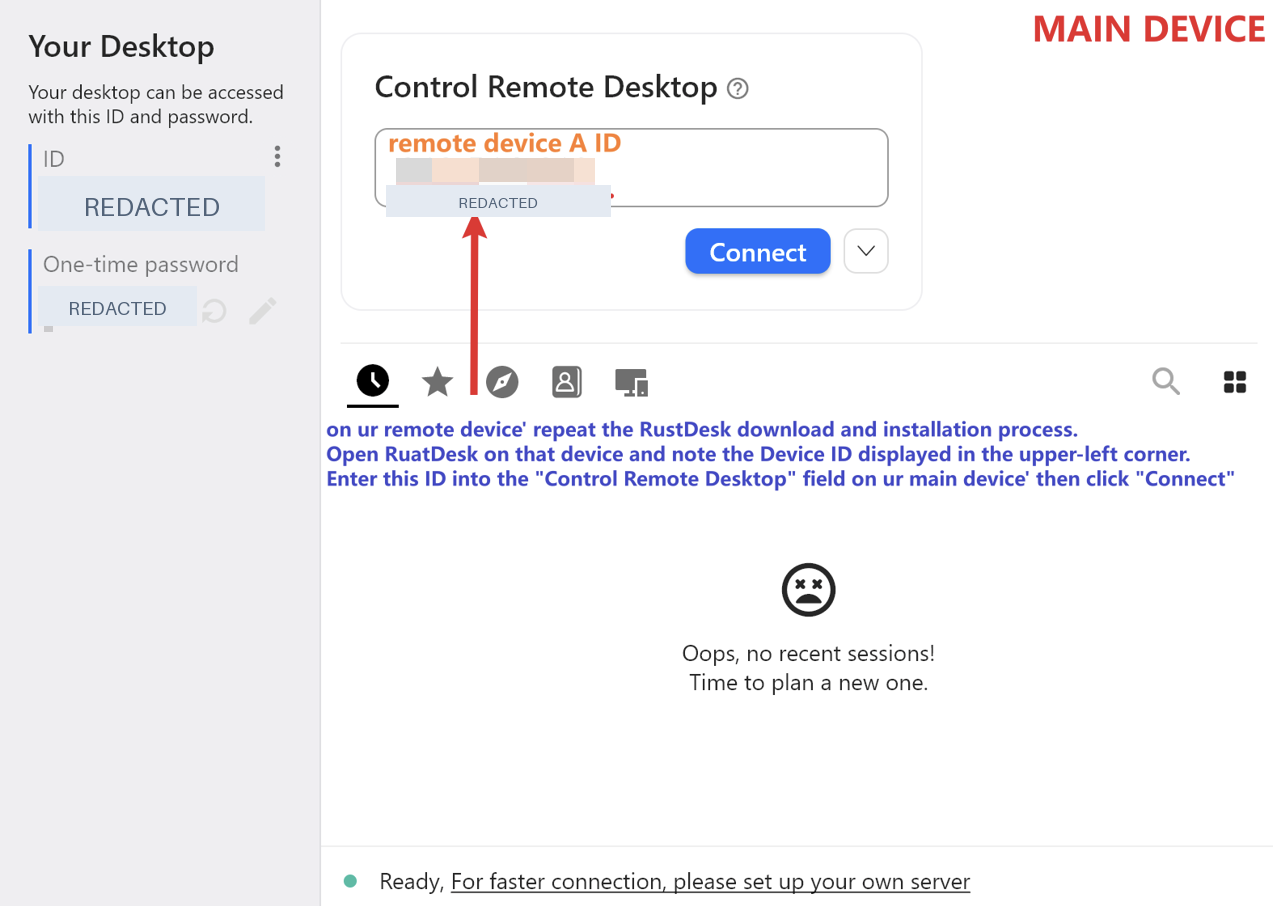
06Enter the remote device ID
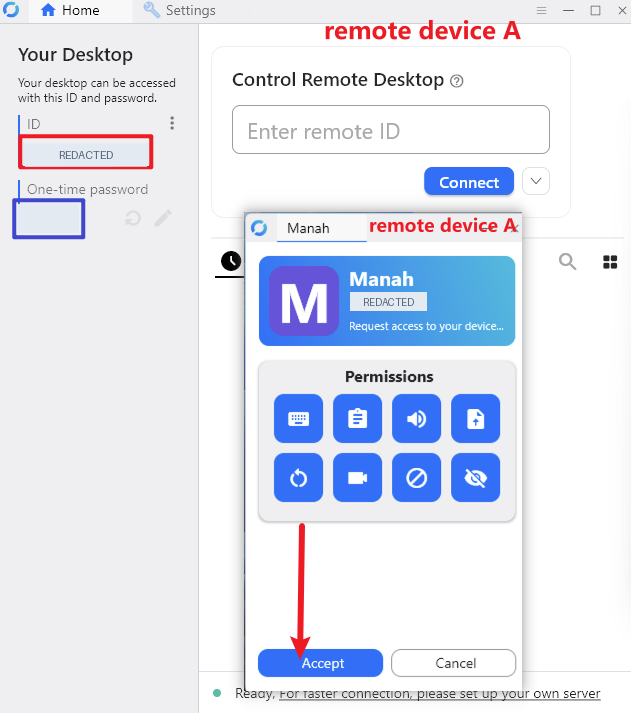
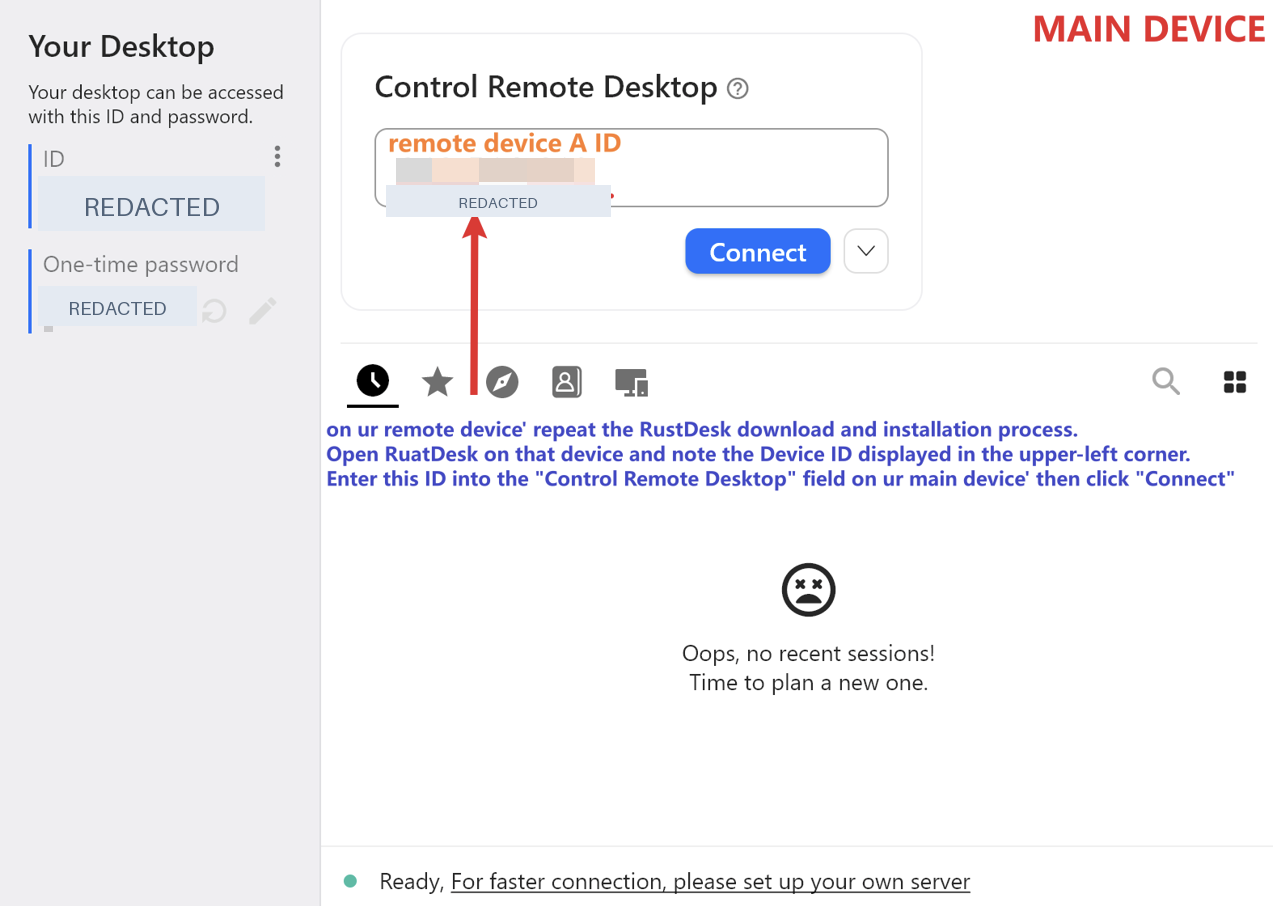
On remote device A, open RustDesk and locate the ID and current One-time password under Your Desktop. Keep both visible or make them available securely to the authorized person operating the main computer.
On the main computer, type remote device A’s ID into Control Remote Desktop and select Connect. RustDesk will then offer the approval or password flow supported by the remote device’s settings.
View larger IMAGE 06 | Enter the ID shown on remote device A into the main device’s remote-control field.Sensitive details hidden
IMPORTANT Keep remote IDs and passwords private. Share them only with someone you have authorized to access the device.
02 / CONNECT YOUR COMPUTERS
07Authorize the connection: approval or one-time password
METHOD A — APPROVE ON THE REMOTE PC: when a request appears on remote device A, check who is connecting and which permissions are requested. If it is your authorized session, choose Accept on remote device A.
METHOD B — ENTER THE ONE-TIME PASSWORD: if RustDesk asks for authentication on the main computer, enter the current One-time password displayed under Your Desktop on remote device A, then continue. This authenticates the session without needing to click Accept on remote device A when password access is enabled. A password may change, so use the one currently shown, not an old screenshot.
View larger IMAGE 07 | Method A: select Accept on remote device A. Method B: enter its current One-time password on the main PC when prompted.Sensitive details hidden
IMPORTANT Use only a device ID and one-time password for a computer you are authorized to control. Never share the current password publicly. The image demonstrates the approval route; password entry is an alternative and may appear differently across RustDesk versions.
03 / RECONNECT & ORGANIZE DEVICES
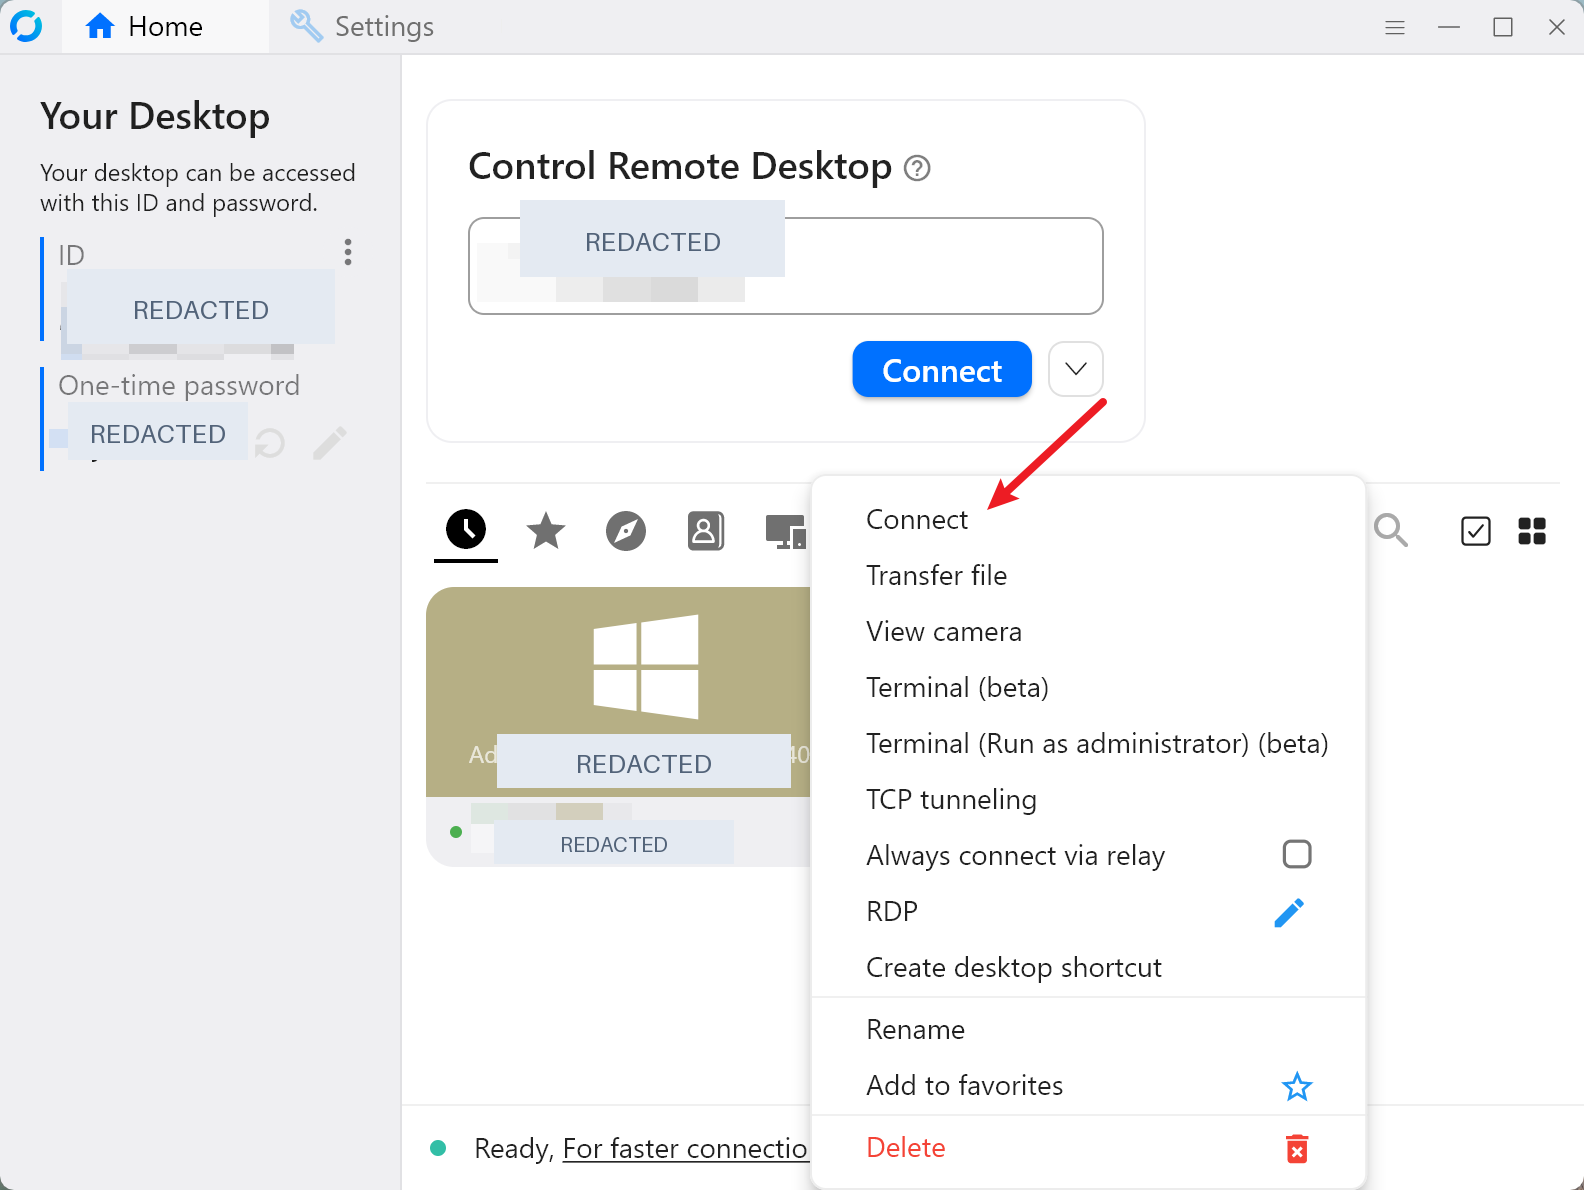
08Use the connection options
Once a remote device has been entered or used previously, RustDesk offers connection options alongside the remote ID field. Open the arrow menu and choose Connect to start a standard remote desktop session.
Additional items may include file transfer, camera, terminal, and other options. Use these only when you specifically need them and understand the associated permissions.
View larger IMAGE 08 | The connection menu includes Connect and other remote-session options.Sensitive details hidden
GOOD TO KNOW For everyday visual access to an Apex Routing computer, select Connect rather than a specialized transfer or terminal option.
03 / RECONNECT & ORGANIZE DEVICES
09Manage a previously connected device
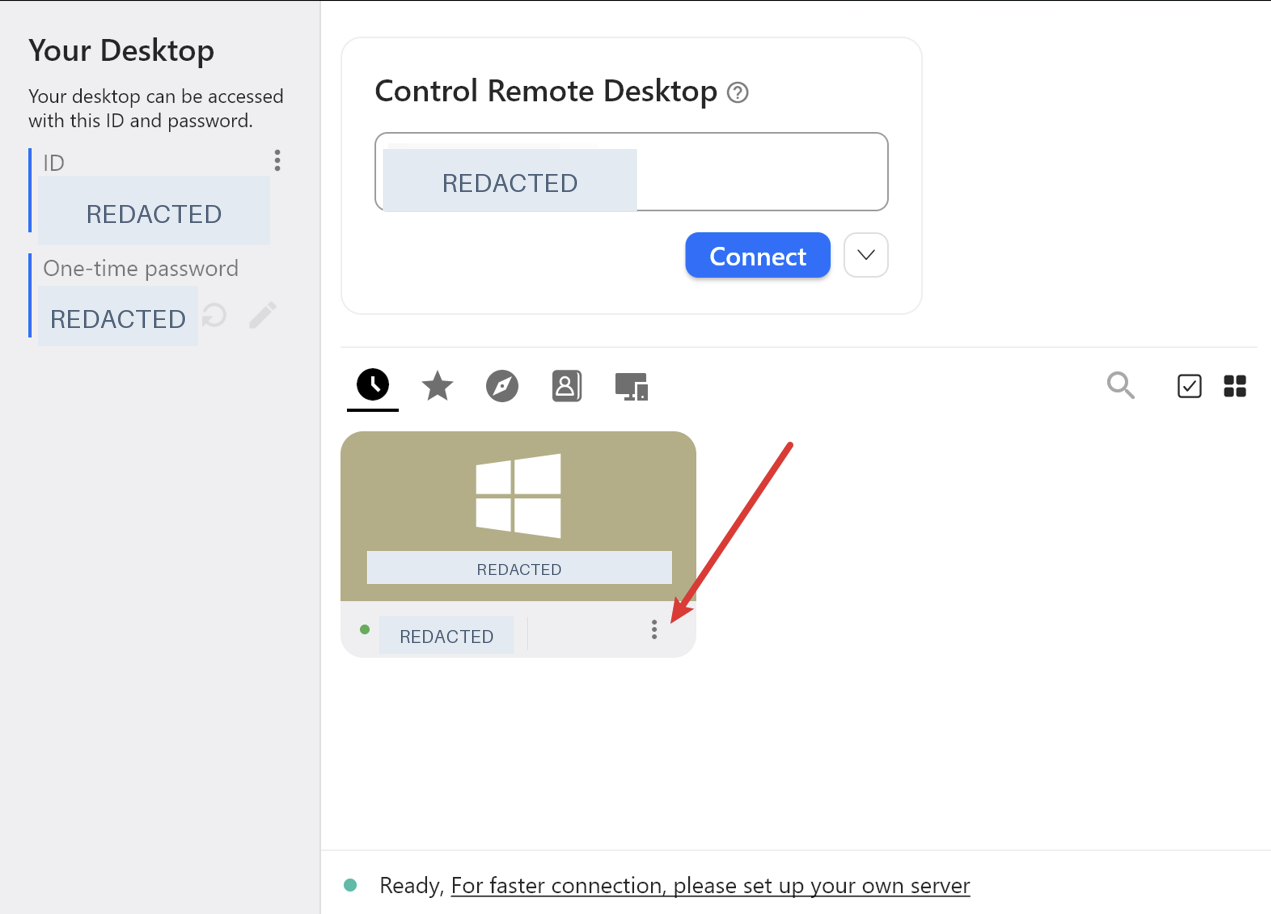
RustDesk may show a previously accessed computer as a device card in its recent connections area. Open the three-dot menu on that card to view management options.
Depending on the installed client version, available options may include connecting, renaming a device entry, adding it to favorites, or creating a desktop shortcut. These can make several authorized computers easier to identify and reopen.
View larger IMAGE 09 | Open the three-dot menu for a previously connected remote computer.Sensitive details hidden
GOOD TO KNOW Consider using recognizable device names when managing multiple remote PCs; do not include remote passwords in saved names.
04 / ACCESS APEX ROUTING REMOTELY
10Open the remote Apex Routing desktop
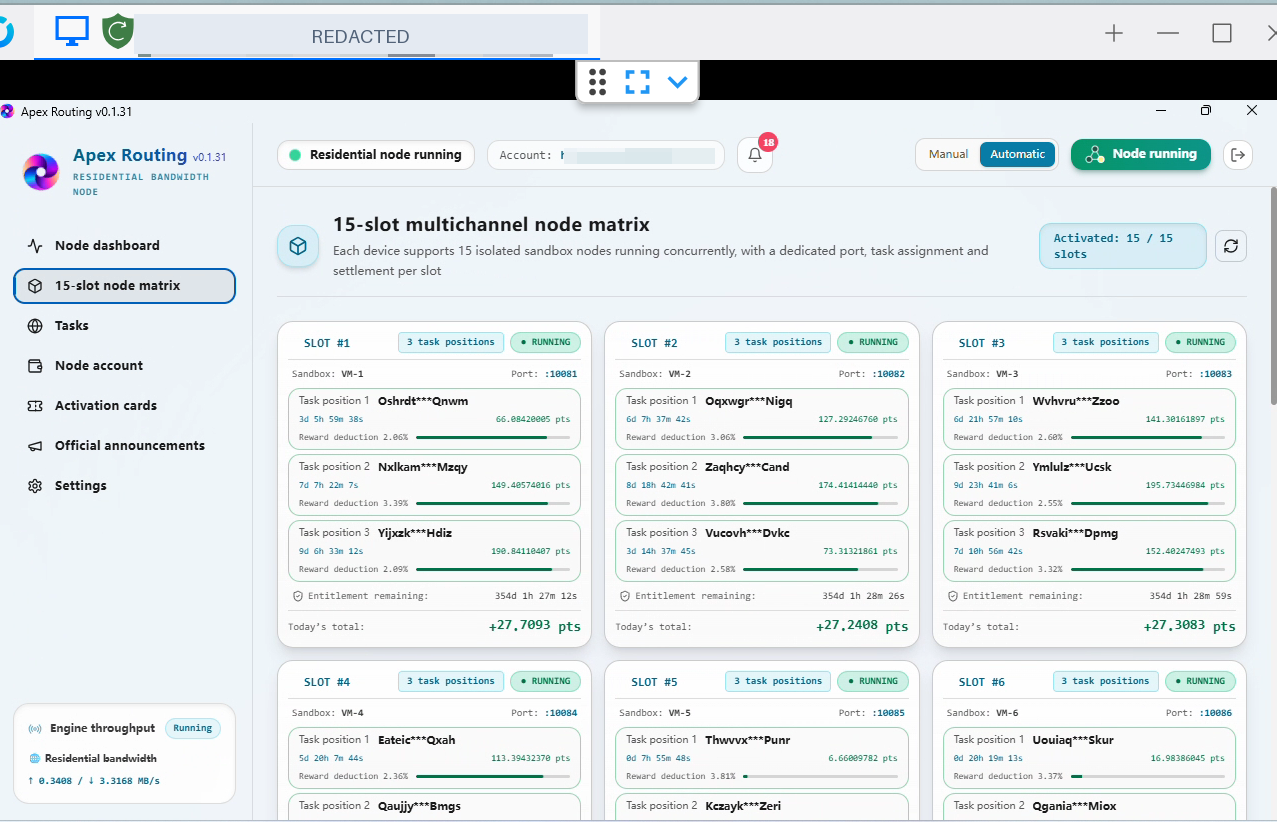
After the RustDesk session is established, the remote computer’s desktop appears in the remote-control window. Open or switch to Apex Routing on that remote computer.
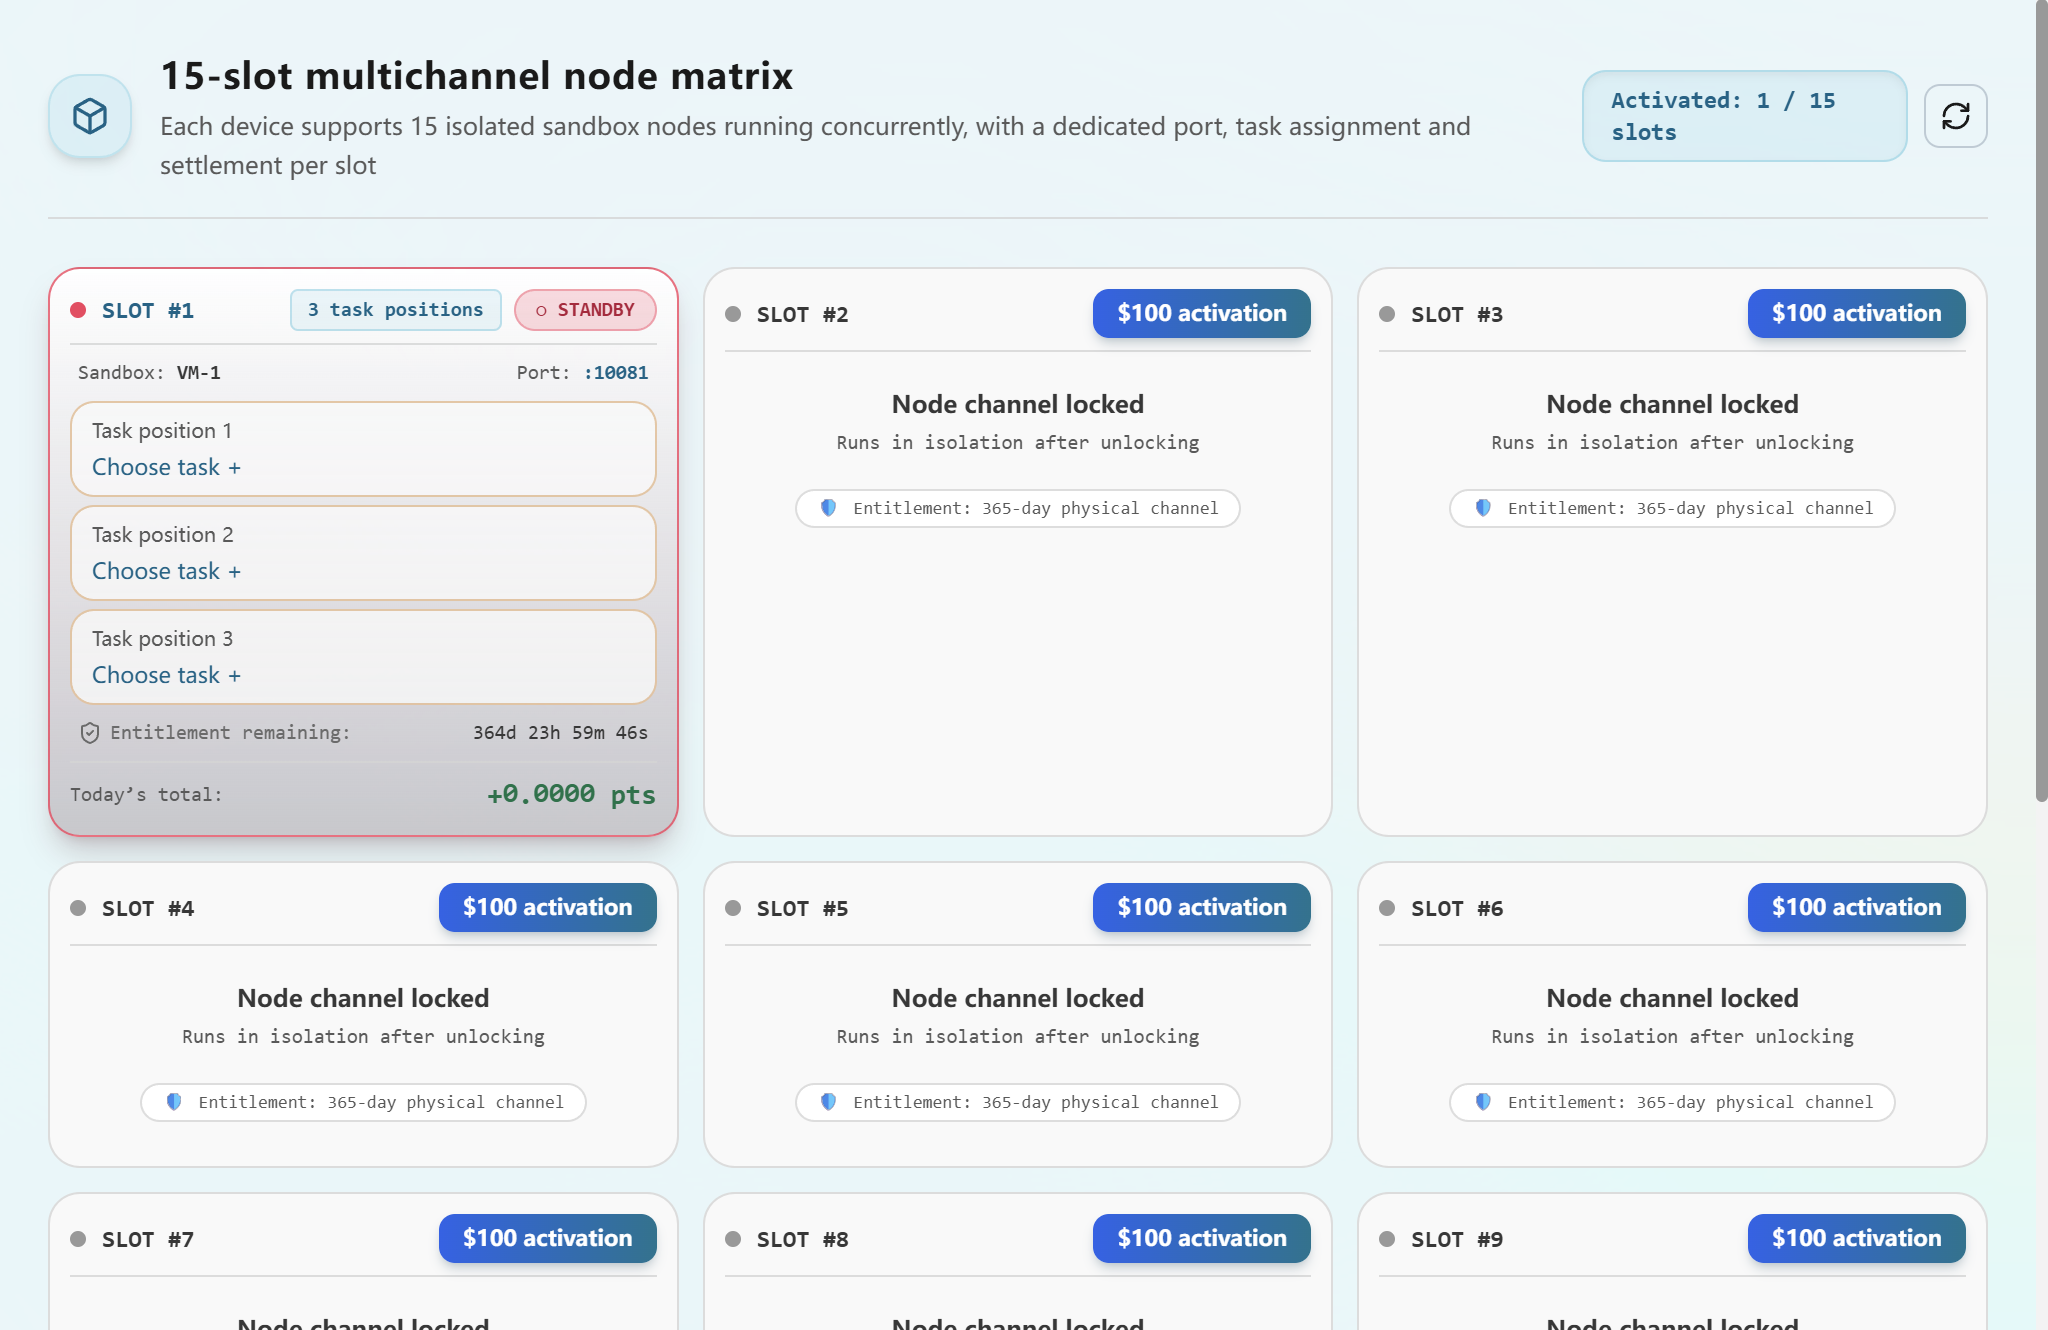
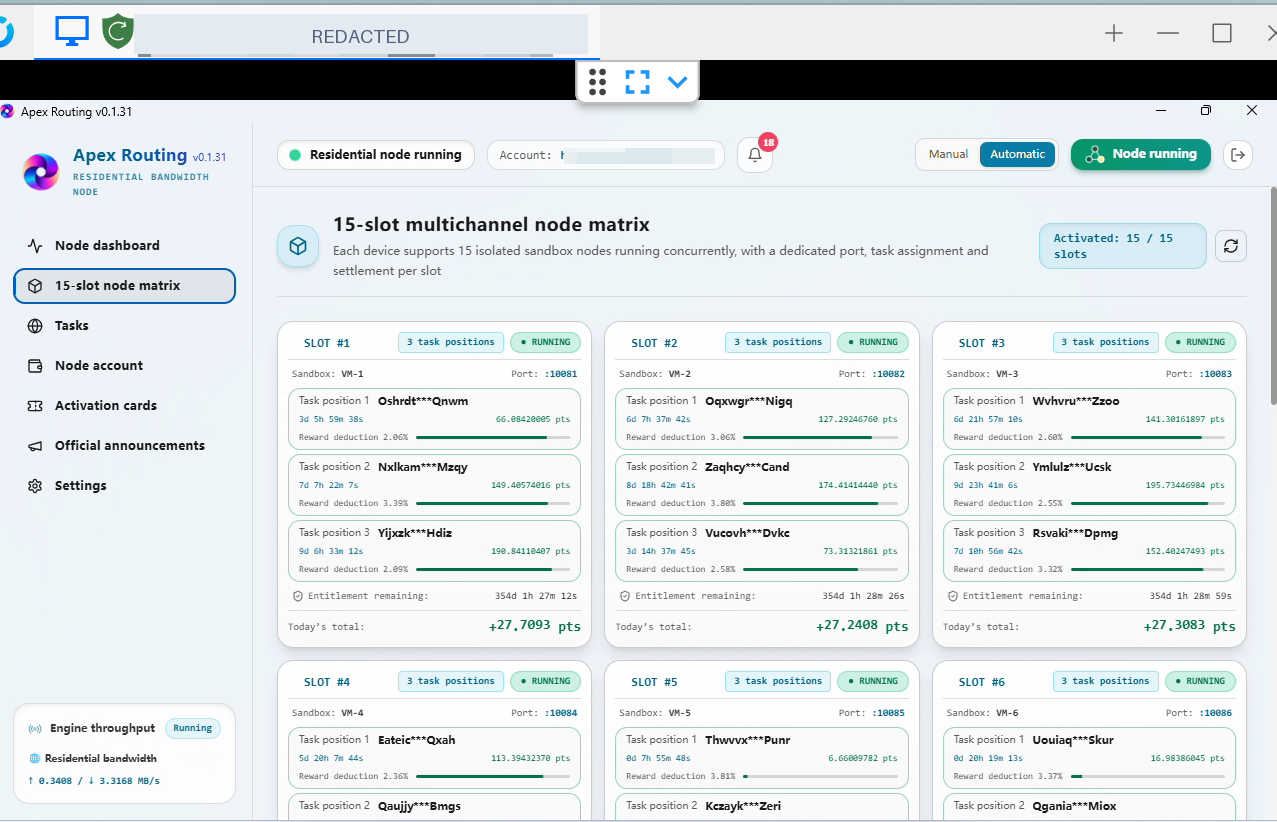
You can now view the remote application’s node status, the 15-slot matrix, current task positions, and other available controls as permitted by your remote session. Repeat the same approved connection process for any additional computer you manage.
View larger IMAGE 10 | Apex Routing’s 15-slot node matrix viewed through a RustDesk remote desktop session.Sensitive details hidden
IMPORTANT Remote access does not merge Apex Routing devices, slot entitlements, balances, or task records. Each computer continues to operate under its own device identity and platform settings.
FINAL CHECKLIST
11Your Remote Access Setup Is Ready
Before relying on a remote computer for ongoing Apex Routing use, confirm these basic conditions:
RustDesk is installed and available on the main computer and each remote device.
You can identify the correct remote device and connect only with appropriate authorization.
The remote computer has stable power and internet access and is not shut down or sleeping.
Apex Routing is running on the remote computer when its node services are intended to operate.
Remote access credentials are kept secure and shared only with authorized people.
PLEASE NOTE Windows turning off the display is not necessarily the same as the computer entering sleep mode. What matters is that the remote PC stays awake and that the applications and network services remain available.
This walkthrough explains two authorized sign-in routes: clicking Accept on the remote PC or entering its current one-time password from the main PC. Permanent-password unattended access requires additional RustDesk settings and is not covered here.
The more devices you can reach securely, the more useful a consistent view of their activity becomes. The next chapter takes the single-device calculation you already know and shows how it reads across several computers.
12Thank You for Choosing Apex Routing
We appreciate your trust in Apex Routing and hope this guide helps you manage your authorized devices with greater convenience and confidence.
— The Apex Routing Team
RustDesk is third-party software. Official documentation: rustdesk.com/docs/en/client/ | rustdesk.com/blog/rustdesk-unattended-access-setup/
Frontier / GUIDE 08
Node providers & referral rewards
Understand device groups, qualifying tiers and commissions.
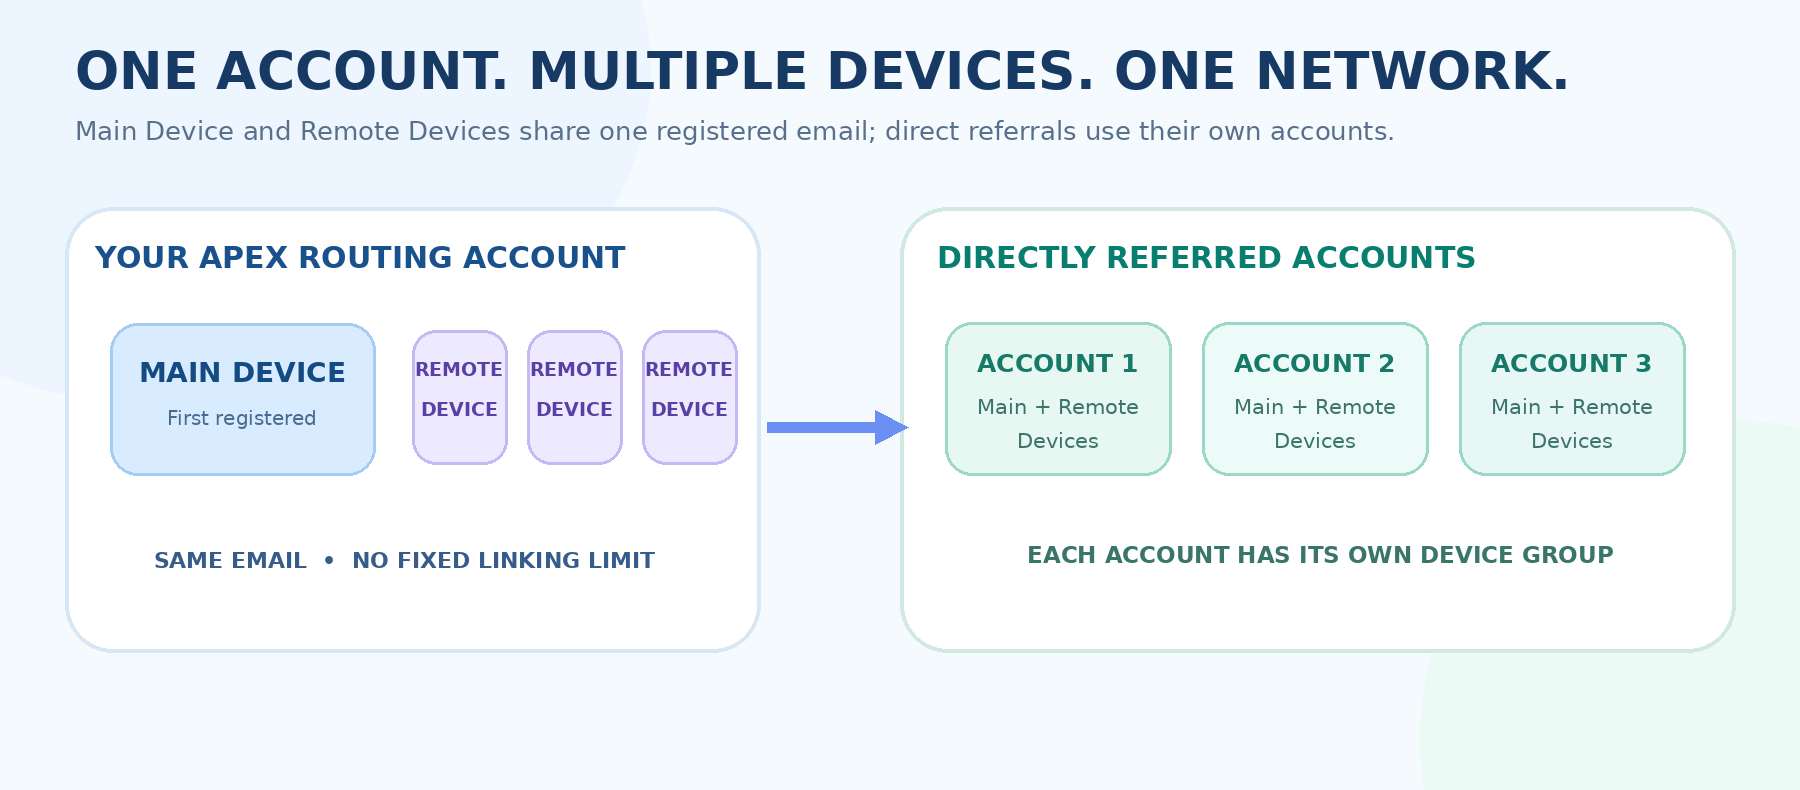
Apex Routing brings Main Devices, Remote Devices and directly referred accounts into a structured provider program, with transparent eligibility figures and a dedicated commission point pool.
View larger NETWORK OVERVIEW | Account devices and directly referred accounts are organized separately.
THE ESSENTIAL IDEA
Device count and referral bindings can expand without a fixed account-level cap. Each individual Windows device still supports up to 15 active node slots.
01 / ACCOUNT STRUCTURE
01Main Device, Remote Device & Direct Referrals
Understand the two relationships that determine where slots are counted and how a device group grows.
01
Main Device — first registration
Install Apex Routing on the first Windows computer and complete registration using your chosen email address. This first registered computer becomes the Main Device of that account.
02
Remote Device — the same registration email
Install Apex Routing on another Windows computer and sign in or register using the exact email of the Main Device. The device is automatically linked under the same account as a Remote Device.
03
Keep expanding the same account
Repeat the process for additional Remote Devices. Device linking has no fixed overall number limit; each Main Device or Remote Device supports up to 15 separate node slots.
04
Directly referred accounts — separate account relationships
A direct referral is a separate Apex Routing account linked to you through the program’s direct-referral relationship. Each directly referred account can also connect its own Main Device and Remote Devices without a fixed number limit.
TWO DISTINCT COUNTERS IN THE APP
My qualifying active slots
All eligible slots on your Main Device and your Remote Devices.
Qualifying slots of directly referred accounts
All eligible slots across the Main Devices and Remote Devices of your directly referred accounts.
Account-owned device group
Direct-referral account groups
EXAMPLE / YOUR OWN DEVICE GROUP
1 + 4
MAIN + REMOTE
5 devices total
15
SLOTS / DEVICE
When activated
75
YOUR ACTIVE SLOTS
5 × 15
02 / PROVIDER TIERS
02Five Tiers. One Clear Progression.
The tier table lists the required number of qualifying slots belonging to directly referred accounts.
NODE PROVIDER TIER
DIRECT-REFERRAL QUALIFYING SLOTS ≥
COMMISSION RATE
TIER 1
150
5%
TIER 2
1,500
8%
TIER 3
7,500
11%
TIER 4
30,000
14%
TIER 5
150,000
20%
The program uses the highest qualifying tier. Tier eligibility and the corresponding commission rate follow the platform’s UTC-day rules.
THE MULTI-DEVICE MATH
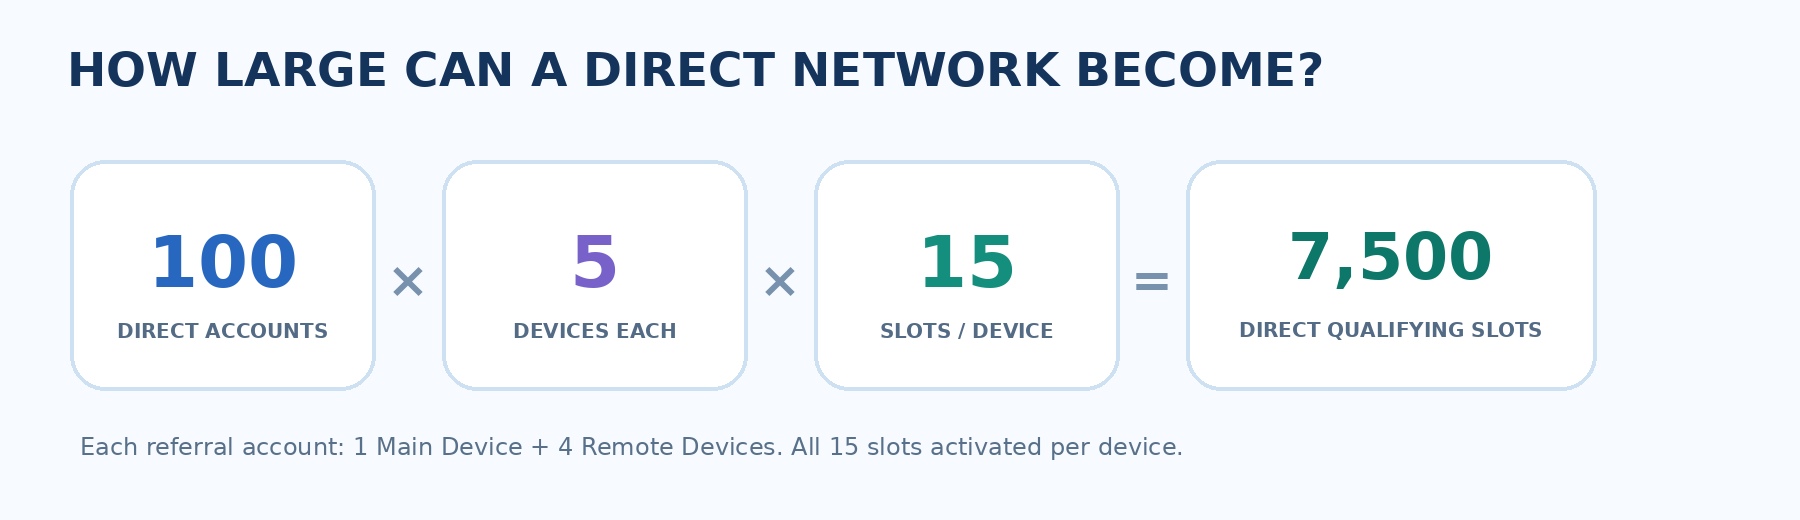
View larger SCALING EXAMPLE | 100 direct accounts × 5 devices each × 15 activated slots = 7,500 direct-referral slots.
REMEMBER THE TWO COUNTS
Your own Main Device and Remote Devices appear under My qualifying active slots. The tier table uses the direct-referral qualifying-slot count displayed in Qualifying slots of directly referred accounts. Your wider network view can show both totals side by side.
03 / IN THE APPLICATION
03Read the Node Provider Dashboard
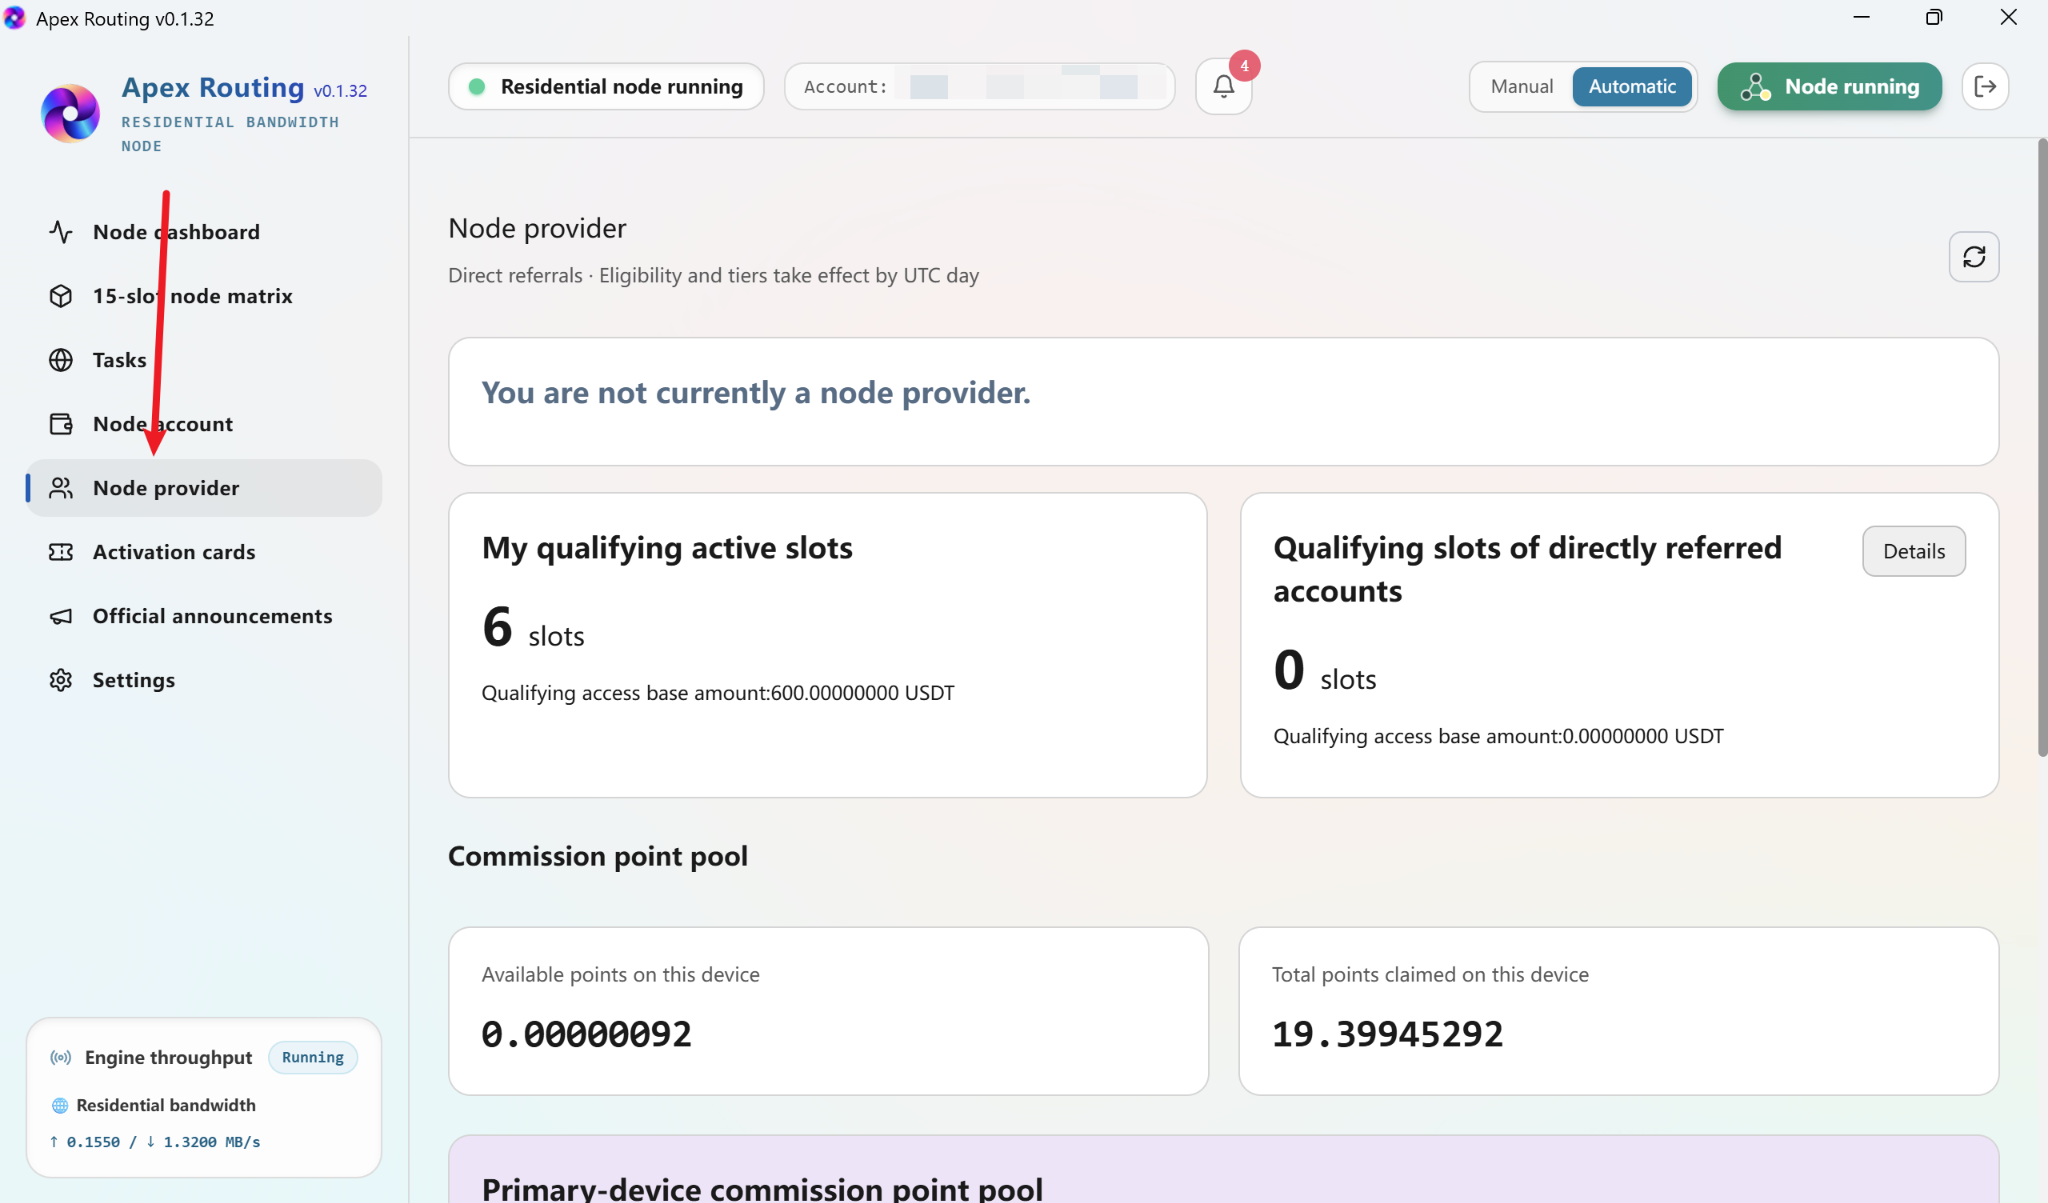
Open Apex Routing and select Node provider in the left navigation to see the counters that support your application and tier review.
View larger IMAGE 01 | Node provider: main overview, qualifying active slots, direct-referral qualifying slots and provider status.
WHAT EACH FIELD MEANS
My qualifying active slots — Your Main Device and all connected Remote Devices, counted by eligible activated slots.
Qualifying slots of directly referred accounts — Your directly referred accounts, each counted across its own Main Device and Remote Devices. Select Details to inspect this group.
Qualifying access base amount — The rental-access base amount displayed for the corresponding qualifying-slot group.
Provider status — The account’s current participation status, displayed at the top of the Node provider screen.
04 / PROVIDER ECONOMICS
04How Direct-Referral Commissions Add Up
Provider commission points are awarded by the Apex Routing system, using eligible rewards produced by directly referred accounts as the calculation base.
THE COMMISSION RULE
Eligible PTS earned by directly referred accounts × your qualifying tier rate = your additional provider commission PTS. The direct referrals keep their own task rewards.
A 30-DAY CALCULATION EXAMPLE / TIER 3
Consider 100 directly referred accounts, each operating one Main Device and four Remote Devices, with 15 qualifying activated slots per device.
100
DIRECT ACCOUNTS
5 devices each
7,500
DIRECT QUALIFYING SLOTS
100 × 5 × 15
11%
TIER 3 RATE
7,500-slot tier
If eligible task activity averages 1,500 PTS per qualifying slot over the 30-day example period, the calculation becomes:
DIRECT-REFERRAL ELIGIBLE PTS
7,500 × 1,500 = 11,250,000 PTS
TIER 3 COMMISSION
11,250,000 × 11% = 1,237,500 PTS
AT 100 PTS = 1 USDT
12,375 USDT equivalent
12,375 USDT
A 30-day Tier 3 commission calculation based on the stated direct-referral PTS volume.
A SECOND SCALE POINT
At Tier 2, 1,500 directly referred qualifying slots producing 2,250,000 eligible PTS in the example period generate 180,000 commission PTS at 8% — equivalent to 1,800 USDT.
05 / COMMISSION RECORDS
05Claim Rewards & Review Commission Details
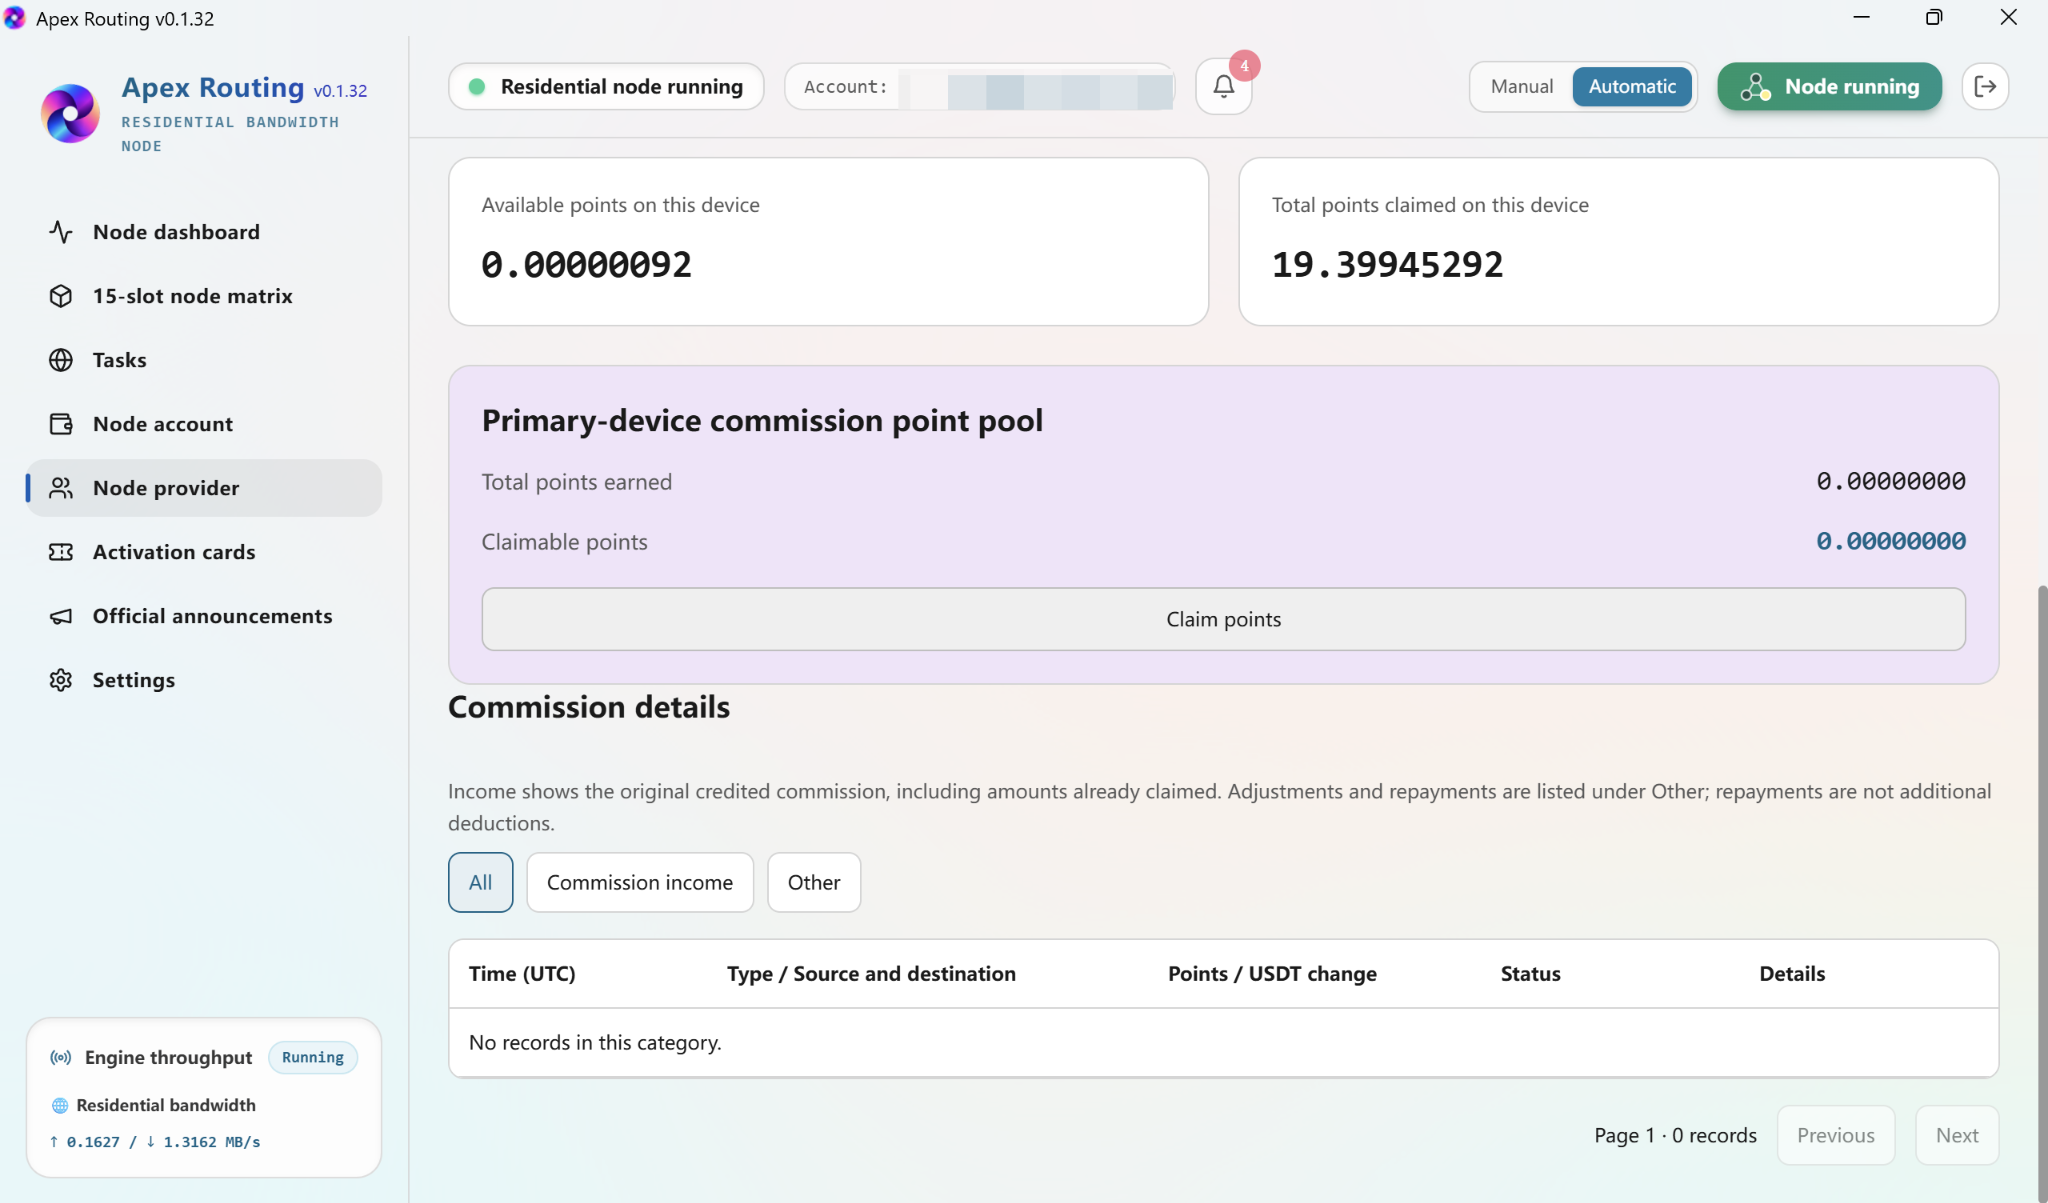
Provider reward information is organized directly in the Node provider workspace, where commission points can be reviewed and claimed.
View larger IMAGE 02 | Primary-device commission point pool, Claim points and Commission details.
01
Open Primary-device commission point pool
Scroll within Node provider to the lavender commission panel. Review Total points earned and Claimable points.
02
Claim available commission points
Use Claim points when your eligible provider commission points are available.
03
Review the ledger
Under Commission details, select All, Commission income or Other to follow the recorded commission activity and related entries.
06 / PROGRAM APPLICATION
06Apply Through the Official Email Channel
The official application process links the provider dashboard, registered device identities and the program’s account verification records.
01
Capture the Node provider screen
Include a clear screenshot showing My qualifying active slots, Qualifying slots of directly referred accounts and the visible provider status. Use the actual current application screen.
02
Identify registered device emails
Provide the email used for the Main Device and the same registration email used by associated Remote Devices. Include a concise device-group overview; direct referrals remain separately linked accounts.
03
Email the official Apex Routing team
Send the screenshot and registration details to the project’s published official email address, requesting review for the applicable Node Provider tier.
APPLICATION EMAIL / COPY & ADAPT
Subject: Apex Routing — Node Provider Application
Hello Apex Routing Team,
I would like to apply for the Node Provider program.
Main Device registration email: [account email] Remote Devices: [device count; same registered email] My qualifying active slots: [current count] Qualifying slots of directly referred accounts: [current count]
I have attached the current Node provider overview screenshot for review.
Thank you, [Applicant / account reference]
ACCOUNT VERIFICATION & PROGRAM INTEGRITY
The official team reviews registration emails, Main Device and Remote Device associations, directly referred account records, qualifying-slot figures and the submitted screenshot against platform data. Deliberately altered screenshots, false device figures or forged account information can result in account suspension or termination and forfeiture of associated points and program privileges.
From a single Main Device to a connected operating network, Apex Routing provides the structure to grow with clarity.
Frontier / GUIDE 09
From one device to multiple devices
Extend the example calculation and organize your devices.
Guide 06 gave the full 15-slot calculation for one computer. Guide 07 then showed how to reach and manage another authorized PC remotely. Together, they give you a clear way to understand a multi-device setup—without changing the underlying arithmetic.
THE CORE IDEA
One fully configured device × number of similar devices = combined model total
SCENARIO INPUTS | This chapter extends Guide 06’s arithmetic across multiple computers. Each device has 15 slots; each slot rents for 100 USDT over 365 calendar days. The scenario applies the same illustrative 30% monthly input, 100% Manual compute, 360 calculation days and the displayed 100 pts = 1 USDT conversion ratio.
NODE SLOT RENTAL | 365-DAY ACCESS Each 100 USDT activation payment provides one node slot with 365 days of rental access after successful activation. Renew the rental term after expiry to continue using that slot.
View larger SOURCE IMAGE 07 | An authorized remote view of Apex RoutingSensitive details hidden
01Build the annual result for one complete device
A 15-slot device gives the clean starting point: calculate the daily value once, then extend it through the 360-day calculation year.
N is the number of comparable computers and F the chosen withdrawal fee. The first-year 1,600 per computer consists of 1,500 USDT for fifteen 365-day slot rentals plus approximately 100 USD for the one-time purchase of a computer. Only the computer is purchased; node-slot access is rented for a defined term.
View larger SOURCE IMAGE 07 | Connecting to an authorized remote computerSensitive details hidden
02From one device to ten: the annual picture
Once the single-device calculation is clear, the figures scale through simple multiplication. Each computer brings 15 slots and the same listed first-year costs.
Devices
Slots
Full-load annual points value
First-year remainder · 0%
1
15
5,400 USDT
3,800 USDT
3
45
16,200 USDT
11,400 USDT
5
75
27,000 USDT
19,000 USDT
10
150
54,000 USDT
38,000 USDT
TEN-DEVICE FIRST-YEAR REMAINDER · SLOW 0%
38,000 USDT
54,000 annual model value − 15,000 in 365-day slot rental fees − 1,000 in first-year hardware purchases
Compare the three withdrawal options
Devices
Fast 10%
Standard 5%
Slow 0%
1
3,260
3,530
3,800
3
9,780
10,590
11,400
5
16,300
17,650
19,000
10
32,600
35,300
38,000
Withdrawal fees are applied to the calculated annual converted value before subtracting the stated first-year computer hardware purchase and slot rental fees. All figures in the table are USDT-equivalent.
03Make the operation simple to manage
A multi-device setup becomes easier to understand when each computer has its own identity, slot records, credited points and withdrawal history. Remote access helps bring those separate views within reach.
Area
What to keep organized
Device identity
Know which computer you are accessing and viewing
Activated slots
Record each 365-day rental term and its expiry date for every slot
Manual task status
Keep track of task expiry and the need to accept the next task
Operating continuity
Keep each computer powered, connected and awake with Apex Routing running
PTS and USDT records
Review credited points, conversions and withdrawals per device
The longer-term difference
The approximately 100 USD purchase price for each computer is a first-year hardware item. Where a device remains usable, later calculations do not repeat that purchase, while the 365-day slot rental terms must be renewed to continue use after expiry. The full-load 10-device model with the Slow 0% route therefore has a later-term remainder of 54,000 − 15,000 = 39,000 USDT equivalent.
A SHORT WAY TO REMEMBER THE SCALE
1 device: 5,400 annual modeled value · 10 devices: 54,000 annual modeled value
From a single computer to an organized group of devices, the model becomes easier to follow when the operations and records are kept consistent. That structure also supports additional collaboration and management workflows as platform features evolve.
Thank you for choosing Apex Routing. — The Apex Routing Team
WORKSHEET BASIS | The multi-device tables apply the same illustrative 30% monthly parameter and continuous Manual-mode task allocation across 360 modeled calculation days. Slot rental fees, equipment costs and the selected withdrawal fees are shown separately to keep the structure easy to follow.